

Buell Cyclone M2 M2l 2000 – 2001 Workshop Service Manual
FILE DETAILS:
LANGUAGE:ENGLISH
PAGES:350+
DOWNLOADABLE:YES
FILE TYPE:PDF
VIDEO PREVIEW OF THE MANUAL:

IMAGES PREVIEW OF THE MANUAL:


DESCRIPTION:
Buell Cyclone M2 M2l 2000 – 2001 Workshop Service Manual
Safety :
Safety is always the most important consideration when performing any job. Be sure you have a complete understanding of the task to be performed. Use common sense. Use the proper tools. Protect yourself and bystanders with approved eye protection. Don’t just do the job – do the job safely. Removing Parts Always consider the weight of a part when lifting. Use a hoist whenever necessary. Do not lift heavy parts by hand. A hoist and adjustable lifting beam or sling are needed to remove some parts.
- The lengths of chains or cables from the hoist to the part should be equal and parallel and should be positioned directly over the center of the part. Be sure that no obstructions will interfere with the lifting operation.
- Never leave a part suspended in mid-air. Always use blocking or proper stands to support the part that has been hoisted. If a part cannot be withdrawn, verify that all fastening hardware has been detached. Check to see if any parts are in the way of the part being removed. When removing hoses, wiring or tubes, always tag each part to ensure proper installation.
- Cleaning If you intend to reuse parts, follow good shop practice and thoroughly clean the parts before reassembly. Keep all dirt out of parts. Seals, filters and covers are used in this vehicle to keep out environmental dirt and dust. These items must be kept in good condition to ensure satisfactory operation.
- Clean and inspect all parts as they are removed. Be sure all holes and passages are clean and open. After cleaning, cover all parts with clean lint-free cloth, paper or other material. Be sure the part is clean when it is installed. Always clean around lines or covers before they are removed. Plug, tape or cap holes and openings to keep out dirt, dust and debris.
- Disassembly and Assembly Always assemble or disassemble one part at a time. Do not work on two assemblies simultaneously. Be sure to make all necessary adjustments. Recheck your work when finished. Be sure that everything is done.
TABLE OF CONTENTS:
Buell Cyclone M2 M2l 2000 – 2001 Workshop Service Manual
11 General 1-1
12 Fluid Requirements 1-5
13 Battery 1-13
14 Engine Lubrication System 1-16
15 Brakes 1-18
16 Tires and Wheels1-21
17 Clutch1-22
18 Rear Belt Deflection 1-24
19 Drive Belt and Sprocket 1-26
110 Primary Chain 1-28
111 Preload Adjustment1-30
112 Suspension1-32
113 Steering Head Bearings1-33
114 Front Fork 1-34
115 Spark Plugs1-36
116 Air Cleaner 1-37
117 Carburetor 1-38
118 Ignition Timing 1-39
119 Vacuum-Operated Electrical Switch (VOES)1-42
120 Handlebars1-43
121 Headlamp 1-44
122 Storage1-45
123 Troubleshooting1-46
21 Torque Values 2-2
22 Tire Specifications 2-5
23 Vehicle Identification Number 2-6
24 Wheels 2-7
25 Front Wheel 2-9
26 Rear Wheel 2-11
27 Checking Cast Rim Runout 2-14
28 Tires 2-15
29 Brakes 2-18
210 Front Brake Master Cylinder 2-20
211 Front Brake Caliper2-24
212 Front Brake Line 2-27
213 Rear Brake Master Cylinder 2-28
214 Rear Brake Caliper2-31
215 Rear Brake Line and Switch 2-33
216 Front Fork 2-35
217 Fork Stem and Bracket Assembly 2-39
218 Steering Head Lock2-41
219 Swingarm 2-43
220 Rear Isolators 2-48
221 Rear Shock Absorber 2-51
222 Suspension Theory2-53
223 Suspension Adjustments 2-55
224 Throttle Control2-59
225 Clutch Control 2-60
226 Instrument Support2-62
227 Handlebars2-63
228 Exhaust System2-64
229 Footrests 2-67
230 Sprocket Cover2-68
231 Fenders2-69
232 Lower Belt Guard and Stone Guard 2-70
233 Frame Heat Shield 2-71
234 Tail Section2-72
235 Windscreen2-74
236 Seat2-75
237 Side Stand 2-76
31 Specifications 3-1
32 Engine 3-5
33 Stripping Motorcycle For Engine Repair3-8
34 Installing The Engine 3-11
35 Cylinder Head 3-13
36 Cylinder and Piston 3-25
37 Lubrication System 3-33
38 Oil Hose Routing3-35
39 Oil Tank3-36
310 Oil Pressure Indicator Switch 3-37
311 Crankcase Breathing System 3-38
312 Oiling System (Color Foldout) 3-39
313 Oil Pump 3-40
314 Oil Filter Mount3-43
315 Hydraulic Lifters 3-44
316 Gearcase Cover and Cam Gears 3-46
41 Specifications 4-1
42 Carburetor 4-2
43 Remote Idle Adjuster 4-21
44 Air Cleaner 4-22
45 Fuel Tank 4-24
46 Fuel Tank Vent Valve 4-27
47 Fuel Supply Valve 4-29
48 Evaporative Emissions Control-California Models 4-30
51 Specifications5-1
52 Electric Starter System 5-2
53 Starting System Diagnosis 5-6
54 Starter Activation Circuits 5-8
55 Diagnostics/Troubleshooting5-9
56 Starter System Testing 5-11
57 Starter 5-12
58 Starter Solenoid 5-19
61 Specifications 6-1
62 Primary Chain 6-3
63 Secondary Drive Belt 6-6
64 Clutch Release Mechanism6-7
65 Primary Drive/Clutch6-9
66 Transmission 6-16
67 Transmission Case 6-18
68 Shifter Forks and Drum 6-20
69 Mainshaft and Countershaft6-23
610 Main Drive Gear 6-29
611 Access Door Bearings6-31
612 Right Transmission Case Bearings 6-32
613 Transmission Installation and Shifter Pawl Adjustment 6-33
71 Specifications7-1
72 Ignition System 7-3
73 Vacuum-Operated Electric Switch (VOES) 7-15
74 Bank Angle Sensor 7-16
75 Engine Temperature Sensor7-17
76 Ignition/Headlamp Key Switch 7-18
77 Ignition Module 7-20
78 Cam Position Sensor and Rotor7-21
79 Ignition Coil 7-24
710 Spark Plug Cables 7-26
711 Starter Interlock7-27
712 Diodes 7-35
713 Charging System 7-36
714 Alternator 7-42
715 Voltage Regulator 7-44
716 Battery Cables 7-45
717 Battery 7-46
718 Headlamp 7-50
719 Tail Lamp 7-52
720 Turn Signals7-53
721 Turn Signal Flasher7-55
722 Handlebar Switches7-56
723 Horn7-58
724 Neutral Indicator Switch7-59
725 Fuses and Circuit Breakers7-60
726 Speedometer Sensor 7-61
727 Speedometer 7-62
728 Speedometer Performance Check7-65
729 Tachometer7-70
730 Tachometer Performance Check 7-73
Appendix A-ToolsA-1
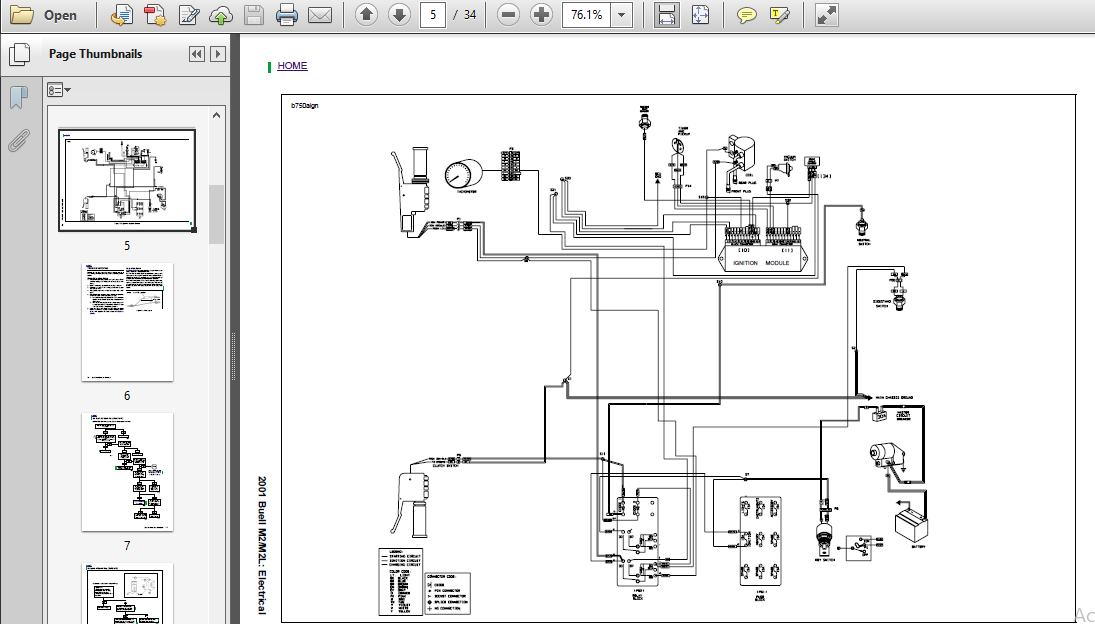
Appendix B-Wiring B-1
Appendix C-Metric Conversions C-1
PLEASE NOTE:
- This is the same manual used by the dealers to diagnose and troubleshoot your vehicle
- You will be directed to the download page as soon as the purchase is completed. The whole payment and downloading process will take anywhere between 2-5 minutes
- Need any other service / repair / parts manual, please feel free to contact [email protected] . We still have 50,000 manuals unlisted


Ahmed Thaddeus –