

Husqvarna Rider 11 Rider 13 Rider 11 Bio Rider 13 Bio Rider 16 Service Repair Workshop Manual
FILE DETAILS:
LANGUAGE:ENGLISH
PAGES:72
DOWNLOADABLE:YES
FILE TYPE:PDF
DESCRIPTION:
Husqvarna Rider 11 Rider 13 Rider 11 Bio Rider 13 Bio Rider 16 Service Repair Workshop Manual
General instructions:
The workshop handbook is written for personnel who are assumed to have general ride-on mower reparation and service know-how. The workshop where the ride-on mower is repaired should be equipped with safety devices in accordance with local regulations. No-one should attempt to repair the ride-on mower without having first read and understood the contents of this handbook. The machine is tested and approved only with the equipment originally provided or recommended by the manufacturer. The below-mentioned boxes are included in this workshop handbook, as is appropriate.
Special instructions:
The fuel used in the ride-on mower has the following hazardous characteristics:
• Toxic fluid and fumes
• Can cause eye and skin complaints
• Can cause breathing difficulties
• Highly flammable
When using compressed air, do not direct the compressed air stream towards your, or anybody else’s, body. Air can be forced into the blood stream, thereby constituting a danger to life .
TABLE OF CONTENTS:
Husqvarna Rider 11 Rider 13 Rider 11 Bio Rider 13 Bio Rider 16 Service Repair Workshop Manual
Safety regulations 2
General instructions 2
Special instructions 2
Special tools 3
Technical data 4
Tightening moments 4
Play 4
Mowing deck 5
Control points 5
Delivery and dealer service 7
Maintenance schedule 9
Delivery measures 10
To our dealer 10
Packaging and unpacking 10
Parts enclosed in packaging 10
Battery 11
Steering wheel 12
Tow plate 12
Oil levels 12
Wheels 13
Checking and adjusting of the mowing
deck’s ground pressure and parallelism 13
Test running 14
Speed regulator 15
Administration 15
Design and function 16
General 16
Serial number 17
Engine 18
Steering 19
Driving 20
Mowing deck 20
Reparation instructions 23
Removing engine 23
Replacing engine 25
Fuel tank 27
Changing engine oil 28
Checking and adjusting steering wires 28
Replacing steering wires 29
Removal/installation of steering axle 29
Removal/installation of wire wheel 30
Checking and adjusting brake wire 31
Checking and adjusting gear control 32
Checking and adjusting freewheel clutch 32
Checking and adjusting throttle control 33
Replacing articulated steering bearing 33
Removal of swing axle 35
Replacing bushings 35
Installation of swing axle 36
Removal/installation of gear box 37
Removal/installation of hydrostatic transmission 37
Replacing hydrostat trans axle seals 38
Input axle 38
Outgoing axles 39
Replacing hydrostatic transmission wire 40
Bleeding hydrostatic transmission oil system 44
Adjustment of transmission neutral position 44
Transmission maintenance 45
Oil change 45
Removal of belt 46
Checking and adjusting cutting unit ground
pressure 47
Checking and adjusting parallelism of the mowing
deck 47
Adjusting cutting height area 49
Adjusting cutting height 49
Removing the cutting unit 50
To leave the service position 51
Dismantling the cutting unit 52
Replacing cutting unit belts 53
Replacing belt on BioClip 103 and
Combi 103 53
Replacing belt on BioClip 90 54
Belt replacement on mowing deck with
side- or rear discharge BioClip 112 and
Combi 112 54
Replacing breakpin 55
Removal of blades with bearings 55
Grinding and balancing of blades 57
Electrical system 58
Circuit diagram Rider 11 58
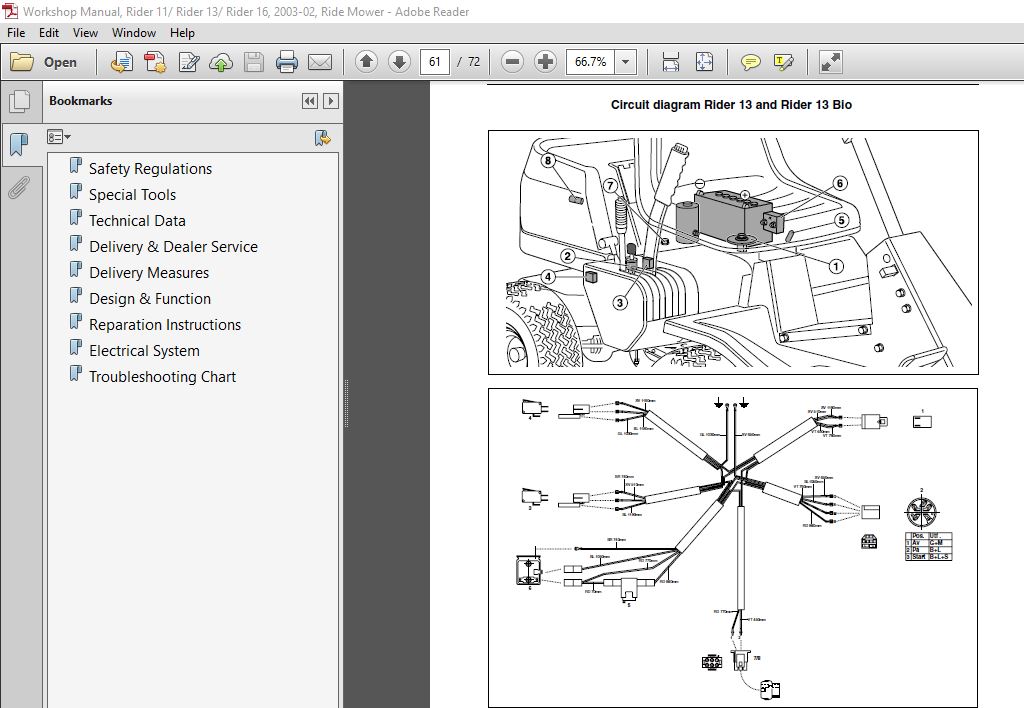
Circuit diagram Rider 13 and Rider 13 Bio 59
Circuit diagram Rider 16 60
Inspection of safety system 61
VIDEO PREVIEW OF THE MANUAL:

IMAGES PREVIEW OF THE MANUAL:

PLEASE NOTE:
- This is the SAME manual used by the dealers to troubleshoot any faults in your vehicle. This can be yours in 2 minutes after the payment is made.
- Contact us at [email protected] should you have any queries before your purchase or that you need any other service / repair / parts operators manual.


Jeremias Jad –