
Zetor Tractor Hortus HS CL 65 Operator’s Manual – PDF DOWNLOAD
FILE DETAILS:
Zetor Tractor Hortus HS CL 65 Operator’s Manual – PDF DOWNLOAD
Language : English
Pages : 142
Downloadable : Yes
File Type : PDF
Size:13.5 MB
DESCRIPTION:
Zetor Tractor Hortus HS CL 65 Operator’s Manual – PDF DOWNLOAD
ZETOR
This Operator’s Manual for the Zetor tractors, which we are presenting to you will help you to become familiar with the operation and maintenance of your new tractor. Although many of you have rich experience with the operation of other tractors, please, read the information contained in this Operator’s Manual very carefully. In the Manual you will find a lot of new information and get a perfect overview of how to use the tractor with maximum efficiency during various kinds of work. If you observe the rules of tractor operation and maintenance and driving safety, your new tractor will become your reliable and long-term friend. The manufacturer of the tractor wishes you thousands of hours of satisfactory work.
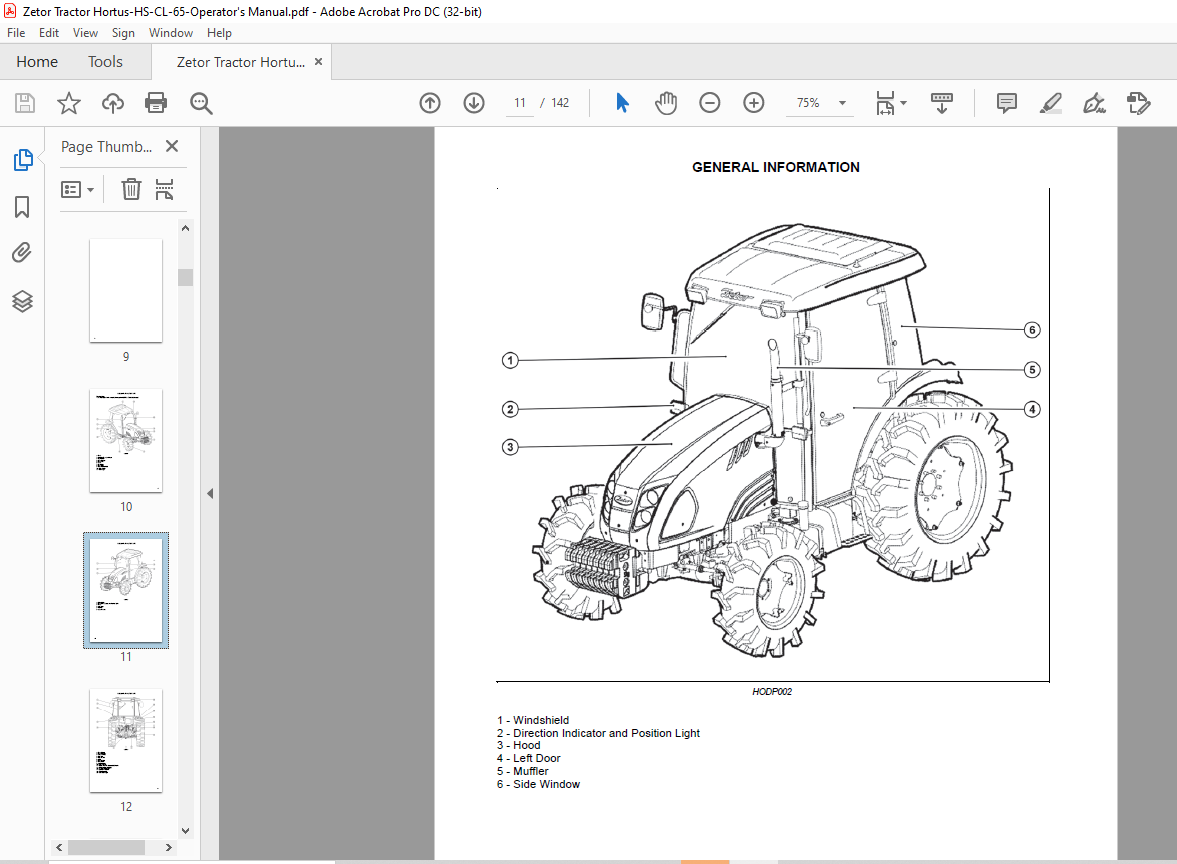
GENERAL INFORMATION
Warranty of the Product
The manufacturer warrants this product, and full details of the warranty are provided on a separate warranty schedule.
Parts
To order any spare parts, please contact your nearest dealer or authorized service center and provide the following details:
- Tractor model
- Tractor serial number
- Tractor engine number
- Part number and description
- Quantity required
About This Manual
- This manual has been prepared to assist you in following the correct procedure for running-in operation and maintenance of your new Zetor tractor. Your tractor has been designed and built to give maximum performance, with good fuel economy and ease of operation under a wide variety of operating conditions.
- Prior to delivery, the tractor was carefully inspected, both at the factory and by your Zetor dealer/distributor, to ensure that it reaches you in optimum conditions. To maintain this condition and ensure trouble-free performance, it is important that the routine services, as specified in this manual, are carried out at the recommended intervals.
- Read this manual carefully and keep it in a convenient place for future reference. If at any time you need technical support concerning your tractor, feel free to contact your authorized Zetor dealer/distributor. They have trained staff, original parts, and the necessary equipment to perform all service tasks.
- The manufacturer’s policy is one of continuous improvement, and the right to change prices, specifications, or equipment at any time without notice is reserved.
- All data given in this book is subject to production variations. Dimensions and weight are approximate only, and the illustrations do not necessarily show tractors in standard condition. For exact information about any particular tractor, please consult your Zetor dealer/distributor.
INTRODUCTION & DESCRIPTION
- Instructions and Description
- The word ‘tractor’ is derived from ‘traction’, which means towing. The tractor is required to tow or draw working equipment, an implement or a trailer that is attached to the body of the tractor by means of a suitable hitch. The tractor can also be used as a drivetrain, thanks to a power output called a PTO or a PTO shaft.
- These operating manual is prepared in accordance with the operating, maintenance and storage instructions for the relevant Zetor tractor model. The manual has been designed to help you better understand the maintenance and efficient operation of this machine.
- If you require any information not provided in this manual or require service from a trained mechanic, contact your local ZETOR TRACTORS a.s. dealer/distributor. Dealers/distributors are kept informed about the latest service procedures for tractors. They have original spare parts in stock and have full service support from the machine manufacturer. In this manual, the use of the terms LEFT, RIGHT, FRONT and REAR must be unified to avoid any confusion when following these instructions.
- LEFT and RIGHT means the left and right sides of the tractor when looking from the driver’s seat towards the front. The reference to FRONT means the end of the tractor radiator, while REAR means the end of the drawbar (see the picture). When ordering spare parts, always specify the tractor and engine serial numbers when ordering.
- This will make their delivery easier and faster and ensure that you receive the right spare parts for your particular tractor. The tractor’s serial number is stamped on a plate attached to the right side of the tractor (see the picture). For easy reference, we recommend you to write this number in the space reserved for the owner’s personal data.
TABLE OF CONTENTS:
Zetor Tractor Hortus HS CL 65 Operator’s Manual – PDF DOWNLOAD
General Information 9
Exterior View . 9
Tractor Identification 12
Warranty of the Product . 13
Parts 13
About This Manual . 13
Introduction & Description . 14
Tractor an Introduction 14
Description . 15
General Construction . 15
Front Axle & Wheels 15
Engine 15
Clutch and transmission 15
Brakes 15
Rear axle & wheels 15
Hydraulic System & Linkages 15
Steering . 15
Electrical System . 15
Owner assistance 16
ROPS (Roll Over Protective Structures) . 16
Roll Over Protective Structures (ROPS) . 16
Damage of the ROPS 17
Seat Sliding 17
Seat Back Reclining 18
Cunshion Strength Adjustment 18
Safety Precautions . 19
Safety Instructions . 19
Recognize Safety Information . 19
Signal Words . 19
Read Safety Instruction . 19
Protection of persons . 19
Use of ROPS and Seat Belt 20
Precaution to Avoid Tipping . 20
Safe parking of the tractor . 20
Handle Fuel Safely Avoid Fires . 20
Keep Riders Off Tractor . 21
Stay Clear of Rotating Shafts 21
Always Use Safety Lights and Devices . 21
Practice Safe Maintenance 22
Avoid High-Pressure Fluids . 22
Prevent Battery Explosions . 23
Prevent ACID Burns 23
Battery Disconnect 23
Service Tractor Safely . 24
Work in Ventilated Area . 24
Safe starting 24
Safety Starter Switch . 24
Emergency Exits 25
Safety Precautions When Using The Loader 25
Towing equipment . 27
Falling object protective structure (FOPS) 27
Operator Protective Structure (OPS) . 27
Safe Operation of Your Tractor . 28
Safety Tips During Maintenance . 28
Mounting and Demounting Implements . 29
The Following Precautions are Suggested to Help Prevent Accidents . 30
The Tractor 30
Servicing the Tractor . 30
Operating the Tractor 31
Driving the Tractor . 31
Operating The PTO . 32
Diesel Fuel . 32
Do’s and Don’t’s 33
CONTENTS
3
Don’ts-For Safe Operation . 34
Safety Signs 35
General Safety Information 35
Decals Mounting Location . 35
Universal Symbols . 41
Description of Tractor Controls 43
Instrument and switches 43
CL Model . 43
HS Model . 44
Main Switch . 45
Headlights Switch (Beacon Light), Turn Signal Lights Switch and Horn Switch . 45
Tachometer 46
Hour Meter . 46
Fuel Gauge 46
Water Temperature . 46
Warning Lights . 47
Independent PTO 48
The PTO Monitor Lamp . 48
PTO On / Off Switch 48
PTO Control Switch . 48
Operation The Controls (CL MODEL) . 50
Operation The Controls (HS Model) 51
Hand Throttle (Throttle Lever) . 52
Clutch Disconnecting Arm . 52
Brake Pedal . 52
Foot Operated Accelerator 53
Parking Brake 53
Parking Brake Lever 53
Shuttle Shift Lever – CL MODEL . 54
Shuttle Shift Lever – HS Model 55
Gear Shift Lever 55
Sub Gear Lever (Linear Shift Lever) . 56
Creep Shift Lever . 57
Diff-Lock Pedal 58
Front Wheel Drive Lever (CL Model) . 58
Front Wheel Drive Lever (HS Model) 59
Driver’s Seat 59
Tilt Lever 59
PTO Gear Selection Lever 60
Operation of the Hydraulic Circuit . 60
Position Control . 60
Lowering Speed Control Knob for The 3 Point Hitch 61
Exterior Hydraulic Lever (Optional) . 62
Remote Hydraulic Control Valve Coupler Connecting and Disconnecting . 62
Connecting . 62
Disconnecting 62
Operating The 3 Point Linkage (TPI) . 63
Adjustment of the Stabilizer Bars 64
Adjustment of The Top Link . 64
Adjustment of the Lift Link (left, right) 64
Adjustment of the Lift Link on the Lower Link 65
Lower Swinging Hitch 65
Lower Hitch Disassembly 66
Multi-level hitch 66
Height Adjustment and Disassembly of the Multi-level Hitch Attachment Tail Piece 67
* Air Brakes 67
Air pressure indication . 68
The button for temporary deactivation of brakes of the trailer or semi-trailer . 68
* Front Three-point Hitch . 69
Controlling front three-point hitch 69
Working and transport position of the front three-point hitch 70
Driving with agricultural machines attached to the front three-point hitch . 70
CONTENTS
4
Operation . 71
Starting the Engine 71
Stopping the Engine 71
Driving the Tractor . 72
Warming Up . 72
Warming Up in Cold Weather 72
Warming Up Time 72
Tight Turns in the Field 73
Normal Braking and Parking 73
Uphill Starts on a Steep Slope 74
Driving Downhill . 74
Operation of the Diff-Lock 74
Check During Driving . 75
Oil Pressure Light 75
Battery Charging 75
Fuel Gauge 75
Check During Driving . 76
Connecting and Disconnecting Implement 77
Connection . 77
Disconnection 77
Mounting Implement 78
Assembly of the Front Loader . 79
Fixation Points of Loader . 79
Joystick lever . 80
Safety implement for joystick lever 80
Front Fenders 80
Maintenance 81
Checks and Service . 81
General Information . 81
Service inspections 81
Pre-Start Checks . 81
Checking Engine Coolant 81
Inspection 81
Engine Oil 82
Transmission Oil 83
Fuel 84
Tire Pressure . 84
Streering 84
Brake . 84
Clutch . 84
Electrical 84
Maintenance and Adjustment Schedule 85
Periodical Check and Service Table . 85
Tire Size and Inflation Pressure 86
Filling Diagram & Capacity Table 87
Lubricants 87
ZETOR service fillings . 88
Motor oils . 88
Oil to gear systems of tractors . 88
Oil for the front driving axle 88
Opening Method of Hood 88
Fuel 89
Bleeding the Fuel System 89
Changing the Oils in the Tractor 90
Changing Engine Oil 90
Changing the Transmission Oil . 90
Changing Oil in the Front Axle . 92
Cleaning and Changing Filters 93
Engine Oil Filter . 93
Cleaning Oil Water Separator of Fuel Filter 93
Empty Water Tank . 94
Change the Fuel Pre-Filter Insert 94
Vent the Fuel System 94
CONTENTS
5
Change the Fuel Filter Cartridge . 95
Hydraulic Oil Filter and Engine Oil Filter Cartridge . 95
Replacing coolant . 96
Anti Freeze 96
Cleaning the Radiator 97
Greasing the Tractor 97
Setting the play of controls 98
Adjusting the Clutch . 98
Adjusting the Brakes 98
Adjustment Method 98
Adjusting the Throttle Leve 99
Adjusting Toe-in . 99
Battery Maintenance 99
Checking the Battery . 99
Battery Maintenance 99
Battery Charging 100
Battery Disconnect 101
Removal of the knob 101
Refitting the knob . 101
Other Maintenance 102
Checking the Belt Drive . 102
Replace V-rib Belt 102
Check and Clean the Air Cleaner According to the Following Instructions . 102
Cautions for inspection and service of air cleaner . 103
Checking Hoses and Lines 103
Checking the Wiring Harness and Fuses 103
Replacing Fuses 104
Main Fuses 104
Position of the Fuse . 105
Wiring Diagram of the Electric Instrument . 106
Service Prior to Daily and Short Terms Storage . 107
For Daily or Short Term Storage . 107
Long-term Storage . 107
Re-use After Long Term Storage 107
Fuel Saving Tips 108
Air Cleaning System 108
Engine 108
Clutch & Brakes . 108
Oil System . 108
Fuel System . 108
Permissible Fuels 108
Winter Operation with Diesel Fuel . 109
Cooling System . 109
Water Quality . 110
Cooling System Corrosion Protection Agent . 110
Cabin System 111
Major Features 111
Instrument and Related Parts 112
Doors . 112
Rear Window . 112
Side Window 112
Roof Hatch (if equipped) 112
Working Lamps (Front and Rear) 113
Rerarview Mirrors 113
Cab Cailing 113
How to Control Cabin 114
Interior Devices 114
Switches on the right cab column 114
Work Light Switches 114
Wiper Control Switch . 114
On Switch 114
Off Switch 114
Windscreen Washer Tank . 114
Interior Lamp . 115
Blower Control Switch . 115
Temperature Control . 115
Air Control Switch 115
Ventilation 116
External Circulation . 116
Circulation Diffuser 116
Heating System . 117
Heating System Configuration . 117
Air-conditioning System . 118
Cab Filter . 118
Radio, CD Player (If Equipped) . 119
Ash Tray 119
Cup Holder . 119
Cigarette Lighter 119
Checking the Air Conditioning System 120
Checking the Air Conditioning System Charge . 120
Diagnosing Malfunctions . 121
1. Tracing Faults 121
2. Check of the air conditioning with a pressure gauge. . 122
3. gauge pressure conversion . 122
Specification . 123
Technical data . 123
Major Specifications 123
Permitted Towed Vehicle Weight 124
Traveling Speed 125
Noise Levels 126
Vibration Referred to the Operator Position 127
Troubleshooting . 129
Engine Troubleshooting . 129
Clutch, Brake and Hydraulic System Troubleshooting 132
Steering Wheel and Electric Instruments Troubleshooting . 133
Towing the Tractor . 134
Towing with the Engine Running . 135
Towing with the Engine Off 135
Index . 137
IMAGES PREVIEW OF THE MANUAL:
VIDEO PREVIEW OF THE MANUAL:
PLEASE NOTE:
- This is the SAME manual used by the dealers to troubleshoot any faults in your vehicle. This can be yours in 2 minutes after the payment is made.
- Contact us at [email protected] should you have any queries before your purchase or that you need any other service / repair / parts operators manual.
S.M


