

Takeuchi Tb228 Tb235 Tb250 Operators Manual
FILE DETAILS:
LANGUAGE:ENGLISH
PAGES:253
DOWNLOADABLE:YES
FILE TYPE:PDF
VIDEO PREVIEW OF THE MANUAL:

IMAGES PREVIEW OF THE MANUAL:

DESCRIPTION:
FOREWORD:
- This manual describes operation, inspection and maintenance of the machine, as well as safety instructions to be heeded during these operations. If you have any questions about the machine, please contact a Takeuchi sales or service outlet.
INTRODUCTION MANUAL STORAGE COMPARTMENT:
- A compartment for storing this manual is provided at the position shown on the diagram below. 1. Insert the starter key and turn it counterclockwise to open the cover under the seat. 2. After using the manual, place it in the plastic pouch and store it back in the manual storage compartment. SERIAL NUMBERS IMPORTANT: Do not remove the machine name plate with the serial number. Check the serial numbers of the machine and engine and write them down in the spaces below.
- This manual refers the front, rear, left and right of the machine as seen when sitting in the operator’s seat with the dozer blade visible to the front. DESIGNATED OPERATIONS Use this machine primarily for the following operations:
- Excavation Digging ditches Digging side ditches Leveling Loading FEATURES Tilting up the operator seat floor for easier maintenance Automatic travel shift-down system Short pitch rubber crawler Low engine noise and exhaust emissions Electronic control of auxiliary hydraulic circuit Single button operation for engine deceleration Slew motors are equipped with shockless valves
TABLE OF CONTENTS:
Takeuchi Tb228 Tb235 Tb250 Operators Manual
Introduction 0-2
Machine description 0-3
Safety 1-1
General precautions 1-2
Precautions when preparing 1-7
Precautions when starting 1-9
Precautions when operating 1-11
Precautions when stopping 1-19
Precautions when transporting 1-20
Precautions on maintenance 1-21
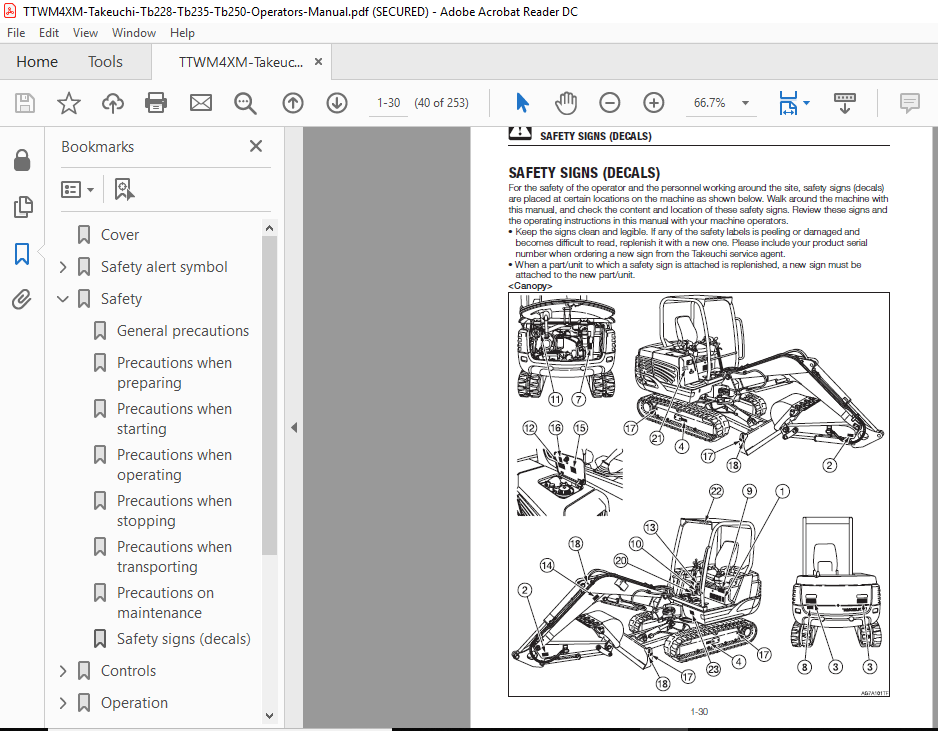
Safety signs (decals) 1-30
Controls 2-1
Names of components (Canopy) 2-2
Names of components (Cab) 2-4
Covers 2-6
Starter key 2-6
Front cover (tool box) 2-6
Fuel lid 2-7
Fuel filler port 2-7
Side cover 2-8
Engine hood 2-8
Cab 2-9
Cab door 2-9
Emergency exit 2-9
Front window 2-10
Lower front window 2-11
Side window 2-11
Emergency hammer (optional) 2-11
Seat and seat belt 2-12
Seat < TB228 > 2-12
Seat belt <TB228> 2-13
Seat < TB235 / TB250 > 2-14
Seat belt <TB235 / TB250> 2-15
Instrument cluster 2-16
Warning lamps 2-16
Indicators 2-17
Meters 2-17
Hour meter 2-17
Switches 2-18
Starter switch 2-18
Horn button 2-18
Deceleration button 2-18
Automatic deceleration switch 2-19
Auxiliary hydraulic switches 2-19
Third auxiliary hydraulic switch and
buttons (Option) 2-20
Travel speed switch 2-21
Light switch 2-21
Wiper switch 2-21
Levers and Pedals 2-22
Safety lock lever 2-22
Throttle lever 2-22
Operating levers 2-23
Blade lever 2-23
Travel levers/pedals 2-24
Boom swing pedal 2-24
Auxiliary hydraulic pedal (option) 2-25
Accessories 2-26
Heater 2-26
Heater (for cold climates) 2-27
Air conditioner 2-28
Cup holder 2-33
Cigarette lighter 2-34
Ashtray 2-34
Interior light 2-35
Mirrors 2-35
External power sockets (for EU) 2-35
Radio (Cab type) 2-36
Auxiliary hydraulic lines 2-40
Operation 3-1
Before starting operation 3-2
Getting on or off the machine 3-2
Walk-around inspection 3-2
Daily inspection 3-2
Starting and stopping the engine 3-3
Before starting the engine 3-3
Starting the Engine 3-4
Warming up the engine 3-5
Stopping the engine 3-5
Operating the machine 3-6
Lever pattern (ISO pattern) 3-6
Lever pattern (JCB pattern) 3-7
Warming up the machine (hydraulic oil) 3-8
Inspection after warm-up 3-9
Operating the travel levers 3-10
Stopping travel 3-13
Operating the working equipment 3-14
Operating procedures 3-16
Prohibited operations 3-16
Cautions on operating 3-19
Cautions on traveling on slopes 3-20
Getting out of mud 3-22
Operations possible with this machine 3-22
Parking the machine 3-24
Parking 3-24
0-6
Inspection and checks after stopping the
engine 3-24
Handling in cold climates 3-25
Preparing for cold climates 3-25
Cautions after operations 3-25
After the cold climate 3-25
Handling rubber crawlers 3-26
Prohibitions 3-26
Cautions 3-27
Preventing the rubber crawlers from
coming off 3-27
Transport 4-1
Loading and unloading 4-2
Hoisting the machine 4-4
Securing the machine 4-5
Precautions to be taken during
transportation 4-5
Maintenance 5-1
General 5-2
Maintenance overview 5-2
Cautions on maintenance 5-2
Service data 5-4
Fuel and lubricant table 5-4
Regularly replace the hydraulic oil 5-6
List of consumables 5-7
List of tools 5-8
List of tightening torques 5-9
Safety-critical parts 5-10
Maintenance list 5-12
Walk-around inspection 5-14
Inspecting by opening the engine hood
and covers 5-14
Inspecting by walking around the machine 5-15
Inspecting while sitting in the operator’s
seat 5-15
Daily inspection (every 10 hours) 5-16
Inspecting and replenishing the coolant 5-16
Inspecting and replenishing the engine oil 5-17
Inspecting the water separator 5-17
Inspecting the fuel level 5-18
Inspecting the hydraulic oil tank level
and replenishing 5-18
Lubricating the working equipment 5-20
After the initial 50 hours (only for new
machines) 5-21
Replacing the engine oil and the oil filter 5-21
Inspecting and adjusting the fan belt 5-22
Inspecting and adjusting the
compressor belt (AC) 5-22
Every 50 hours 5-24
Inspecting and adjusting the crawler
tension 5-24
Lubricating the slew bearing 5-26
Draining the water from the fuel tank 5-27
Inspecting the battery fluid level and
replenishing 5-28
Every 100 hours 5-30
Cleaning the water separator 5-30
After the initial 250 hours (only for new
machines) 5-31
Replacing the hydraulic oil return filter 5-31
Replacing the pilot line filter 5-32
Replacing the travel motor gear oil 5-33
Every 250 hours 5-34
Replacing the engine oil and the oil filter 5-34
Inspecting and adjusting the fan belt 5-34
Inspecting and adjusting the
compressor belt (AC) 5-34
Cleaning the air cleaner 5-34
Cleaning the radiator fins and oil cooler
fins 5-35
Cleaning the air filters 5-36
Cleaning the condenser (AC) 5-36
Inspecting the refrigerant (gas) level (AC) 5-37
Every 500 hours 5-39
Replacing the fuel filter 5-39
Every 1000 hours 5-40
Replacing the hydraulic oil return filter 5-40
Replacing the pilot line filter 5-40
Replacing the travel motor gear oil 5-40
Cleaning the engine cooling system 5-40
Replacing the air cleaner element 5-42
Replacing the air breather filter (If
equipped) 5-43
Inspecting and adjusting the engine
valve clearance 5-43
Retightening the engine cylinder head bolt 5-43
Every 1500 hours 5-44
Inspecting and cleaning the engine fuel
injectors 5-44
Inspecting the crankcase breather system 5-44
Every 2000 hours 5-45
Lapping the engine valve seats 5-45
Every 4000 hours 5-46
Replacing the hydraulic oil and
cleaning the suction strainer 5-46
0-7
When required 5-48
Replacing the bucket teeth and the side
cutters 5-48
Replacing the bucket 5-52
Adjusting the gap between the bucket
and arm (If equipped) 5-54
Inspecting and replenishing the
windshield washer fluid 5-55
Lubricating the levers and pedals 5-56
Inspecting the rubber crawlers 5-57
Replacing the rubber crawlers 5-58
Tilting up the platform 5-60
Maintenance during extended storage period 5-62
Troubleshooting 6-1
Symptoms that are not malfunctions 6-2
If the engine overheats 6-3
If the battery goes dead 6-4
If a fuse blows 6-6
Inspecting and replacing the fuse 6-6
Inspecting the fusible link 6-7
Restarting after adding fuel 6-8
Bleeding air from the fuel system 6-8
If a warning lamp flashes 6-9
Other symptoms 6-10
Lowering the boom to the ground 6-12
Towing 6-13
Specifications 7-1
Basic Specifications 7-2
Machine dimensions 7-6
Operating ranges 7-12
Lifting Capacities 7-15
Options 8-1
General precautions 8-2
Safety precautions 8-2
Cautions when installing attachments 8-2
Cautions when operating attachments 8-3
Attachment combination table 8-4
Hydraulic breaker 8-6
Cautions on operating 8-6
Replacing the hydraulic oil regularly 8-7
Load safety device 8-8
Emergency shut-off valve 8-8
Overload warning device 8-9
Accumulator 8-10
Operating the machine with an
accumulator 8-10
Battery switch 8-11
Selecting a lever pattern 8-12
Switching the lever pattern 8-12
Travel alarm 8-13
3-hole bucket 8-14
Arm-in restriction system 8-15
Optional equipment mass 8-16
Biodegradable oil 8-18
Replacing the hydraulic oil with
biodegradable oil 8-18
Angle dozer blade 8-19
PLEASE NOTE:
⦁ This is the SAME manual used by the dealers to troubleshoot any faults in your vehicle. This can be yours in 2 minutes after the payment is made.
⦁ Contact us at [email protected] should you have any queries before your purchase or that you need any other service / repair / parts operators manual.


