

Liebherr A 976 1360 1402 1403 1404 1460 1461 Hydraulic Excavator Operator’s Manual SN 37462 – PDF DOWNLOAD
FILE DETAILS:
Liebherr A 976 1360 1402 1403 1404 1460 1461 Hydraulic Excavator Operator’s Manual SN 37462 – PDF DOWNLOAD
Language : English
Pages : 318
Downloadable : Yes
File Type : PDF
DESCRIPTION:
Liebherr A 976 1360 1402 1403 1404 1460 1461 Hydraulic Excavator Operator’s Manual SN 37462 – PDF DOWNLOAD
Product ID
Manufacturer: Liebherr-France SAS
Type: R 976
Type no.: 1360 1402 1403 1404 1460 1461
From Serial no.: 37462
Preface:
- This operating manual is intended for you as the machine operator or as a member of the maintenance personnel. It contains warnings, important information and tips for working with the machine. It simplifies the process of familiarisation and getting to know the machine, and helps to avoid faults caused by incorrect operation.
- Compliance with the operating manual increases the reliability and service life of the machine.
- The operating manual must be kept with the machine. Make sure that a copy is always kept close to hand at the workplace.
- Read the operating manual before initial commissioning and subsequently at regular intervals. Everyone who carries out work with or on the machine must be familiar with and use this operating manual.
Examples of this work:
– Operation including setup and fitting attachments, elimination of faults, care,
disposal of service products and consumables
– Maintenance including servicing, inspection and repair
– Transporting or loading the machine
- The owner is responsible for supplementing the operating manual with instructions based on existing national regulations on accident prevention and environmental protection. In addition to this operating manual and the regulations on accident prevention applicable in the user’s country and at the place of use, it is also necessary to comply with the recognised technical rules on safety and technically proficient working.
- Some sections of this operating manual do not apply to all machines.
- Some illustrations in this operating manual may show details and implements that are different from your machine.
- In some illustrations, protective devices and covers have been removed to provide a clearer representation.
- Liebherr machines are subject to continuous development and improvement. This may have resulted in modifications to your machine which are possibly not referred to in this operating manual.
- If you require further explanations or information, please contact Liebherr customer service.
Liability and warranty:
- Due to the wide variety of products offered by other manufacturers (e.g. service products, lubricants, tool attachments and spare parts), Liebherr cannot examine the general suitability and absence of defects in third-party products which are used in or on Liebherr products. The same applies to possible interactions between third-party products and Liebherr products.
- Third-party products are used in or on Liebherr machines at the user’s own discretion.
Liebherr does not offer any warranty or accept any liability for losses of anykind caused by failures of or damage to Liebherr machines attributable to the use of third-party products. - Furthermore, Liebherr will not recognise any warranty claims attributable to incorrect operation, inadequate maintenance or the failure to follow safety instructions.
Modifications, conditions, copyright:
- Liebherr reserves the right to make modifications in the course of technical development, without issuing prior notification.
- Information and illustrations in these instructions are not allowed to be duplicated, distributed or used for the purposes of competing with Liebherr. All rights under copyright legislation are expressly reserved.
- The aforementioned provisions do not extend the warranty and liability conditions in the general terms and conditions of business of Liebherr.
TABLE OF CONTENTS:
Liebherr A 976 1360 1402 1403 1404 1460 1461 Hydraulic Excavator Operator’s Manual SN 37462 – PDF DOWNLOAD
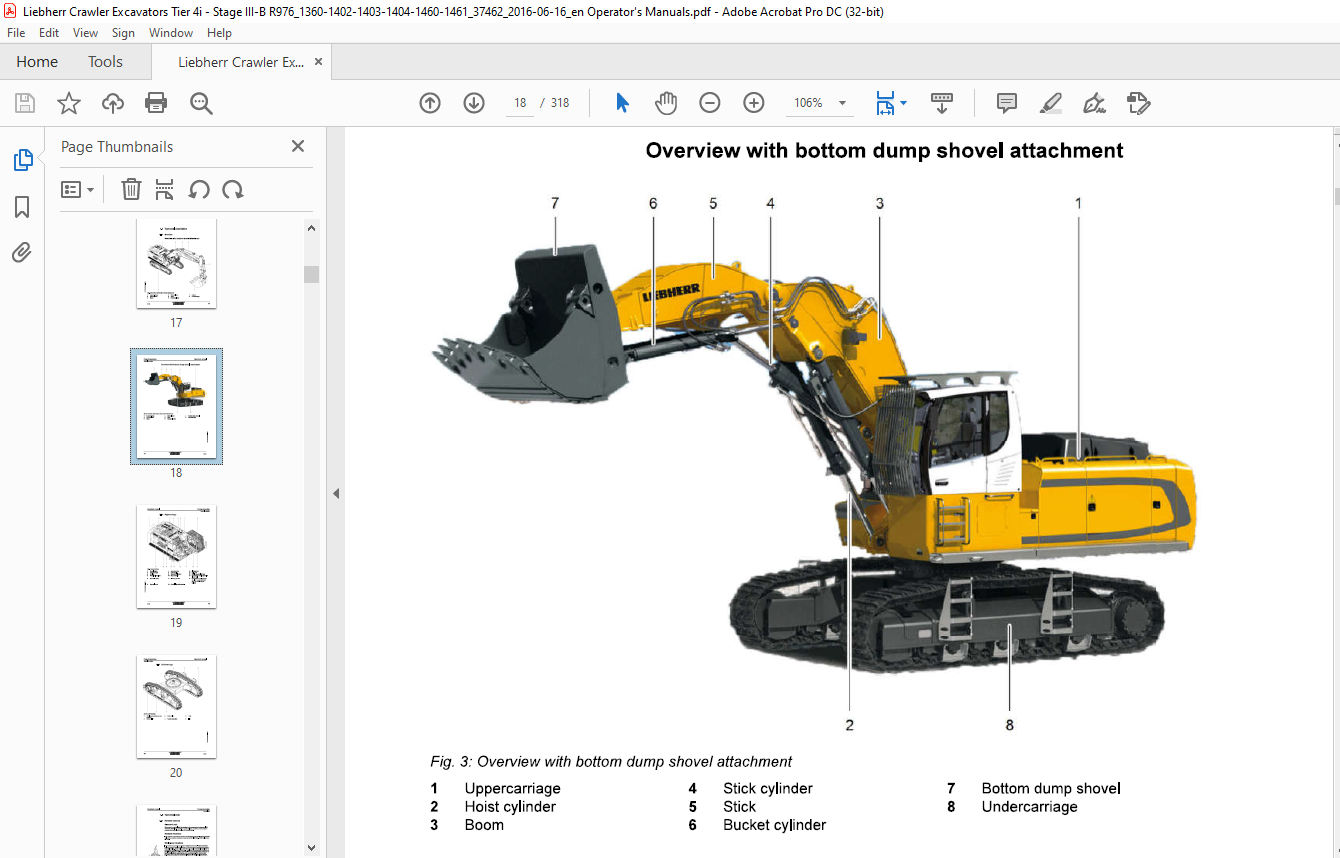
1.1 Technical description 17
1.1.1 Overview 17
1.2.1 Vibration emission 21
Safety warnings, signs 23
2.1 Safety advices and symbols 23
2.1.1 Designation of safety advices 23
2.3 Designated use 24
2.4 Signs on the machine 25
2.41 Locations of signs 25
2.51 General safety instructions 31
25.9 Working 36
2.5.10 Shutting down the machine 38
2.5.11 Transporting the machine 39
2.5.12 Towing 39
2.5.13 Maintenance and repair 39
2.5.14 Modifications, add-ons and conversions 43
2.5.15 Removal and installation of the attachment pins 43
2.5.16 Falling object protective structures (FOPS and FGPS) 44
2.5.17 Checking machine for cracks 44
2.5.18 Regular checks 45
3 Control and operation 47
3.1 Control and operating elements 47
3.1.1 Overview of operator’s platform 47
3.1.2 Control unit A 49
3.1.3 Control unit B 50
3.2 Control 51
3.2.1 Battery main switch 51
3.2.2 Entering and exiting the machine 52
3.2.3 Emergency exit 53
3.2.4 Fire extinguisher (option) 53
3.25 Safety lever 54
3.2.6 Operator’s seat 54
3.2.7 Safety belt 60
3.2.8 Horn 62
3.2.9 Sun blind 62
3.2.10 Side windows 64
3.2.11 Exterior mirrors 64
3.2.12 Lighting 65
3.2.13 Cab lighting system 65
3.2.14 Windscreen wipers 66
3.2.15 Display 66
3.2.16 Status symbols 68
3.2.17 Main menu 71
3.2.19 Air conditioning unit 72
3.2.20 Operating status menu 75
3.2.21 System settings menu 75
3.2.22 Function settings menu 83
3.2.23 Information menu 91
3.2.24 Tool Control menu 92
3.2.25 Messages menu 94
3.2.26 Auxiliary heater (option) 94
3.3 Operation 96
3.3.1 Inspection before commissioning 96
3.3.2 Refuelling 97
3.3.3 Refuelling with electric refuelling pump (option) 98
3.3.4 Topping up diesel exhaust fluid 100
3.3.5 Immobiliser (option) 100
3.3.6 Preparing machine for dust intensive application 102
3.3.7 Preparing machine for use in biologically sensitive areas 102
3.3.8 Starting diesel engine 102
3.3.9 Bringing machine to operating temperature 103
3.3.10 Engine speed and operating mode 104
3.3.11 After starting 105
3.3.12 Sensor-controlled low idle automatic 106
3.3.13 Automatic engine shut-off after idling (option) 108
3.3.14 Shutting off diesel engine 108
3.3.15 Travelling 110
3.3.16 Braking 112
3.3.17 Travel alarm (option) 112
3.3.18 Driving on slopes 113
3.3.19 Controlling the working attachment 114
3.3.20 Turning and braking uppercarriage 116
3.3.21 Turning alarm (option) 117
3.3.22 Overload warning system (option) 118
3.3.23 Float position of hoist cylinders 120
3.3.24 Hoist cylinder protection (option) 121
3.3.25 Stick cylinder protection 123
3.3.27 Controlling special working attachment with mini-joystick (option) 127
3.3.28 Control changeover (option) 129
3.3.29 Control changeover to right mini-joystick (option) 130
3.3.30 Control changeover to left double pedal (option) 131
3.4 Shut-down and limitation devices 133
3.41 Stick cylinder shut-off and hoist cylinder shut-off (option) 133
3.5 General working methods 136
3.5.1 Safety belt 136
3.5.2 Drugs and alcohol 136
3.56.3 Working without damaging machine 136
3.5.4 Preparatory work 138
3.5.5 Putting machine in working position 139
3.5.6 Working on slopes 139
3.5.7 Working with a backhoe bucket 140
3.5.8 Ground surface grading 141
3.5.9 Working with a hydraulic hammer 142
3.5.10 Working with the grapple 143
3.5.11 Working with the clamshell 144
3.5.12 Transferring loads 145
3.5.13 Loading a transport vehicle 146
3.5.14 Lifting loads 146
3.5.15 Lifting loads with quick coupler 147
3.5.16 Lifting loads using working tool with load lift hook 148
3.6 Installation and removal of attachment parts 150
3.6.1 Installing and removing bucket 150
3.6.2 Installing and removing bucket with special seal 152
3.6.3 Using quick coupler 153
3.6.4 Installing and removing grapple on stick 153
3.6.5 Installing and removing grapple on industrial stick 1565
3.7 Installing and removing the counterweight 157
3.7.1 Installing and removing counterweight 157
3.8 Transport 159
3.8.1 Adjusting undercarriage width mechanically (option) 159
3.8.2 Driving machine onto low-loader 164
5.3.8 Gear oils 212
5.3.9 Pump distributor gear oils 212
5.3.10 Greases 213
5.3.11 Windscreen washer fluid 214
5.3.12 Lubricants and care products for electrical and mechanical systems 214
Access points for maintenance work 215
5.4.1 Access points on uppercarriage 215
5.4.2 Access points under the uppercarriage 216
5.4.3 Access points on the undercarriage 217
General maintenance 218
5.6.1 Welding 218
5.6.2 Bleeding hydraulic cylinders 218
5.6.3 Applying corrosion protection to piston rods 219
5.6.4 Cleaning the machine 220
5.6.5 Cleaning travel gear 222
5.6.6 Cleaning fan and radiator 222
Drive group 223
5.7.1 Diesel engine: Bringing into maintenance position 223
5.7.2 Diesel engine: Checking oil level 223
5.7.3 Fuel pre-filter: Draining water 224
5.7.4 Fuel tank: Draining water and sediments 225
5.7.5 Fuel fine filter: Replacing filter cartridge 225
5.7.6 Air filter: Emptying dust collecting tank 227
5.7.7 Air filter: Replacing main filter cartridge 228
5.7.8 Pump distributor gear: Checking oil level 228
Cooling system 230
5.8.1 Checking coolant level 230
5.8.2 Coolant: Checking concentration 231
Working hydraulics system 235
5.9.1 Depressurising hydraulic system 235
5.9.2 Hydraulic tank: Checking oil level 236
5.9.3 Hydraulic tank: Draining water and sediments 239
5.9.4 Return filter: Checking and cleaning magnetic rod 240
5.9.5 Bypass filter (option): Checking level of contamination of filter cartridge ~~ 240
5.10.1 General information 242
5.11.1 Checking track tension 243
5.11.2 Tightening track 244
5.11.3 Slackening track 245
5.11.4 Track pads and sprocket wheels: Checking mounting 246
5.12.1 Lubricating working tool 248
5.12.2 Changing bucket teeth with Z system 249
5.13.1 Filling with windscreen washer fluid 250
5.13.2 Switching on air conditioning unit 250
5.13.3 Cleaning pre-filter 251
5.14.1 Lubrication system: Filling with grease 252
5.15.1 Slewing gearbox: Checking oil level 253
Appendix 255
6.1 Pre-tightening torque and turning angle 255
6.1.1 Procedure 255
Index 257
VIDEO PREVIEW OF THE MANUAL:
IMAGES PREVIEW OF THE MANUAL:

PLEASE NOTE:
- This is not a physical manual but a digital manual – meaning no physical copy will be couriered to you. The manual can be yours in the next 2 mins as once you make the payment, you will be directed to the download page IMMEDIATELY.
- This is the same manual used by the dealers inorder to diagnose your vehicle of its faults.
- Require some other service manual or have any queries: please WRITE to us at [email protected]
S.V


