

Hitachi ZAXIS 850-3 850LC-3 870H-3 870LCH-3 Hydraulic Excavator Technical Operator’s Manual
FILE DETAILS:
Hitachi ZAXIS 850-3 850LC-3 870H-3 870LCH-3 Hydraulic Excavator Technical Operator’s Manual
Language : English
Pages : 366
Downloadable : YES
Format : PDF
Size : 7.29 MB
Part No : EM1JB-1-1
DESCRIPTION:
Hitachi ZAXIS 850-3 850LC-3 870H-3 870LCH-3 Hydraulic Excavator Technical Operator’s Manual
FOREWORD:
Read this manual carefully to learn how to operate and service your machine correctly. Failure to do so could result in personal injury or machine damage. This manual should be considered a permanent part of your machine and should remain with the machine when you sell it. This machine is of metric design. Measurements in this manual are metric. Use only metric hardware and tools as specified. • SI Units (International System of Units) are used in this manual. For reference MKS system units and English units are also indicated in parentheses after the SI units. Example : 24.5 MPa (250 kgf/cm2, 3560 psi) Right-hand and left-hand sides are determined by facing in the direction of forward travel.
- Write product identification numbers in the Machine Numbers section. Accurately record all the numbers to help in tracing the machine should it be stolen. Your dealer also needs these numbers when you order parts. If this manual is kept on the machine, also file the identification numbers in a secure place off the machine.
- Warranty is provided as a part of Hitachi’s support program for customers who operate and maintain their equipment as described in this manual. The warranty is explained on the warranty certificate which you should have received from your dealer. This warranty provides you the assurance that Hitachi will back its products where defects appear within the warranty period. In some circumstances, Hitachi also provides field improvements, often without charge to the customer, even if the product is out of warranty.
- Should the equipment be abused, or modified to change its performance beyond the original factory specifications, the warranty will become void and field improvements may be denied. Setting fuel delivery above specifications or otherwise overpowering machines will result in such action. Only qualified, experienced operators officially licensed (according to local law) should be allowed to operate the machine. Moreover, only officially licensed personnel should be allowed to inspect and service the machine.
TABLE OF CONTENTS:
Hitachi ZAXIS 850-3 850LC-3 870H-3 870LCH-3 Hydraulic Excavator Technical Operator’s Manual
SAFETY
Recognize Safety Information S-1
Understand Signal Words S-1
Follow Safety Instructions S-2
Prepare for Emergencies S-2
Wear Protective Clothing S-3
Protect Against Noise S-3
Inspect Machine S-3
General Precautions for Cab S-4
Use Handholds and Steps S-5
Adjust the Operator’s Seat S-5
Ensure Safety Before Rising from or
Leaving Operator’s Seat S-5
Fasten Your Seat Belt S-6
Move and Operate Machine Safely S-6
Handle Starting Aids Safely S-6
Operate Only from Operator’s Seat S-7
Jump Starting S-7
Keep Riders Off Machine S-7
Precautions for Operations S-8
Investigate Job Site Beforehand S-9
Equipment of Head Guard, Rops, Fops S-10
Provide Signals for Jobs Involving
Multiple Numbers of Machines S-10
Confirm Direction of Machine to Be Driven S-10
Drive Machine Safely S-11
Avoid Injury from Rollaway Accidents S-13
Avoid Injury from Back-over and Swing Accidents S-14
Keep Person Clear from Working Area S-15
Never Position Bucket Over Anyone S-15
Avoid Undercutting S-15
Avoid Tipping S-16
Never Undercut a High Bank S-16
Dig with Caution S-17
Operate with Caution S-17
Avoid Power Lines S-18
Precautions for Lightening S-18
Object Handling S-18
Protect Against Flying Debris S-19
Park Machine Safely S-19
Handle Fluids Safely−Avoid Fires S-19
Transport Safely S-20
Practice Safe Maintenance S-21
Warn Others of Service Work S-22
Support Machine Properly S-22
Stay Clear of Moving Parts S-22
Prevent Parts from Flying S-23
Store Attachments Safely S-23
Prevent Burns S-24
Replace Rubber Hoses Periodically S-24
Avoid High-Pressure Fluids S-25
Prevent Fires S-26
Evacuating in Case of Fire S-27
Beware of Exhaust Fumes S-27
Precautions for Welding and Grinding S-27
Avoid Heating Near Pressurized Fluid Lines S-28
Avoid Applying Heat to Lines Containing
Flammable Fluids S-28
Remove Paint Before Welding or Heating S-28
Beware of Asbestos Dust S-29
Prevent Battery Explosions S-29
Service Air Conditioning System Safely S-29
Handle Chemical Products Safely S-30
Dispose of Waste Properly S-30
SAFETY SIGNS/Europe/Asia/Middle and
Near East Model Only S-31
SAFETY SIGNS/North America and Oceania
Model Only S-38
COMPONENTS NAME 1-1
GETTING ON / OFF THE MACHINE 1-2
OPERATOR’S STATION
Cab Features 1-3
Multi Function Monitor 1-5
Outline 1-6
Menu Screen (23) 1-9
Hour Meter 1-10
Fuel Gauge 1-10
Clock 1-10
Back Monitor Selector 1-10
Menu Key 1-11
Optional Function Key 1-11
Return to Basic Screen Key 1-11
Alarm Light 1-11
Optional Function Display 1-11
Coolant Temperature Gauge 1-12
Operating Status Icon Display 1-12
Alarm Occurrence Screen 1-17
Contents of Alarms 1-19
Clock Setting 1-21
Attachment Selection
(Only Machines Equipped with Optional Parts) 1-22
Pump 2 Flow Rate Adjustment
(Only Machines Equipped with Optional Parts) 1-25
Displaying Operating Conditions 1-26
Fuel Rate Display/No Display 1-27
Back Monitor Settings 1-35
Maintenance Settings 1-42
Mail (Optional) 1-47
Language Settings 1-49
Switch Panel 1-51
Engine Control Dial 1-52
Auto-idle Switch 1-52
Power Mode Switch 1-53
CONTENTS
Travel Mode Switch 1-53
Work Light Switch 1-54
Wiper/Washer Switch 1-55
Switch Panel (Optional Included) 1-56
Fan Rotating Direction Device(Optional) 1-60
Key Switch 1-61
Power Boost Switch 1-61
Horn Switch 1-61
Cigar Lighter 1-62
Cab Light 1-63
Installing Fire Extinguisher (Optional) 1-63
Pilot Control Shut-off Lever 1-64
Engine Stop Switch 1-64
Fuse Box 1-65
Additional Fuse Box 1-65
Air Conditioner Operation 1-66
Auto Air Conditioner 1-67
Cab Heater Operation 1-72
Cooling Operation 1-72
Defroster Operation 1-73
Tips for Optimal Air Conditioner Usage 1-74
AM/FM Radio Operation 1-75
Digital Clock Setting Procedure 1-76
Cab Door Release Lever 1-77
Opening Upper Front Window (ZAXIS850-3, 850LC-3) 1-77
Closing Upper Front Window 1-78
Removing and Storing Lower Front Window
(ZAXIS850-3, 850LC-3) 1-79
Opening Side Windows 1-79
Opening/Closing Overhead Window
(ZAXIS850-3, 850LC-3) 1-80
Opening/Closing Overhead Window 1-80
Emergency Exit(ZAXIS850-3, 850LC-3) 1-81
Emergency Exit(ZAXIS870H-3, 870LCH-3) 1-82
Adjusting the Seat 1-83
Adjusting the Seat (Heater Seat Optional) 1-85
Seat With a Built-in Heater 1-86
Adjusting the Air-suspension Seat (Optional) 1-87
Seat With a Built-in Heater 1-88
Adjusting Console Height 1-89
Seat Belt 1-90
BREAK-IN
Observe Engine Operation Closely 2-1
Every 8 Hours or Daily 2-1
After the First 50 Hours 2-1
After the First 100 Hours 2-1
OPERATING THE ENGINE
Inspect Machine Daily Before Starting 3-1
Before Starting Engine 3-2
Level Check 3-3
Starting the Engine in Ordinary Temperature 3-4
Starting in Cold Weather 3-5
Check Instruments after Starting 3-6
Using Booster Batteries 3-7
Stopping the Engine 3-9
DRIVING THE MACHINE
Drive the Machine Carefully 4-1
Steering the Machine Using Pedals 4-2
Steering the Machine Using Levers 4-3
Travel Mode Switch 4-4
Travel Alarm (Optional) 4-4
Operating on Soft Ground 4-5
Raise One Track Using Boom and Arm 4-5
Towing Machine a Short Distance 4-6
Operating in Water or Mud 4-7
Parking the Machine on Slopes 4-8
Parking the Machine 4-8
OPERATING THE MACHINE
Control Lever (ISO Pattern) 5-1
Control Lever (HITACHI Pattern) 5-2
Pilot Control Shut-off Lever 5-3
Engine Speed Control 5-6
Auto-idle 5-7
Work Mode 5-8
Work Mode Select 5-9
Power Boost 5-10
Power Mode 5-11
Operating Backhoe 5-12
Grading Operation 5-12
Precaution for Arm Roll-in/ Bucket Roll-in Combined
Operation 5-13
Avoid Abusive Operation 5-13
Operating Tips 5-14
Select Correct Track Shoes 5-14
Object Handling — If Equipped 5-15
Overnight Storage Instructions 5-17
ASSEMBLING
Precautions for Assembling 6-1
Precautions for Slinging Work 6-3
Precautions for Operating Machine 6-4
Installing Counterweight 6-5
Installing Boom Cylinder 6-6
Installing Boom 6-8
Connecting Hoses Between Boom Cylinder and
Machine 6-9
Installing Boom Cylinder Rod 6-10
Installing Arm 6-11
Connecting Arm Cylinder Rod 6-12
Connecting Bucket Cylinder Hoses 6-13
Installing Bucket 6-14
Final Inspection 6-15
Transporting by Road 6-16
Transporting the Machine by Trailer 6-16
Loading/Unloading on a Trailer 6-16
Retracting or Extending the Side Frame 6-20
CONTENTS
Retracting the Side Frame 6-21
Extending the Side Frame 6-22
Type of Packings for Transportaion 6-25
Packing Dimensions and Weights for
Transportation-1 (Backhoe) 6-26
Packing Dimensions and Weights for
Transportation-2 (Backhoe) 6-29
MAINTENANCE
Correct Maintenance and Inspection Procedures 7-1
Check the Hour Meter Regularly 7-2
Use Correct Fuels and Lubricants 7-2
Prepare Machine for Maintenance 7-3
Hood and Access Covers 7-4
Periodic Replacement of Parts 7-5
Maintenance Guide 7-6
A Greasing 7-9
Automatic Lubrication — If Equipped 7-10
Front Joint Pins (Backhoe) 7-12
Swing Bearing 7-14
Electric Grease Gun — If Equipped 7-15
Swing Internal Gear 7-19
B Engine Oil 7-20
Engine Oil Level 7-21
Change Engine Oil 7-22
Replace Engine Oil Filter 7-22
C Transmission Oil 7-24
Pump Transmission 7-25
Swing Reduction Gear 7-26
Travel Reduction Gear 7-27
D Hydraulic System 7-29
Inspection and Maintenance of Hydraulic
Equipment 7-30
Check Hydraulic Oil Level 7-32
Drain Hydraulic Oil Tank Sump 7-33
Change Hydraulic Oil 7-34
Suction Filter Cleaning 7-34
Replace Hydraulic Oil Tank Filter 7-37
Replace Pump Drain Filter 7-38
Replace Pilot Oil Filter 7-39
Replace Air Breather Element 7-40
Check Hoses and Lines 7-41
Service Recommendations for Hydraulic Fittings 7-44
E Fuel System 7-46
Drain Fuel Tank Sump 7-48
Check Water Separator 7-48
Replace Fuel Main Filter Element 7-52
Replace Fuel Pre-Filter Element 7-53
Clean Feed Pump Strainer 7-54
Check Fuel Hoses 7-55
F Air Cleaner 7-56
Clean the Air Cleaner Outer Element 7-56
Replace the Air Cleaner Outer and Inner Elements 7-56
G Cooling System 7-57
Check Coolant Level 7-59
Change Coolant 7-60
Clean Radiator/ Oil Cooler/ Inter Cooler/
Fuel Cooler Core 7-61
Clean Oil Cooler Front Screen 7-61
H Air Conditioner 7-62
Clean and Replace Air Conditioner Filter 7-63
Check Refrigerant (Gas) Quantity 7-65
Check Compressor Belt Tension 7-65
Clean Condenser Core 7-66
Check Looseness at Each of Fastened Areas 7-66
Check in-season and Off-season 7-67
I Electrical System 7-68
Batteries 7-69
Replace Batteries 7-73
Replacing Fuses 7-73
Fuse Box 7-73
Additional Fuse Box 7-73
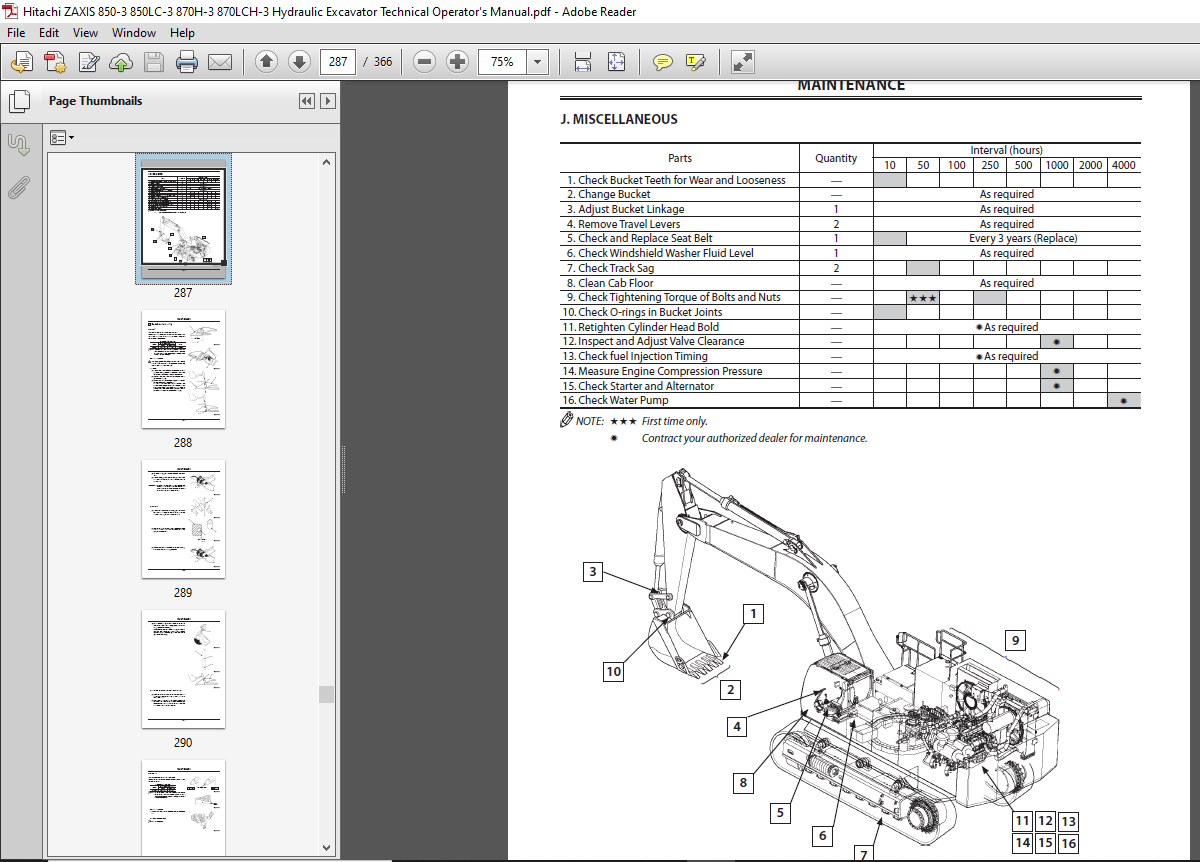
J Miscellaneous 7-75
Check Bucket Teeth 7-76
Change Bucket 7-82
Adjust the Bucket Linkage (Backhoe) 7-83
Remove the Travel Levers 7-84
Check and Replace Seat Belt 7-84
Check Windshield Washer Fluid Level 7-84
Check Track Sag 7-85
Clean Cab Floor 7-87
Check Tightening Torque of Bolts and Nuts 7-88
Check O-rings in Bucket Joints 7-102
Retighten Cylinder Head Bolt 7-103
Inspect and Adjust Valve Clearance 7-103
Check Fuel Injection Timing 7-103
Measure Engine Compression Pressure 7-103
Check Starter and Alternator 7-103
Check Water Pump 7-103
HYDRAULIC CIRCUIT AND ELECTRICAL CIRCUIT
Hydraulic System 8-1
Main Circuit 8-2
Electrical Circuit 8-4
Electrical Diagram 8-5
MAINTENANCE UNDER SPECIAL
ENVIRONMENTAL CONDITIONS
Maintenance Under Special Environmental Conditions 9-1
STORAGE
Storing the Machine 10-1
Removing the Machine from Storage 10-2
TROUBLESHOOTING
Engine 11-1
Electrical System 11-5
Control Levers 11-9
Hydraulic System 11-9
CONTENTS
SPECIFICATIONS
Specifications (Backhoe)
ZAXIS850-3, ZAXIS850LC-3 12-1
Working Ranges (Backhoe)
ZAXIS850-3, ZAXIS850LC-3 12-2
Shoe Types and Applications 12-3
ZAXIS850-3 12-3
ZAXIS850LC-3 12-3
Bucket Types and Applications (Backhoe) 12-4
ZAXIS850-3, ZAXIS850LC-3 12-4
Specifications (Backhoe) 12-5
ZAXIS870H-3, ZAXIS870LCH-3 12-5
Working Ranges (Backhoe) 12-6
ZAXIS870H-3, ZAXIS870LCH-3 12-6
Shoe Types and Applications 12-7
ZAXIS870H-3 12-7
ZAXIS870LCH-3 12-7
Bucket Types and Applications (Backhoe) 12-8
ZAXIS870H-3, ZAXIS870LCH-38 12-8
Lifting Capacities 12-9
Sound Level Results (2000/14/EC) 12-10
Vibration Level 12-10
OPTIONAL ATTACHMENTS and DEVICES
Hydraulic Breaker 13-1
Work Mode 13-2
Breaker Operation 13-3
Precautions for Breaker Operation 13-5
Breaker Maintenance 13-9
Replace Breaker Circuit Return Oil Filter 13-11
Hydraulic Crusher 13-12
Stop Valve Operation 13-13
Three-Way-Valve Operation (Machines Equipped
with the Piping Common to Hydraulic Breaker
and Crusher Operation) 13-14
Flow Combining Valve Operation 13-14
Precautions for Crusher Operation 13-15
INDEX 14-1
VIDEO PREVIEW OF THE MANUAL:

IMAGES PREVIEW OF THE MANUAL:

PLEASE NOTE:
- This is not a physical manual but a digital manual – meaning no physical copy will be couriered to you. The manual can be yours in the next 2 mins as once you make the payment, you will be directed to the download page IMMEDIATELY.
- This is the same manual used by the dealers inorder to diagnose your vehicle of its faults.
- Require some other service manual or have any queries: please WRITE to us at [email protected]


