

FENDT Fixed Chamber Baler Rotana 130 F Classic Rotana 130 F Master Rotana 130 F Xtra Operator’s Manual – PDF DOWNLOAD
DESCRIPTION:
FENDT Fixed Chamber Baler Rotana 130 F Classic Rotana 130 F Master Rotana 130 F Xtra Operator’s Manual – PDF DOWNLOAD
1.2 Safety Instructions
- YOU are responsible for the SAFE operation and maintenance of your machine.
- YOU must make sure that each person who operates or does work on the machine understands all the SAFETY data in this manual.
- YOU are the key to safety. Good safety procedures prevent accidents to you and each person near you. Make these procedures a set part of your safety sequence.
- Make sure that EVERYONE who operates, does maintenance or works near to the machine obeys the safety precautions.
Follow the safety sequence to prevent the risk of injury or death:
- Owners must complete training with all operators before they operate the machine. This training must be done a minimum of each year
- The operator must read, understand and obey all safety and operation instructions in the manual
- A person who did not read and understand all safety and operation instructions must not operate the machine
- Do not change the equipment. Adjustments not approved by the manufacturer can change the function of the machine and cause damage or personal injury
- Only use approved replacement parts and make sure that only approved technicians do the repair procedures.
1.2.1 General Safety
- • Read and understand the manual and all safety decals, before you operate the machine
- Follow all safety regulations, in this manual and instructions or warnings shown on the machine
- Only use the machine for its correct operation
- Only approved persons that understand the operator manual, can operate, drive and do maintenance on the machine
- Keep persons and objects away from parts that move
- Make sure that the installation of all the safety guards and protection devices is correct and they operate correctly
- Always use a tractor with a cabin. Make sure that you close the cabin of the tractor during operation to decrease the quantity of sound. High quantity of sound can cause reduction in hearing
- Always keep a minimum distance of 3 m (10 ft) between the machine and electrical power lines, specially when you open the tailgate
- Know that the height of the machine is up to 3.50 m (11.5 ft) and with an opened tailgate 4.28 m (14.04 ft), depending on specifications and installed tyres
- Put on the correct protective clothing and equipment (gloves, safety glasses and ear protectors)
- Look for hazards and signs of defects (leakage and noise)
- Keep the safety decals clean to make sure that you can see them at all times. Replace safety decals that are missing or you cannot see
- Know the telephone number for emergency medical help in your area
- Speak to your local dealer, if you are not sure of one or more items
- Only connect the machine to the tractor using the procedures in this manual. Only connect the machine to a tractor trailer hitch with your local regulations approval
- Make sure that the front axle weight of the tractor is sufficient. Make sure that you do not have more weight than the maximum permitted on the rear axle
- Do not connect the machine to the tractor when the tractor engine is in operation
- Release the pressure from the hydraulic system before you connect or disconnect the hydraulic hoses. Refer to the manual of the tractor
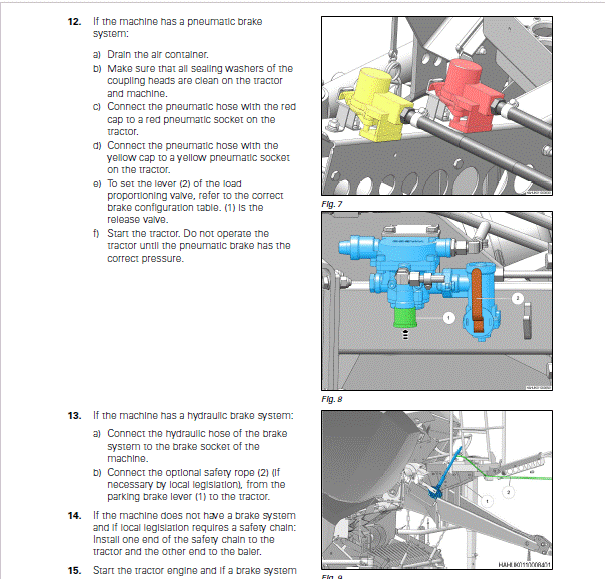
- If the machine has a pneumatic or hydraulic brake, connect the brake hose(s) to the tractor
- Make sure that all safety guards and protection devices are in position
- Do not remove a blockage by hand or by foot. Always use an applicable tool.
TABLE OF CONTENTS:
FENDT Fixed Chamber Baler Rotana 130 F Classic Rotana 130 F Master Rotana 130 F Xtra Operator’s Manual – PDF DOWNLOAD
1 Safety 7
1.1 Safety Icons 9
1.2 Safety Instructions 10
1.2.1 General Safety 10
1.2.2 Safe Driving 11
1.2.3 Public Road Transport Safety 11
1.2.4 Safe Operation 11
1.2.5 Safe Maintenance 12
1.2.6 Fire Prevention 13
1.3 Safety Decals 14
1.4 Safety Devices 20
1.4.1 Tailgate Safeguard 20
1.4.2 Set the Tailgate Safeguard 20
1.4.3 Remove the Tailgate Safeguard 20
1.4.4 Hydraulic Shut-off Valve 21
1.4.5 Net Knife Safeguard 21
1.4.6 Install the Net Knife Safeguard 21
1.4.7 Remove the Net Knife Safeguard 21
1.4.8 Pick-up Safeguard 22
1.4.9 Safety Chain (optional) 22
1.5 Danger Zones 23
2 Introduction 25
2.1 Preface 27
2.1.1 Manual Contents 27
2.1.2 Vehicle Identification Number (VIN) and VIN Plate 27
2.2 Intended Use 30
2.2.1 The Machine 30
2.2.2 Correct Use 30
2.2.3 Known Misuse 30
2.3 Description 31
2.3.1 General Overview 31
2.3.2 Drawbar 31
2.3.3 Device to Stop Use Without Approval 32
2.3.4 Main Drive Shaft 32
2.3.5 Hydraulic System 32
2.3.6 Pick-up Unit 32
2.3.7 Feed Rotor 33
2.3.8 Cutting Unit 33
2.3.9 Feed Channel Floor 34
2.3.10 Bale Chamber 34
2.3.11 Tying Unit 34
2.3.12 Bale Ejector 34
2.3.13 Tailgate 34
2.4 Controllers 35
2.4.1 E-Link Pro 35
2.4.2 E-Link Control 36
2.5 E-Link Pro Software 38
2.5.1 Home Page E-Link Pro and ISOBUS 39
2.5.2 Bale Adjustments Page 42
Table of contents
Fixed Chamber Baler
1747.FT.EN02
2.5.3 Field Data Page 43
2.5.4 Tasks Page 43
2.5.5 Advanced Menu 44
2.6 E-Link Control Software 47
2.6.1 Home Page 48
2.6.2 Bale Adjustment Page 51
2.6.3 Field Data 51
2.6.4 Tasks Page 51
2.6.5 Advanced Menu 52
3 Operation 55
3.1 First Use 57
3.1.1 Calculate the Maximum Permitted Vertical Load on the Coupling Point 57
3.1.2 Calculate the Maximum Permitted Horizontal Load on the Coupling Point 57
3.1.3 Adjust the Height of the Drawbar 57
3.1.4 Adjust the PTO Shaft 59
3.1.5 To Prepare Before You Connect the Power Supply 59
3.1.6 Connect the Hydraulics 60
3.1.7 Prepare the Chain Lubrication System 60
3.1.8 Adjust the Net Roll Holder 60
3.1.9 Setup the E-Link Pro Display 62
3.1.10 Set the Language on the E-Link Control 63
3.2 Connect the Machine to the Tractor 64
3.3 Transport Position and Driving 66
3.3.1 Apply or Release the Parking Brake 67
3.3.2 Place or Remove the Wheel Chocks 68
3.3.3 Drain the Air Container of the Pneumatic Brake System 68
3.4 Prepare the Machine to Bale 69
3.4.1 Adjust The Height of the Pick-up 69
3.4.2 Adjust the Height of the Wind Guard 70
3.4.3 Pull out the Bale Ejector Tubes 70
3.4.4 Put in the Wrapping Material 70
3.4.5 Insert a Net Roll 71
3.4.6 Insert the Net 72
3.4.7 Twine Tying (optional) 74
3.4.8 Thread the Twine 75
3.4.9 Set the Twine Brake 76
3.4.10 Set the Edge Clearance 76
3.4.11 Set the Wrapping Distance 76
3.4.12 Set the Wrap on the Edge 76
3.4.13 Insert the Knives 77
3.4.14 Adjust the Machine Settings on the Control 77
3.4.15 Open or Close the Side Covers 78
3.5 To Operate the Machine 79
3.5.1 Check Before You Operate the Machine 79
3.5.2 Start Baling 79
3.5.3 Drive Instructions for Material Intake 79
3.5.4 Large Swath 79
3.5.5 Small Swath 80
3.5.6 Drive on Slopes 80
3.5.7 Dry, Brittle, Smooth Crop Material 80
3.5.8 Eject a Bale 80
3.5.9 Manually Remove a Blockage (machine without Hydroflexcontrol) 81
3.5.10 Shut Down Procedure on the Field 82
3.6 Disconnect the Machine from the Tractor 84
3.6.1 Park the Machine 84
3.6.2 Remove the Pressure from the Hydraulic System 84
Table of contents
Fixed Chamber Baler
1747.FT.EN02
3.6.3 Disconnect the Machine 84
3.6.4 Support Foot 85
3.6.5 Install the Support Foot 86
3.6.6 Remove the Support Foot 86
3.6.7 To Move the Machine without Brakes 86
3.6.8 Take the Machine out of Operation 87
4 Maintenence and Lubrication 89
4.1 Preventive Maintenance Schedule 91
4.2 Lubrication Chart 93
4.3 Clean the Machine 96
4.4 Grind the Cutting Unit Knives 97
4.4.1 Remove the Knives 97
4.4.2 Grind the Knives 98
4.4.3 Install the Knives 98
4.5 Replace the Knives with Blind Knives 99
4.5.1 Remove the Knives 99
4.5.2 Install the Blind Knives 100
4.6 Lubricate the Tailgate Rollers 101
4.6.1 Lubricate the Rollers 101
4.7 Adjust the Disk Brake of the Net Tying Unit 102
4.8 Adjust the Shock Absorbers 103
4.9 Chain Lubrication System Maintenance 104
4.9.1 Check the Level in the Oil Container of the Chain Lubrication 104
4.9.2 Fill the Oil Container 104
4.9.3 Bleed Air from the Lubrication Pump 105
4.10 Tighten the Chains of the Pick-Up, Bale Chamber and Feed Rotor 107
4.11 Examine the Hydraulic Hoses for Damage and Leaks 109
4.12 Adjusting the Deflectors 110
5 Troubleshooting 111
5.1 Remove a Blockage (machine with Hydroflexcontrol) 113
5.2 Replace a Transport Wheel 114
6 Specifications 115
6.1 Specifications 117
6.1.1 Dimensions 118
6.2 Lift the Machine 119
6.2.1 Attach the Machine to a Truck 119
6.3 Disposal 121
7 Index 123
Table of contents
Fixed Chamber
IMAGES PREVIEW OF THE MANUAL:

VIDEO PREVIEW OF THE MANUAL:

PLEASE NOTE:
- This is the SAME exact manual used by your dealers to fix your vehicle.
- The same can be yours in the next 2-3 mins as you will be directed to the download page immediately after paying for the manual.
- Any queries / doubts regarding your purchase, please feel free to contact [email protected]
S.M


