

CLAAS C1200 F1200 Operator’s Manual – PDF DOWNLOAD
DESCRIPTION:
CLAAS C1200 F1200 Operator’s Manual – PDF DOWNLOAD
Introduction
1.1 General Information
1.1.1 How to use this manual
- This operator’s manual is the original operator’s manual. In the following texts, it will be referred to simply as the operator’s manual. This operator’s manual is intended for all users and provides information on the use, operation, adjustment, maintenance, cleaning and transportation of the machine.
- Provided all instructions regarding proper maintenance and operation of your machine are followed, you can count on many years of reliable service. Failure to perform maintenance or incorrect operation lead to an increased safety risk, premature wear, a reduction in performance, loss of earnings and time. Have the post harvest check / annual check
- performed regularly by your CLAAS dealer. A combination of the prescribed maintenance work with the post harvest check is recommended. If you use the latest expertise and experience that went into this machine, it will render you consistently excellent service. There is a separate operator’s manual for front attachments and hitched devices.
Safety precautions
3.1 General Information
3.1.1 Important information
- The instructions contained in this operator’s manual should be carefully read and observed by all persons involved with the operation, maintenance and inspection of this front attachment in order to prevent accidents. Pay particular attention to the sections “Safety Rules”, “Prior to initial operation“ and “Prior to operation” in the operator’s manual of the machine.
- The use of spare parts, accessories and auxiliary equipment that are not original CLAAS products and have not specifically been tested and approved by CLAAS, can change the specified design characteristics of the CLAAS combine or detract from its functional performance, with a possible adverse effect on the active and/or passive operational safety and on its
- occupational safety standards (accident prevention). CLAAS is in no way liable for any damage or personal injury caused as a result of the use of other than original or approved CLAAS parts, accessories and auxiliary equipment
TABLE OF CONTENTS:
CLAAS C1200 F1200 Operator’s Manual – PDF DOWNLOAD
1 Introduction
11 General Information 10
111 How to use this manual 10
112 Validity of instructions 12
113 Specifications 12
12 Identification plates and identification numbers 13
121 Spare parts and technical questions 13
122 Identification plate 13
2 Overview
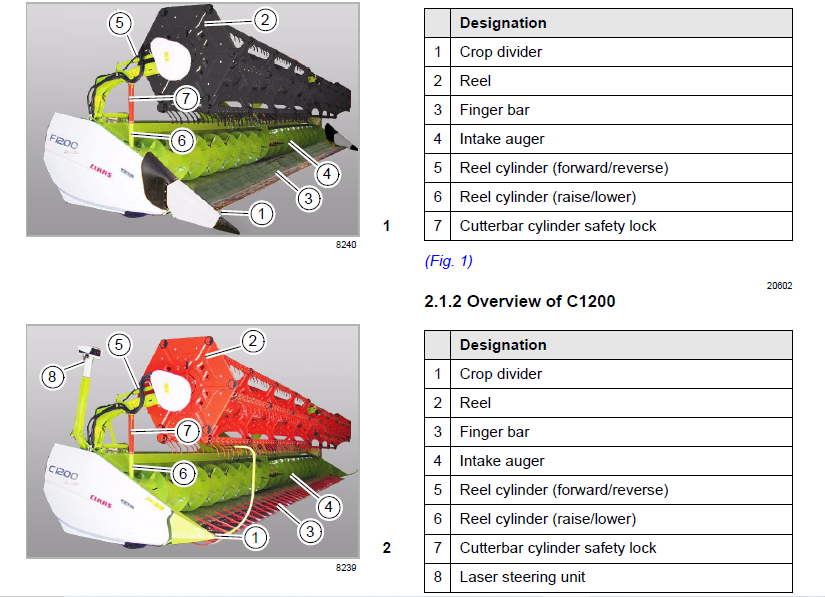
21 Overview of front attachment 14
211 Overview of F1200 14
212 Overview of C1200 14
3 Safety precautions
31 General Information 15
311 Important information 15
312 General safety and accident prevention regulations 15
313 Intended use 16
314 Reasonable foreseeable misuse 17
315 Precautionary measures 18
32 General safety measures 20
321 Applying the feeder housing safety lock 20
322 Disengaging feed rake conveyor safety lock 21
323 Engaging the reel safety lock 21
324 Disengaging reel safety lock 23
325 Attaching finger bar safety bar 24
326 Compressed air and water 25
327 Danger of injury due to escaping hydraulic liquid 25
328 Burn prevention 26
329 Oils 26
3210 Fire prevention and explosion prevention 26
3211 Lines, Tubes and Hoses 27
3212 Before every start-up 27
3213 Putting the machine into operation 28
3214 Road travel 28
3215 Parking 29
3216 First aid measures 29
3217 Decommissioning and disposal 30
33 Safety rules 31
331 Identification of warning and danger signs 31
34 Safety decals 32
341 General information on safety decals 32
342 Machine body 33
343 Reel 34
344 Drives 36
6
78805
4 Specifications
41 F1200 – TYPE 442 37
411 Dimensions 37
412 Weights 37
413 Finger bar 37
414 Feeder unit 37
415 Reel 38
416 Safety features 38
42 C1200 – TYPE 442 39
421 Dimensions 39
422 Weights 39
423 Finger bar 39
424 Feeder unit 39
425 Reel 40
426 Safety features 40
5 Before initial operation
51 General warnings 41
52 General Information 42
521 Initial operation check list 42
53 Reel 43
531 Remove the transport safety equipment for the reel 43
6 Prior to each operation
61 General warnings 44
62 General Information 45
621 Checklist for putting the machine into operation 45
7 Mounting/removing front attachment
71 General warnings 47
72 General assembly and settings 48
721 Mounting the front attachment 48
722 Dismounting the front attachment 48
723 Adjusting the cutting angle of the HP feed rake conveyor (option)
to its basic adjustment 48
73 Drives 51
731 Installing universal drive shaft 51
732 Removing universal drive shaft 52
74 Hydraulic system 53
741 Mounting the multi-coupler 53
742 Dismounting the multi-coupler 53
75 Machine body 55
751 Suspending front attachment 55
752 Interlocking the front attachment 55
753 Unlocking the front attachment 55
754 Unhitching front attachment 56
8 Fieldwork settings
81 General warnings 57
82 General adjustment for working 58
7
78805
821 Adjusting the front attachment for harvesting soybeans (optional equipment) 58
822 Adjusting the front attachment for grain harvest (optional equipment) 58
83 Electrical system 59
831 Changing cutting height sensor over to grain harvesting (optional equipment) 59
832 Changing cutting height sensor over to soybean harvesting (optional equipment) 60
84 Finger bar 62
841 Changing finger bar over to grain harvesting (optional equipment) 62
842 Changing finger bar over to soybean harvesting (optional equipment) 62
843 Changing knives over to soybean harvesting (optional equipment) 63
844 Changing knives over to grain harvesting (optional equipment) 63
845 Installing the crop lifters (optional equipment) 64
846 Removing the crop lifters (optional equipment) 64
847 Adjusting skids (optional equipment) 65
9 Fieldwork
91 General warnings 67
92 General operation 68
921 Before working in the field 68
922 Checking the crop intake 68
923 Basic setting for soybean harvesting (optional equipment) 68
924 Basic setting for grain harvesting (optional equipment) 69
925 Adjusting the cutting height for harvesting soybeans (optional equipment) 69
926 Adjusting the cutting angle of the HP feed rake conveyor (optional equipment) 69
93 Feeder unit 72
931 Adjusting the stripper profile 72
932 Adjusting the position of the intake auger 73
933 Adjusting the intake auger fingers 74
934 Auger baffle plate extension 75
935 Removing the auger baffle plate extension 75
936 Installing the baffle plate extension 76
937 Adjusting the intake auger speed 76
94 Finger bar 79
941 Moving the table height from the machine (optional equipment) 79
942 Moving the table height from the front attachment (optional equipment) 80
943 Adjusting the knife drive speed (auxiliary equipment) 81
95 Accessory equipment 83
951 Installing the stripper profiles (auxiliary equipment) 83
96 Reel 84
961 Adjusting the reel tines 84
97 Crop divider 85
971 Adjusting the soybean crop divider (optional equipment) 85
10 Faults and remedies
101 General warnings 86
102 General problems and remedies 87
1021 Crop is not picked up 87
1022 Cutterbar is not level 87
1023 Flow of material from the cutterbar is uneven 87
1024 Poor crop feeding or wrapping 87
8
78805
1025 Auger stops 87
1026 Cutting height 88
1027 Knife problems 88
1028 Knife is stopping 88
1029 Material is wrapping around the reel 88
10210Reel fingers are touching the finger bar 88
10211Reel is not level 89
10212Reel stops 89
10213Reel does not rotate 89
10214Foreign material on the tip of the crop divider 89
103 Hydraulic system 90
1031 Bleeding reel cylinders 90
104 Finger bar 91
1041 Aligning the double fingers 91
1042 Adjusting skid spring pressure (optional equipment) 92
1043 Adjusting the control arm spring pressure (optional equipment) 92
105 Reel 94
1051 Adjusting the reel height 94
1052 Adjusting the reel speed sensor 94
11 Maintenance
111 General warnings 96
112 General maintenance notes 97
1121 Fixing material 97
1122 Maintenance operations after the harvest 97
1123 Tightening torques for metric standard threads 98
1124 Tightening torques for metric fine threads 99
1125 Tightening torques for hydraulic screw fittings with ferrule
according to DIN 3861 100
1126 Tightening torques for hydraulic screw fittings and air conditioner fittings
with a sealing cone and O-ring DIN 3865 100
1127 Tightening torques for bolt fittings in plastic parts 100
113 Maintenance schedule 101
1131 Service intervals 101
114 Lubricants chart 102
1141 Lubricants 102
115 Drives 103
1151 Removing the knife drive belt 103
1152 Installing the knife drive belt 103
1153 Adjusting the knife drive belt 103
1154 Tensioning intake auger drive chain 104
1155 Tensioning reel drive chain 104
1156 Checking chain tension 105
116 Finger bar 106
1161 Changing the knives 106
1162 Adjusting knife clips 109
1163 Cleaning the Covers 110
117 Reel 111
1171 Adjusting the horizontal reel positioning slider 111
9
78805
12 Lubrication chart
121 General warnings 112
122 Lubrication points 113
1221 Lubrication intervals 113
1222 Lubrication points – 100 h on the left 114
1223 Lubrication points – 100 h central 115
1224 Lubrication points – 100 h on the right 116
1225 Lubrication points – 250 h on the left 118
IMAGES PREVIEW OF THE MANUAL:

VIDEO PREVIEW OF THE MANUAL:

PLEASE NOTE:
- This is the SAME exact manual used by your dealers to fix your vehicle.
- The same can be yours in the next 2-3 mins as you will be directed to the download page immediately after paying for the manual
- Any queries / doubts regarding your purchase, please feel free to contact [email protected]
S.M


