

Bobcat E17z Compact Excavator Operation & Maintenance Manual SN B4ZM11001 & Above – PDF DOWNLOAD
FILE DETAILS:
Bobcat E17z Compact Excavator Operation & Maintenance Manual SN B4ZM11001 & Above – PDF DOWNLOAD
Language : English
Pages : 158
Downloadable : Yes
File Type : PDF
Size: 81.3 MB
DESCRIPTION:
Bobcat E17z Compact Excavator Operation & Maintenance Manual SN B4ZM11001 & Above – PDF DOWNLOAD
S/N: B4ZM11001 & Above
FOREWORD
This Operation & Maintenance Manual was written to give the owner / operator instructions on the safe operation
and maintenance of the Bobcat excavator. READ AND UNDERSTAND THIS OPERATION & MAINTENANCE
MANUAL BEFORE OPERATING YOUR BOBCAT EXCAVATOR. If you have any questions, see your Bobcat
dealer. This manual may illustrate options and accessories not installed on your excavator
SAFETY INSTRUCTIONS
Before Operation
- Carefully follow the operating and maintenance instructions in this manual. The Bobcat excavator is highly manoeuvrable and compact. It is rugged and useful under a wide variety of conditions. This presents an operator with hazards associated with off motorway, rough terrain applications, common with Bobcat excavator usage. The Bobcat excavator has an internal combustion engine with resultant heat and exhaust.
- All exhaust gases can kill or cause illness so use the excavator with adequate ventilation. The dealer explains the capabilities and restrictions of the Bobcat excavator and attachment for each application. The dealer demonstrates the safe operation according to Bobcat instructional materials, which are also available to operators. The dealer can also identify unsafe modifications or use of unapproved attachments.
- The attachments and buckets are designed for a Rated Lift Capacity. They are designed for secure fastening to the Bobcat excavator. The user must check with the dealer, or Bobcat literature, to determine safe loads of materials of specified densities for the machine – attachment combination.
The following publications and training materials provide information on the safe use and maintenance of the Bobcat machine and attachments:
The dealer and owner / operator review the recommended uses of the product when delivered. If the owner / operator will be using the machine for a different application(s) he or she must ask the dealer for recommendations on the new use
TABLE OF CONTENTS:
Bobcat E17z Compact Excavator Operation & Maintenance Manual SN B4ZM11001 & Above – PDF DOWNLOAD
OPERATOR SAFETY WARNINGS 2
CONTENTS 5
FOREWORD 11
INTRODUCTION 11
Doosan Bobcat China Co , Ltd Is ISO 9001 Certified 11
MANUFACTURING LOCATIONS 11
China 11
REGULAR MAINTENANCE ITEMS 12
SERIAL NUMBER LOCATIONS 12
Machine Serial Number Location 12
Engine Serial Number Location 12
DELIVERY REPORT 13
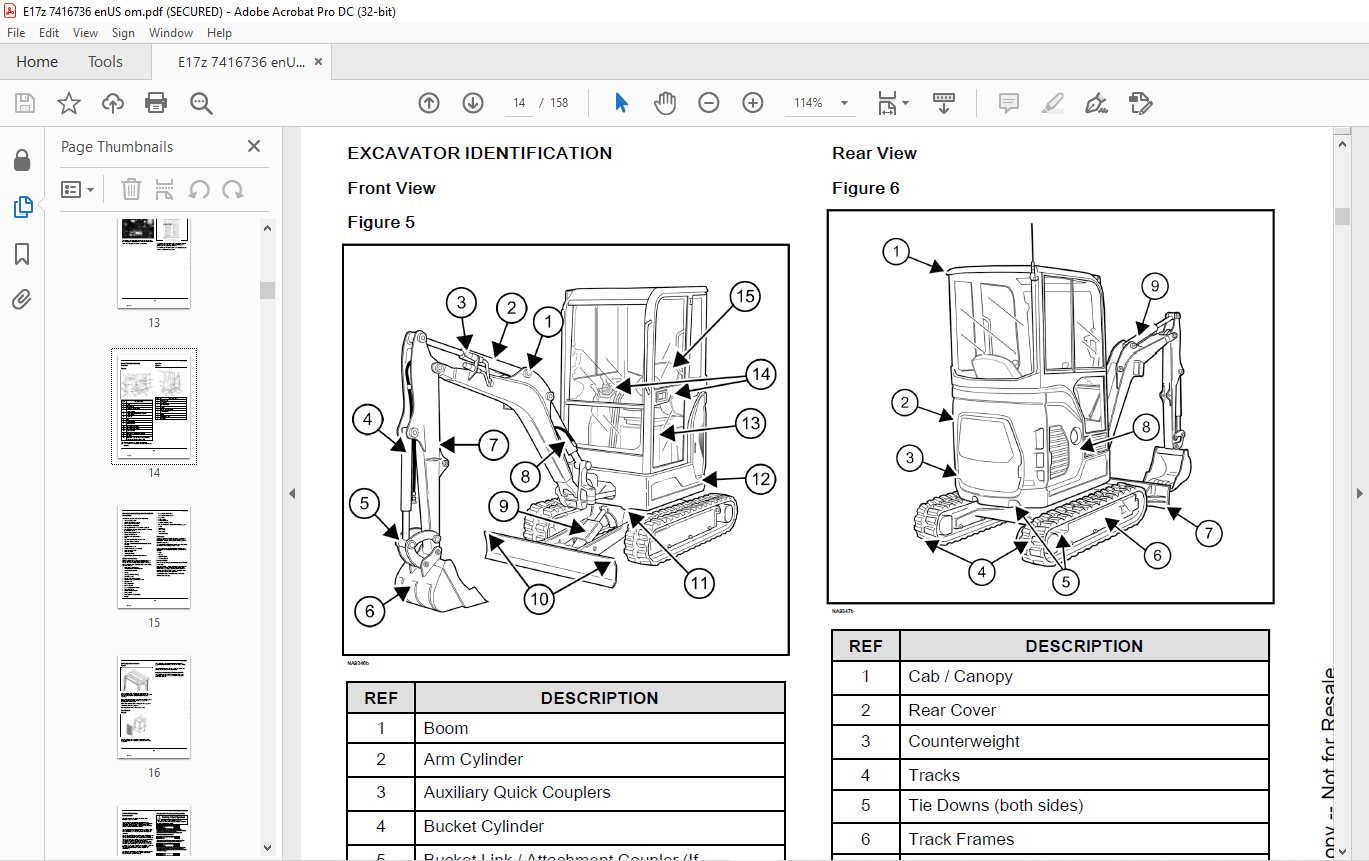
EXCAVATOR IDENTIFICATION 14
Front View 14
Rear View 14
FEATURES, ACCESSORIES, AND ATTACHMENTS 15
Standard Items 15
Options And Accessories 15
Attachments 15
Buckets Available 15
Falling-Object Guard Structure 16
Front Guard Kit 16
Inspecting And Maintaining The Front Guard Kit 16
SAFETY AND TRAINING RESOURCES 17
SAFETY INSTRUCTIONS 17
Before Operation 17
Safe Operation Is The Operator’s Responsibility 17
Safe Operation Needs A Qualified Operator 17
A Qualified Operator Must Do The Following 17
Silica Dust Exposure 18
FIRE PREVENTION 18
Maintenance 18
Operation 18
Electrical 18
Hydraulic System 18
Fueling 19
Starting 19
Spark Arrester Exhaust System 19
Welding And Grinding 19
Fire Extinguishers 19
PUBLICATIONS AND TRAINING RESOURCES 20
PICTORIAL ONLY SAFETY SIGNS 20
MACHINE SIGNS (DECALS) 21
OPERATING INSTRUCTIONS 30
INTENDED USE 30
INSTRUMENTS AND CONSOLES 31
Left Console 31
Right Console 32
Standard Instrument Panel 33
Display Screen Of Standard Instrument Panel 34
RADIO 35
Radio Identification 35
Operating Radio Timer 35
Adjusting Radio Settings 36
Operating The Radio Clock 36
RAISING AND LOWERING THE CONSOLE 37
TWO-SPEED TRAVEL 37
Engaging Two-Speed Travel 37
Auto Shift Drive Motors 37
OPERATOR CANOPY (ROPS / TOPS / FOPS) 38
OPERATOR CAB (ROPS / TOPS) 39
Operating The Cab Door 39
Operating The Front Window 40
Operating The Right Window 41
Operating The Cab Interior Light 41
Operating Windshield Wiper 41
Window Washer Reservoir 42
Heating And Ventilation Ducting 42
EMERGENCY EXITS 43
Emergency Exit Locations 43
Making An Emergency Exit Through The Front Window 43
Making An Emergency Exit Through The Rear Window 43
MOTION ALARM 44
Motion Alarm System Description 44
TRAVEL CONTROLS 44
Forward And Reverse Travel 44
Making A Right Turn 45
Making A Counter-Rotation Right Turn 45
Making A Left Turn 45
Making A Counter-Rotation Left Turn 46
HYDRAULIC CONTROLS 46
Hydraulic Controls Description 46
Control Pattern Options 46
ISO Control Pattern 47
Standard Control Pattern 47
ISO / STD Selector Valve 48
QUICK COUPLERS 48
Connecting Quick Couplers 49
PRIMARY AUXILIARY HYDRAULICS 49
Operating Attachments With Primary Auxiliary Hydraulics 49
Setting Auxiliary Hydraulics Flow Rate 50
Releasing Hydraulic Pressure In Excavator With Joystick 51
Releasing Hydraulic Pressure In Excavator With Pedal 51
Releasing Hydraulic Pressure In Attachments 51
ENGINE SPEED CONTROL 52
Setting Engine Speed (RPM) 52
BLADE CONTROL LEVER 53
Raising And Lowering The Blade 53
TRACK FRAME EXPANSION 53
Tips For Expanding And Retracting The Track Frame 53
Expanding And Retracting The Track Frame 53
Expanding The Blade 55
OVERLOAD WARNING DEVICE 55
Operating The Overload Warning Device 55
BOOM SWING 56
Enabling Boom Swing 56
DAILY INSPECTION 57
Daily Inspection And Maintenance List 57
PRE-STARTING PROCEDURE 59
Entering The Excavator 59
Operation & Maintenance Manual And Operator’s Handbook Locations 59
Seat Adjustment 60
Adjusting The Basic Seat 60
Adjusting The Standard Seat 60
Adjusting Mirrors 60
Fastening The Seat Belt 61
STARTING THE ENGINE 61
Starting Engine With Key Switch 61
Starting Engine With Start Switch 62
Lowering The Control Console 63
Warming The Hydraulic System 63
Cold Temperature Starting Tips 64
MONITORING THE DISPLAY 64
Monitoring The Display During Operation 64
Warning And Shutdown Conditions 64
OPERATING PROCEDURE 65
Inspect The Work Area 65
Basic Operating Instructions 65
Operating Near An Edge Or Water 65
Lowering The Work Group If The Engine Stops 65
Driving The Excavator 66
Operating On Slopes 66
Operating In Water 68
Protecting The Track From Damage 69
STOPPING THE ENGINE AND LEAVING THE MACHINE 70
Stopping The Engine And Leaving The Machine 70
INSTALLING ATTACHMENTS (PIN-ON ATTACHMENT) 71
REMOVING ATTACHMENTS (PIN-ON ATTACHMENT) 72
INSTALLING ATTACHMENTS (PIN-ON X-CHANGE) 73
REMOVING ATTACHMENTS (PIN-ON X-CHANGE) 75
INSTALLING ATTACHMENTS (QUICK COUPLER, KLAC SYSTEM) 76
INSPECTING AND ADJUSTING THE QUICK COUPLER LATCH 78
REMOVING ATTACHMENTS (QUICK COUPLER, KLAC SYSTEM) 79
INSTALLING ATTACHMENTS (GERMAN STYLE COUPLER) 80
REMOVING ATTACHMENTS (GERMAN STYLE COUPLER) 83
INSTALLING ATTACHMENTS (COMMON INDUSTRY INTERFACE) 84
REMOVING ATTACHMENTS (COMMON INDUSTRY INTERFACE) 85
HYDRAULIC CLAMP 86
Hydraulic Clamp Operation 86
Using Left Pedal To Activate Clamp 86
Using Right Joystick To Activate Clamp 86
HANDLING OBJECTS 87
Handling Objects With The Lifting Device 87
LIFT CAPACITY 88
Lift Capacity Description 88
Calculating Lift Capacity 88
Attachment Mounting System And Clamp Weights 89
BOOM LOAD HOLDING VALVE 90
Location Of Boom Load Holding Valve 90
Lowering Boom With Load Holding Valve 90
For Base End Hose Failure, Or For Rod End Hose Failure And No Accumulator Pressure, Or For Loss Of Hydraulic Pressure 90
For Rod End Hose Failure With Accumulator Pressure 91
ARM LOAD HOLDING VALVE 91
Location Of Arm Load Holding Valve 91
Lowering Arm With Load Holding Valve 92
For Base End Hose Failure, Or For Rod End Hose Failure And No Accumulator Pressure, Or For Loss Of Hydraulic Pressure 92
For Rod End Hose Failure With Accumulator Pressure 92
TOWING THE MACHINE 93
Towing The Machine 93
LIFTING THE MACHINE 93
Lifting The Machine 93
TRANSPORTING THE MACHINE 94
Fastening The Machine To A Trailer 95
MAINTENANCE SAFETY WARNINGS 96
MAINTENANCE SAFETY WARNINGS 97
PREVENTIVE MAINTENANCE 98
SERVICE SCHEDULE 98
Maintenance Intervals 98
Every 10 Hours (Before Starting The Machine) 98
First 50 Hours 99
Every 50 Hours 99
First 100 Hours 99
Every 100 Hours 99
Every 250 Hours Or Every 12 Months 99
Every 500 Hours Or Every 12 Months 99
Every 1000 Hours Or Every 12 Months 100
Every 24 Months 100
CONTROL CONSOLE LOCKOUTS 100
Inspecting And Maintaining The Control Console Lockouts 100
SEAT BELT 100
Inspecting And Maintaining The Seat Belt 100
MOTION ALARM SYSTEM 101
Motion Alarm System Description 101
Inspecting The Motion Alarm System 101
Maintaining The Motion Alarm Switch 102
TAILGATE 103
Opening And Closing The Tailgate 103
RIGHT SIDE COVER 104
Opening And Closing The Right Side Cover 104
CAB FILTERS 105
Cleaning And Maintaining The Fresh Air Filter 105
ENGINE AIR CLEANER 106
Checking The Condition Indicator Daily 106
Replacing The Outer Filter Of The Air Cleaner 106
Replacing The Inner Filter Of The Air Cleaner 107
FUEL SYSTEM 108
Fuel Specifications 108
China Standard (GB 252-2015) 108
Biodiesel Blend Fuel 108
Filling The Fuel Tank 108
Removing Water From The Fuel Filter 109
Replacing The Fuel Pre-Filter And Filter 109
Draining The Fuel Tank 109
First Option For Draining The Fuel Tank 110
Second Option For Draining The Fuel Tank 110
Removing Air From The Fuel System 110
ENGINE LUBRICATION SYSTEM 111
Checking And Adding Engine Oil 111
Engine Oil Chart 111
Replacing Engine Oil And Filter 112
ENGINE COOLING SYSTEM 113
Cleaning The Engine Cooling System 113
Checking Coolant Level 113
Replacing Coolant 113
ELECTRICAL SYSTEM 115
Electrical System Description 115
Fuse And Relay Identification 115
Battery Disconnect Switch 116
Battery Maintenance 117
Maintaining Battery Charge Level 117
Battery Maintainers 117
Battery Service During Machine Storage 117
Testing The Battery 118
Battery Charging 118
Using A Booster Battery (Jump Starting) 118
Removing And Installing The Battery 120
HYDRAULIC SYSTEM 121
Checking And Adding Hydraulic Fluid 121
Hydraulic Fluid Chart 122
Replacing The Hydraulic Filter 122
Replacing Hydraulic Fluid 123
SPARK ARRESTER MUFFLER 124
Cleaning The Spark Arrester Muffler 124
TRACK TENSION 125
Adjusting Track Tension 125
TRAVEL MOTOR 127
Checking And Adding Travel Motor Fluid 127
Replacing Travel Motor Fluid 127
BELTS 128
Adjusting Alternator And Fan Belt 128
Replacing Alternator And Fan Belt 128
QUICK COUPLER 129
Inspecting And Maintaining The Bucket Link And Coupler 129
MACHINE LUBRICATION 130
Grease Fitting Locations 130
Lubricate Every 8 – 10 Hours (Boom, Arm, And Bucket) 130
Lubricate Every 50 Hours 131
PIVOT PINS 131
Pivot Pin Inspection And Maintenance 131
STORAGE AND RETURN TO SERVICE 131
Extended Storage Procedure 131
Returning Machine To Service 132
SYSTEM SETUP AND ANALYSIS 133
DIAGNOSTIC SERVICE CODES 133
Viewing Service Codes 133
Service Codes List 133
PASSWORD SETUP (KEYLESS START PANEL) 137
Password Description 137
Changing The Owner, User 1, And User 2 Passwords 137
Disabling Password Lockout 138
Enabling Password Lockout 138
MAINTENANCE CLOCK 139
Maintenance Clock Description 139
Maintenance Notification On Standard Instrument Panel 139
Maintenance Clock Setup 139
Resetting The Maintenance Clock 139
SPECIFICATIONS 140
MACHINE DIMENSIONS 140
RATED LIFT CAPACITY – STANDARD ARM AND CAB (NO DEMOLITION KIT) 144
RATED LIFT CAPACITY – STANDARD ARM AND CAB (WITH DEMOLITION KIT) 145
RATED LIFT CAPACITY – STANDARD ARM AND CANOPY (NO DEMOLITION KIT) 146
RATED LIFT CAPACITY – STANDARD ARM AND CANOPY (WITH DEMOLITION KIT) 147
EXCAVATOR SPECIFICATIONS 148
Performance Specifications 148
Controls Specifications 148
Engine Specifications 148
Hydraulic System Specifications 149
Hydraulic Cylinders 150
Hydraulic Cycle Times 150
Electrical System Specifications 150
Drive System Specifications 150
Slew System Specifications 151
Undercarriage Specifications 151
Capacities Specifications 151
Track Specifications 151
Ground Pressure Specifications 151
Temperature Range 151
WARRANTY 152
WARRANTY 152
ALPHABETICAL INDEX 153
IMAGES PREVIEW OF THE MANUAL:

VIDEO PREVIEW OF THE MANUAL:
PLEASE NOTE:
- This is the SAME MANUAL used by the dealerships to diagnose your vehicle
- No waiting for couriers / posts as this is a PDF manual and you can download it within 2 minutes time once you make the payment.
- Your payment is all safe and the delivery of the manual is INSTANT – You will be taken to the DOWNLOAD PAGE.
- So have no hesitations whatsoever and write to us about any queries you may have : heydownloadss @gmail.com
S.M


