Aspire 8920 Series Laptop Service Guide Manual – PDF DOWNLOAD
Preface
Before using this information and the product it supports, please read the following general information.
1. This Service Guide provides you with all technical information relating to the BASIC CONFIGURATION
decided for Acer’s global product offering. To better fit local market requirements and enhance product
competitiveness, your regional office MAY have decided to extend the functionality of a machine (e.g.
add-on card, modem, or extra memory capability). These LOCALIZED FEATURES will NOT be covered
in this generic service guide. In such cases, please contact your regional offices or the responsible
personnel/channel to provide you with further technical details.
2. Please note WHEN ORDERING FRU PARTS, that you should check the most up-to-date information
available on your regional web or channel. If, for whatever reason, a part number change is made, it will
not be noted in the printed Service Guide. For ACER-AUTHORIZED SERVICE PROVIDERS, your Acer
office may have a DIFFERENT part number code to those given in the FRU list of this printed Service
Guide. You MUST use the list provided by your regional Acer office to order FRU parts for repair and
service of customer machines
Aspire 8920 Series Laptop Service Guide Manual – PDF DOWNLOAD
Features………………………………………………………………………………………………………………………………………………………………………………………….. 7
System Block Diagram……………………………………………………………………………………………………………………………………………………………………………….. 9
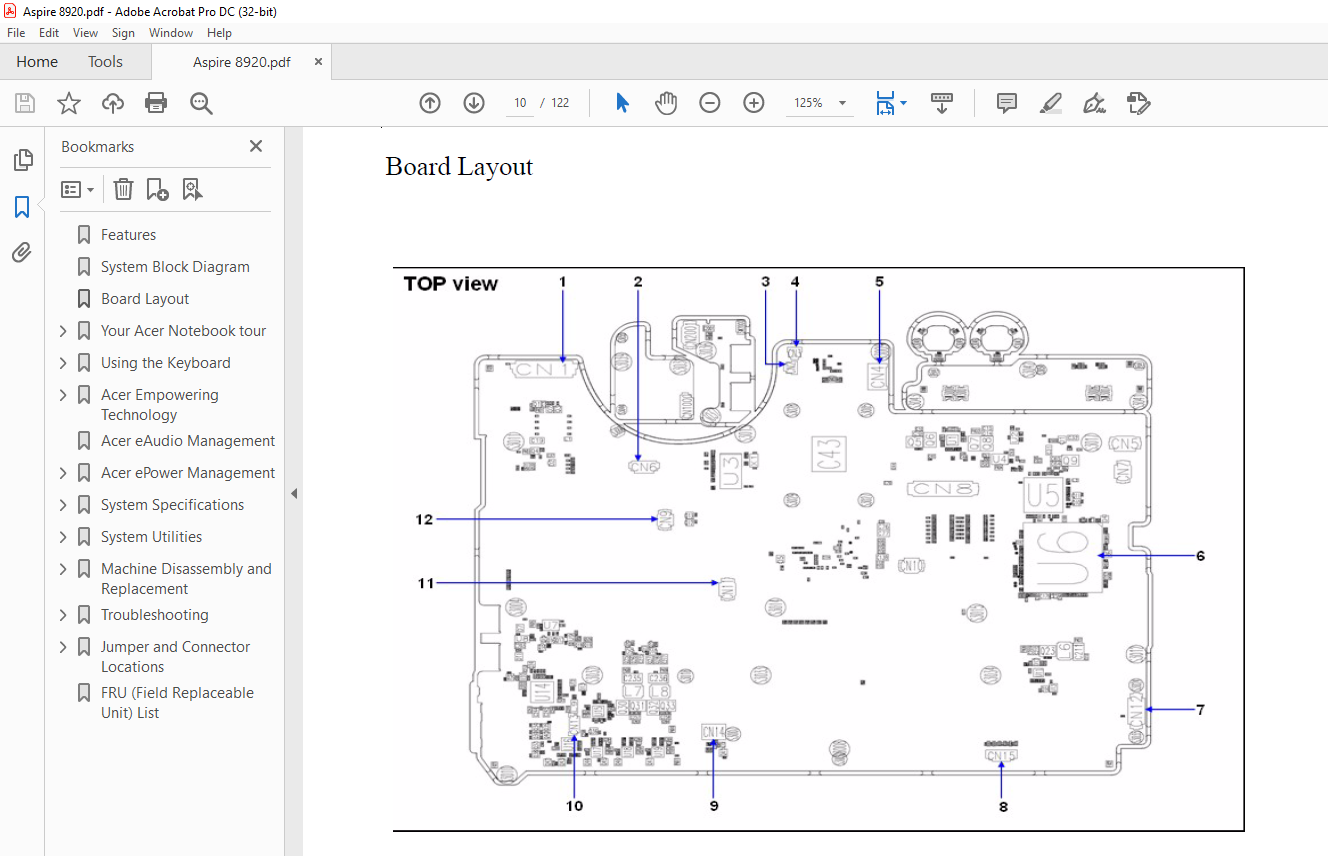
Board Layout……………………………………………………………………………………………………………………………………………………………………………………….10
Your Acer Notebook tour……………………………………………………………………………………………………………………………………………………………………………..12
Front View……………………………………………………………………………………………………………………………………………………………………………………..12
Closed Front View……………………………………………………………………………………………………………………………………………………………………………….13
Left View………………………………………………………………………………………………………………………………………………………………………………………14
Right View……………………………………………………………………………………………………………………………………………………………………………………..14
Rear view………………………………………………………………………………………………………………………………………………………………………………………15
Base view………………………………………………………………………………………………………………………………………………………………………………………16
Indicators……………………………………………………………………………………………………………………………………………………………………………………..16
Easy-Launch Buttons……………………………………………………………………………………………………………………………………………………………………………..17
Touchpad Basics…………………………………………………………………………………………………………………………………………………………………………………18
Using the Keyboard………………………………………………………………………………………………………………………………………………………………………………….20
Lock Keys and embedded numeric keypad……………………………………………………………………………………………………………………………………………………………..20
Windows Keys……………………………………………………………………………………………………………………………………………………………………………………21
Hot Keys……………………………………………………………………………………………………………………………………………………………………………………….21
Special Key…………………………………………………………………………………………………………………………………………………………………………………….22
Acer Empowering Technology…………………………………………………………………………………………………………………………………………………………………………..24
To launch Acer Empowering Technology:……………………………………………………………………………………………………………………………………………………………..24
You may also launch Acer Empowering Technology by running the program from the Acer Empowering Technology program group in the Start menu, or by double-clicking the icon if you have created adesktop shortcut…..24
To launch Acer Empowering Technology applications:………………………………………………………………………………………………………………………………………………….24
Acer eAudio Management………………………………………………………………………………………………………………………………………………………………………………25
Acer ePower Management………………………………………………………………………………………………………………………………………………………………………………26
Using power plan………………………………………………………………………………………………………………………………………………………………………………..26
To create a new power plan:………………………………………………………………………………………………………………………………………………………………………26
To switch between power plans:……………………………………………………………………………………………………………………………………………………………………26
To edit a power plan:……………………………………………………………………………………………………………………………………………………………………………26
To delete a power plan:………………………………………………………………………………………………………………………………………………………………………….26
Battery status………………………………………………………………………………………………………………………………………………………………………………….26
(for selected models)……………………………………………………………………………………………………………………………………………………………………………27
Acer eRecovery Management………………………………………………………………………………………………………………………………………………………………………..29
Acer eSettings Management………………………………………………………………………………………………………………………………………………………………………..30
Using the System Utilities……………………………………………………………………………………………………………………………………………………………………….32
Acer Bio-Protection (for selected models)………………………………………………………………………………………………………………………………………………………32
Launch Manager………………………………………………………………………………………………………………………………………………………………………………34
Hardware Specifications and Configurations…………………………………………………………………………………………………………………………………………………………35
System Specifications………………………………………………………………………………………………………………………………………………………………………………. 7
BIOS Setup Utility………………………………………………………………………………………………………………………………………………………………………………45
Invoking BIOS Setup………………………………………………………………………………………………………………………………………………………………………….46
Information…………………………………………………………………………………………………………………………………………………………………………………47
Main……………………………………………………………………………………………………………………………………………………………………………………….49
Advanced……………………………………………………………………………………………………………………………………………………………………………………51
Security……………………………………………………………………………………………………………………………………………………………………………………52
Boot……………………………………………………………………………………………………………………………………………………………………………………….56
Exit……………………………………………………………………………………………………………………………………………………………………………………….57
BIOS Flash Utility………………………………………………………………………………………………………………………………………………………………………………58
Remove HDD password Utility………………………………………………………………………………………………………………………………………………………………………59
1. Key in “unlock6 error code 205”…………………………………………………………………………………………………………………………………………………………….59
2. Select “2”……………………………………………………………………………………………………………………………………………………………………………….59
3. Choose one HDD password……………………………………………………………………………………………………………………………………………………………………59
System Utilities……………………………………………………………………………………………………………………………………………………………………………………45
General Information……………………………………………………………………………………………………………………………………………………………………………..62
Before You Begin…………………………………………………………………………………………………………………………………………………………………………….62
Disassembly Procedure Flowchart…………………………………………………………………………………………………………………………………………………………………..63
Removing the Battery Pack………………………………………………………………………………………………………………………………………………………………………..65
Removing the HDD/Memory Module/Wireless LAN Card/TV Tuner Card/ System Fan/Thermal Modules/CPU…………………………………………………………………………………………………………..66
Removing the HDD…………………………………………………………………………………………………………………………………………………………………………….66
Removing the Wireless Card & RAM Module………………………………………………………………………………………………………………………………………………………..66
Removing the TV Tunder Card, HDD module and System Fan…………………………………………………………………………………………………………………………………………..66
Removing the Thermal Modules and the CPU……………………………………………………………………………………………………………………………………………………….67
Removing the ODD…………………………………………………………………………………………………………………………………………………………………………….68
Removing the Hinge cover……………………………………………………………………………………………………………………………………………………………………..69
Removing the BTCB screws………………………………………………………………………………………………………………………………………………………………….69
Disassembling the Main Unit………………………………………………………………………………………………………………………………………………………………………71
Disassembling the LED boards………………………………………………………………………………………………………………………………………………………………….71
Remove I/O baord and Main Board……………………………………………………………………………………………………………………………………………………………….72
Disassembly LCM module……………………………………………………………………………………………………………………………………………………………………….74
Disassembling the External Modules………………………………………………………………………………………………………………………………………………………………..76
Disassembling the HDD Module………………………………………………………………………………………………………………………………………………………………….76
Disassembling the ODD Module………………………………………………………………………………………………………………………………………………………………….76
Machine Disassembly and Replacement…………………………………………………………………………………………………………………………………………………………………..61
System Check Procedures………………………………………………………………………………………………………………………………………………………………………….78
External Diskette Drive Check…………………………………………………………………………………………………………………………………………………………………78
External CD-ROM Drive Check…………………………………………………………………………………………………………………………………………………………………..78
Keyboard or Auxiliary Input Device Check……………………………………………………………………………………………………………………………………………………….78
Memory check………………………………………………………………………………………………………………………………………………………………………………..79
Power System Check…………………………………………………………………………………………………………………………………………………………………………..79
Touchpad Check………………………………………………………………………………………………………………………………………………………………………………81
Power-On Self-Test (POST) Error Message……………………………………………………………………………………………………………………………………………………………82
Index of Error Messages………………………………………………………………………………………………………………………………………………………………………….83
Phoenix BIOS Beep Codes………………………………………………………………………………………………………………………………………………………………………….86
Index of Symptom-to-FRU Error Message……………………………………………………………………………………………………………………………………………………………..90
Intermittent Problems……………………………………………………………………………………………………………………………………………………………………………93
Undetermined Problems……………………………………………………………………………………………………………………………………………………………………………94
Troubleshooting…………………………………………………………………………………………………………………………………………………………………………………….77
Top View……………………………………………………………………………………………………………………………………………………………………………………….95
Bottom View…………………………………………………………………………………………………………………………………………………………………………………….96
Jumper and Connector Locations……………………………………………………………………………………………………………………………………………………………………….95
Aspire 8920 Exploded Diagram……………………………………………………………………………………………………………………………………………………………………..98
FRU (Field Replaceable Unit) List…………………………………………………………………………………………………………………………………………………………………….97
PLEASE NOTE:
- This is not a physical manual but a digital manual – meaning no physical copy will be couriered to you. The manual can be yours in the next 2 mins as once you make the payment, you will be directed to the download page IMMEDIATELY.
- This is the same manual used by the dealers inorder to diagnose your vehicle of its faults.
- Require some other service manual or have any queries: please WRITE to us at [email protected]