

1993 Jeep XJ Cherokee 2.5L 4-CYL – VIN [P] Service Manual – PDF DOWNLOAD
FILE DETAILS:
1993 Jeep XJ Cherokee 2.5L 4-CYL – VIN [P] Service Manual – PDF DOWNLOAD
Language : English
Pages : 1378
Downloadable : Yes
File Type : PDF
Size: 15.1
DESCRIPTION:
1993 Jeep XJ Cherokee 2.5L 4-CYL – VIN [P] Service Manual – PDF DOWNLOAD
ENGINE
Removal (Cherokee)
1) Remove battery and air cleaner. Remove hood. Drain cooling system. Remove radiator hoses, coolant recovery hose and fan shroud. Disconnect transmission fluid cooler lines (if equipped).
2) Discharge A/C system (if equipped). Discharge A/C system using approved refrigerant recovery/recycling equipment. Remove A/C condenser (if equipped) and radiator. Remove fan. To maintain pulley and water pump alignment, install a 5/16 x 1/2″ bolt through fan pulley into water pump flange.
3) Disconnect heater hoses, throttle linkage, cruise control cable (if equipped) and throttle valve rod. Disconnect wires from starter solenoid, oxygen (O2) sensor and all fuel injection harness connections.
4) Release fuel pressure. See FUEL PRESSURE RELEASE. Disconnect fuel supply and return lines at fuel rail. Disconnect TDC sensor wire connector. Remove A/C service valves and cap compressor ports (if equipped).
5) Remove vacuum check valve from power brake booster (if equipped). Disconnect power steering hoses at steering gear (if equipped). Drain power steering pump reservoir. Cap power steering hoses and fittings.
6) Tag and disconnect any remaining hoses or electrical connectors. Raise and support vehicle. Disconnect exhaust pipe from exhaust manifold. Remove starter and flywheel cover.
7) On automatic transmission equipped models, mark converter and flexplate for installation reference. Remove converter-toflexplate bolts. On all models, remove upper bellhousing bolts and loosen bottom bolts. Remove engine mount bolts.
8) Remove engine shock damper bracket. Lower vehicle. Attach lifting device to engine. Raise engine from front supports. Place support under bellhousing. Remove remaining bellhousing bolts. Remove engine.
Removal (Wrangler)
1) Pad windshield with cloth. Raise hood and rest it against
windshield frame. Drain cooling system. Remove battery. Disconnect
wiring from alternator, ignition coil, distributor, oil pressure
sender and fuel injection wire harness.
2) Disconnect fuel line quick-connect couplings at fuel rail.
Remove engine ground strap. Remove air cleaner. Disconnect vacuum
purge hose from vapor canister tee. Unplug idle speed actuator
connector. Disconnect throttle cable and remove it from bracket.
3) Disconnect throttle rod at bellcrank. Unplug oxygen (O2)
sensor connector. Disconnect coolant hoses at radiator, intake
manifold and thermostat housing. Remove fan shroud and radiator.
Remove fan and spacer. Install a 5/16 x 1/2″ bolt through fan pulley
into water pump flange to maintain pulley and water pump alignment.
4) Remove check valve from power brake booster (if equipped).
Disconnect power steering hoses at steering gear (if equipped). Drain
power steering pump reservoir. Cap power steering hoses and fittings.
5) Tag and disconnect any remaining hoses or electrical
connectors. Raise and support vehicle. Disconnect exhaust pipe from
exhaust manifold. Remove starter. Remove flywheel housing access
cover. Remove engine mount through-bolts. Remove upper bellhousing
bolts. Loosen lower bellhousing bolts.
6) Lower vehicle. Attach lifting device to engine. Raise
engine from front supports. Place support under bellhousing. Remove
remaining bellhousing bolts. Lift engine from engine compartment.
Installation (All Models)
Remove engine mount cushions from brackets to aid alignment
of engine and transmission. To complete installation, reverse removal
procedure. Adjust throttle and cruise control linkage (if equipped).
Tighten bolts to specification. See TORQUE SPECIFICATIONS table.
Refill and check fluid levels.
INTAKE MANIFOLD
Removal
1) Disconnect negative battery cable. Remove air inlet hose
at throttle body and air cleaner. Remove power steering pump with
hoses attached and wire it aside.
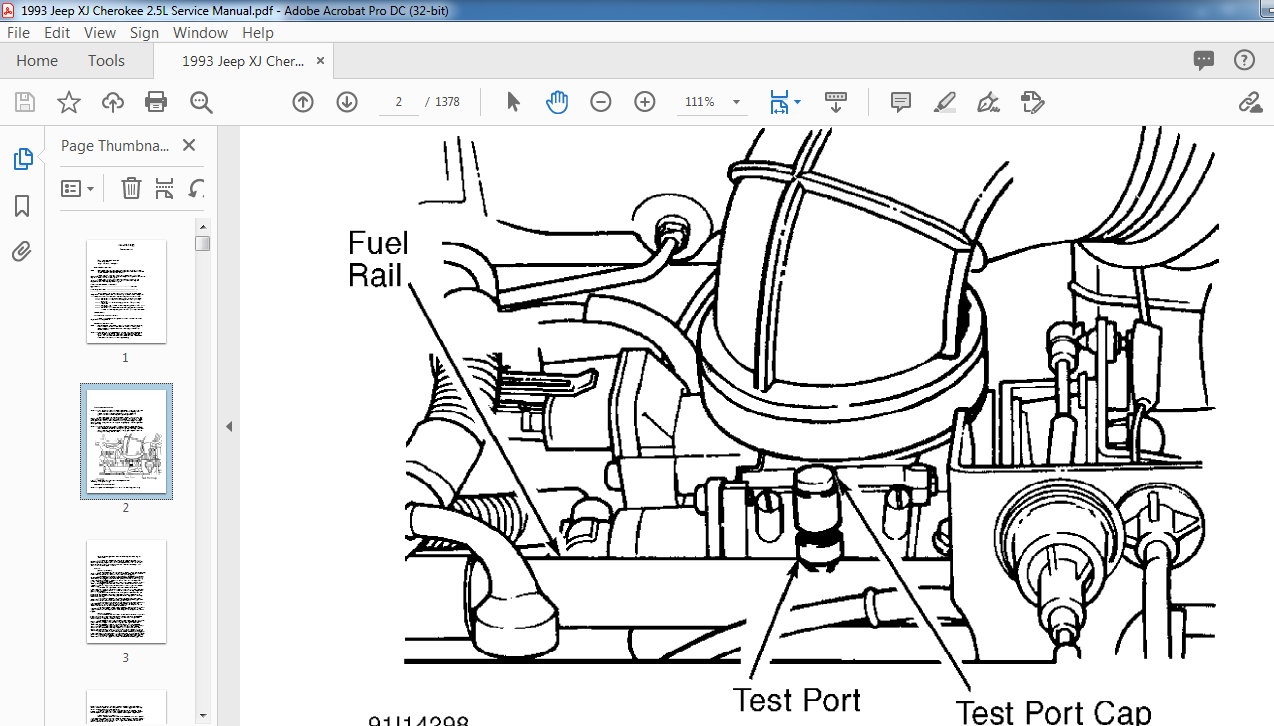
2) Release fuel pressure. See FUEL PRESSURE RELEASE. Remove
power steering pump brackets at water pump and intake manifold.
Disconnect fuel supply and return lines at fuel rail.
3) Disconnect accelerator cable. Unplug cruise control
connector at throttle body, using finger pressure only. Remove
crankcase ventilation and manifold pressure sensor hoses. Tag and
disconnect all wiring and hoses.
4) Remove bolts No. 2 through 5 securing intake manifold to
cylinder head. See Fig. 2. Slightly loosen bolt No. 1 and nuts No. 6
and 7. Remove intake manifold. Drain coolant from manifold.
VIDEO PREVIEW OF THE MANUAL:
IMAGES PREVIEW OF THE MANUAL:
PLEASE NOTE:
- This is the SAME exact manual used by your dealers to fix your vehicle.
- The same can be yours in the next 2-3 mins as you will be directed to the download page immediately after paying for the manual.
- Any queries / doubts regarding your purchase, please feel free to contact [email protected]
S.V


