

1989 GM Light Duty Truck R-V, P WIRING DIAGRAMS MANUAL – PDF DOWNLOAD
DESCRIPTION:
1989 GM Light Duty Truck R-V, P WIRING DIAGRAMS MANUAL – PDF DOWNLOAD
DESCRIPTION
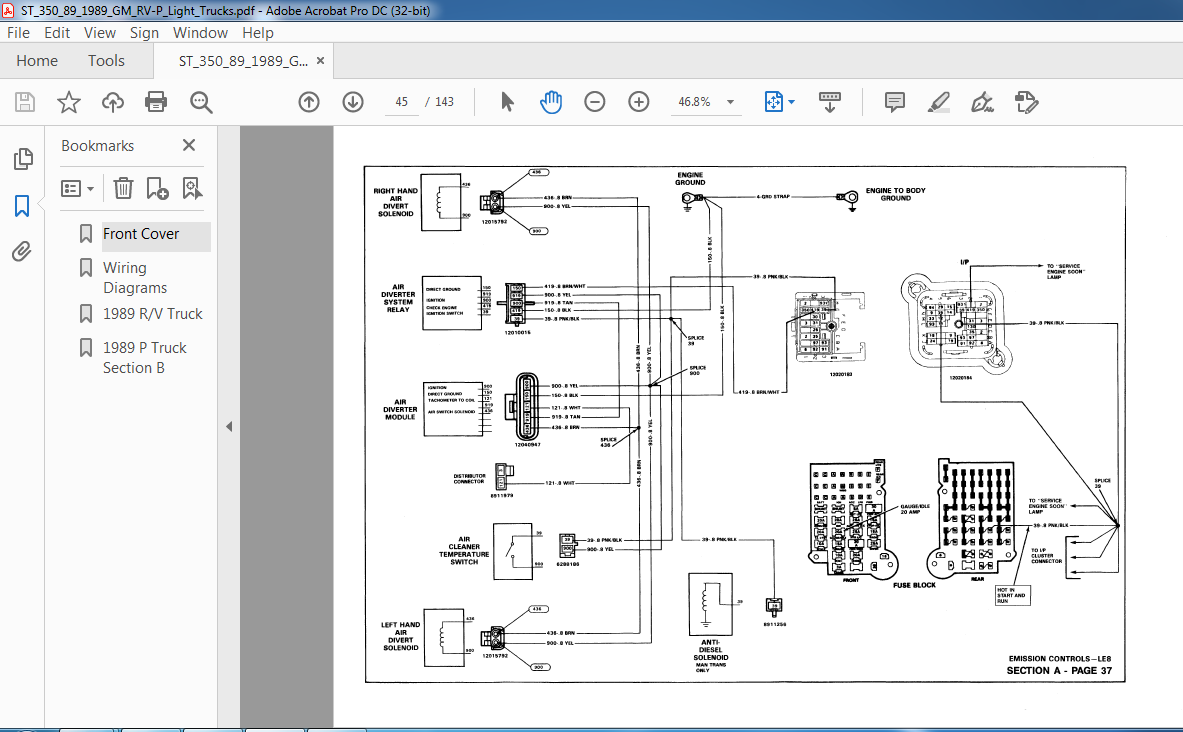
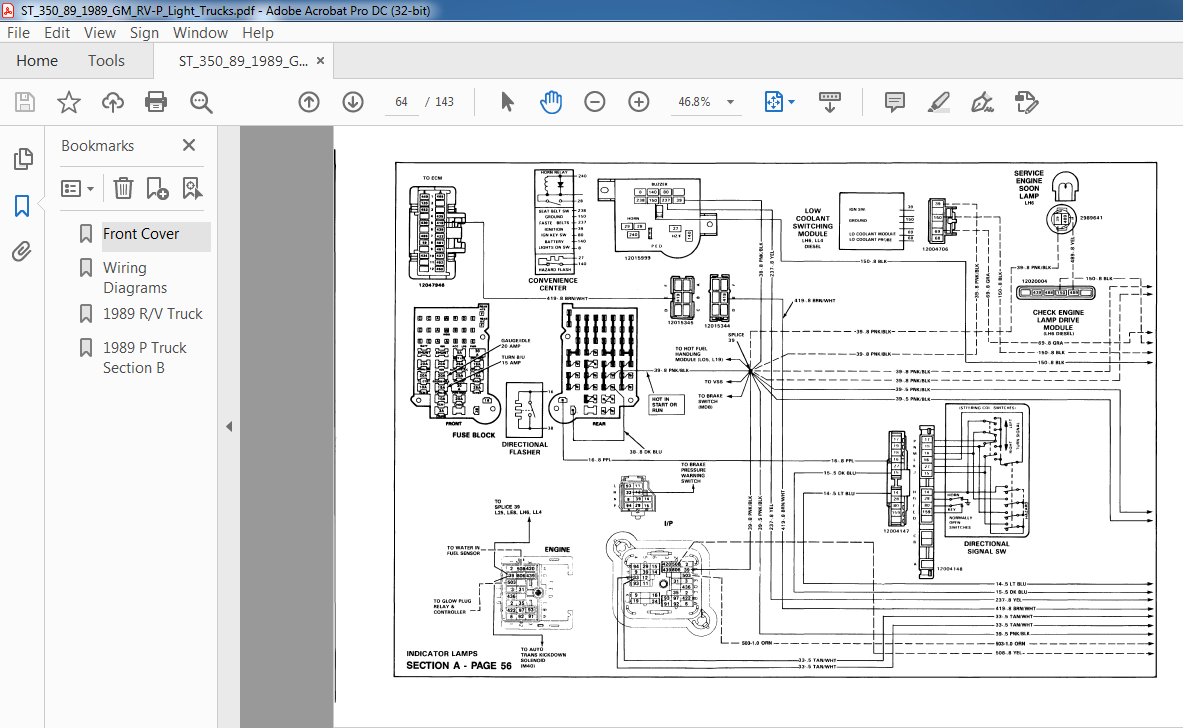
- The diagrams are to be traced from the source of electricity (the battery positive post) to ground. The ground may be a chassis ground on a certain component (such as an alternator or a starter), or a wire from a component to a chassis or frame ground (such as used on the electronic control module and instrument panei).
- All grounds are connected to the negative battery post through body and/or angina ground wires and straps. • Many times the source of the electricity is shown as the ignition switch or the fuse block. This is done to eliminate the confusion that would occur if the entire power distribution was shown in each circuit.
- For a detailed outline of the power to the ignition switch or the fuse block, refer to the power distribution circuit. • The ground portion of the circuit (usually circuit 150 or 151) may be shown entirely, or it may refer to the ground distribution circuit in order to avoid confusion of listing ail the grounds in one splice on a single page.
- • For ease of diagnosis, ali splices and grounds are identified by number, and all the wires on a common splice or ground are identified by circuit number, size (in mm) and color. Each component or circuit common to s spliced wire is called out by the page number of that circuit. This will help identify and diagnose multiple electrical problems that could occur in a truck.
- • All connectors are shown with their part numbers to save time when ordering these parts.
- • Switches are shown in their at rest positions, unless otherwise marked. TRACING CIRCUITS Figures 1 through 3 are examples of how the wiring diagrams are laid out., and will be referred to, throughout this description. In order to trace a circuit on these diagrams, start from the source, the battery. In figure 2, the battery positive circuit is a 19.0 mm black wire. This wire runs from the battery to the starter motor, and supplies power to the starter motor post. Once you have determined the source of power to your component, from the Power Distribution Circuit (figure 2), then refer to the individual circuit you are working on for more detail about that circuit. (Figure 3 shows the starting circuit). In figure 3, the starter motor circuit is shown.
- This circuit shows the battery feed coming from the Power Distribution page. The cable comes from the battery to the start©? positive post. At the starter post, other circuits such as the generator, ignition switch, and electronic control module are fed. When the ignition switch is in the start position, power flows from circuit #2 through the switch, to circuit #6. Circuit #6 goes through the clutch switch with an automatic transmission. At the clutch switch the circuit is opened, unless the dutch is depressed. At the solenoid the current flowing from circuit #6 closes the soiertoid, allowing current to flow from the battery at circuit #1 to the starter motor.
- The current flowing to the starter motor, causes the starter motor to spin. BASIC ELECTRICAL CIRCUITS An electrical circuit starts from a supply of electricity back to a load and then conducts the electricity back to the supply of electricity. There should be a device to open and close the circuit, and a protective device to open the circuit in case too much current is drawn into the circuit by an overload condition. Electrical circuits can be set up as series circuits, parallel circuits or series/parallel’ circuits. The circuits in trucks are usually parallel circuits
TABLE OF CONTENTS:
1989 GM Light Duty Truck R-V, P WIRING DIAGRAMS MANUAL – PDF DOWNLOAD
WIRING DIAGRAMS
All diagrams in this manual are based on the latest product information at the time of publication approval. The right is
reserved to make changes at any time without notice.
SUBJECT PAGE
Description 2
Tracing Circuits 2
Baste Electric Circuits 2
Circuit Diagnosis 8
Abbreviation List 7
Diagnostic Tools 11
Wire Size Conversion Table 11
On-Vehicle Service 11
Circuit Maintenance and Repair 11
Weather Pack Connectors 12
Metri-Pack Connectors 12
Wiring Repair 14
Special Tools 15
VEHICLE SECTION
R/V Models A-1
P :Chassis B-1
VIDEO PREVIEW OF THE MANUAL:
IMAGES PREVIEW OF THE MANUAL:
PLEASE NOTE:
- This is not a physical manual but a digital manual – meaning no physical copy will be couriered to you. The manual can be yours in the next 2 mins as once you make the payment, you will be directed to the download page IMMEDIATELY.
- This is the same manual used by the dealers inorder to diagnose your vehicle of its faults.
- Require some other service manual or have any queries: please WRITE to us at [email protected]
S.M


