Yamaha F50a Ft50b Ft50c Outboards Factory Service Repair Workshop Manual Instant
FILE DETAILS:
LANGUAGE:ENGLISH
PAGES:403
DOWNLOADABLE:YES
FILE TYPE:PDF
VIDEO PREVIEW OF THE MANUAL:
IMAGES PREVIEW OF THE MANUAL:


DESCRIPTION:
Yamaha F50a Ft50b Ft50c Outboards Factory Service Repair Workshop Manual Instant
FOREWORD:
- This manual has been prepared by Yamaha primarily for use by Yamaha dealers and their trained mechanics when performing maintenance procedures and repairs to Yamaha equipment. It has been written to suit the needs of persons who have a basic understanding of the mechanical and electrical concepts and procedures inherent in the work, for without such knowledge attempted repairs or service to the equipment could render it unsafe or unfit for use.
- Because Yamaha has a policy of continuously improving its products, models may differ in detail from the descriptions and illustrations given in this publication. Use only the latest edition of this manual. Authorized Yamaha dealers are notified periodically of modifications and significant changes in specifications and procedures, and these are incorporated in successive editions of this manual.
How to use this manual :
Manual format
The format of this manual has been designed to make service procedures clear and easy to understand. Use the information below as a guide for effective and quality service.
1 Parts are shown and detailed in an exploded diagram and are listed in the components list.
2 Tightening torque specifications are provided in the components list at the beginning of each section and after a numbered step with tightening instructions.
3 Symbols are used to indicate important aspects of a procedure, such as the grade of lubricant and lubrication point.
4 The components list consist of parts and part quantities, as well as bolt and screw dimensions.
5 Service points regarding removal, checking, and installation are shown in individual illustrations to explain the relevant procedure.
INDEX DETAILS:
Yamaha F50a Ft50b Ft50c Outboards Factory Service Repair Workshop Manual Instant
A
Acceleration pump 1-15
Adjusting the dash-pot
(acceleration pump) 4-24
Adjusting the pilot screw 4-22
Adjusting the throttle link rod4-21
Adjusting the trim sensor 7-46
After test run 1-36
Applicable models1-5
Assembling the carburetor 4-20
Assembling the cylinder body 5-64
Assembling the drive shaft 6-27, 6-66
Assembling the forward gear 6-27, 6-65
Assembling the fuel pump4-10
Assembling the gear pump 7-66
Assembling the lower case 6-25, 6-63
Assembling the oil pan7-39
Assembling the power trim and tilt motor7-76
Assembling the propeller shaft
assembly 6-16, 6-55
Assembling the propeller shaft
housing 6-16, 6-55
Assembling the tiller handle 7-15, 7-23
Assembling the tilt cylinder 7-69
Assembling the trim cylinder 7-67
B
Backlash (F50/F50A) 6-39
Backlash (T50/FT50B, FT50C) 6-77
Bleeding the power trim and tilt (built-in)7-71
Bleeding the power trim and tilt
(not installed) 7-70
Bottom cowling7-25
Break-in1-36
C
Carburetor1-10, 4-17
Carburetor unit 4-11
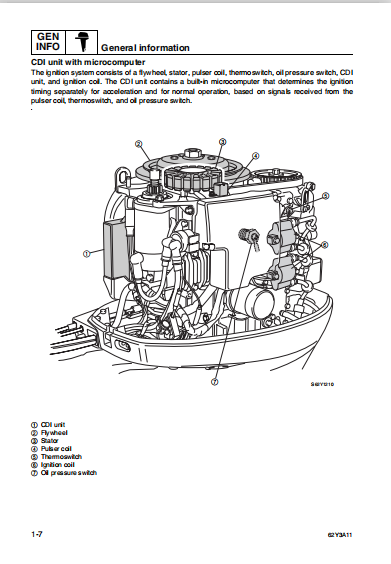
CDI unit with microcomputer1-7
Charging system8-25
Check the valves7-65
Checking the anodes 3-19
Checking the armature8-23
Checking the battery 1-33, 3-20
Checking the bearings 6-25, 6-63
Checking the brushes 8-24
Checking the camshaft 5-45
Checking the carburetor4-19
Checking the CDI unit 8-15
Checking the charge coil8-15
Checking the compression pressure5-25
Checking the connecting rod big end side
clearance 5-59
Checking the connecting rod bolt 5-59
Checking the connecting rod small end
inside diameter 5-59
Checking the cooling water passage 3-13
Checking the crankshaft 5-59
Checking the crankshaft main journal oil
clearance 5-60
Checking the crankshaft pin oil
clearance 5-61
Checking the cylinder bore 5-56
Checking the cylinder head 5-46
Checking the diaphragm and valves 4-10
Checking the drive shaft 6-25, 6-63
Checking the electrical components 8-4
Checking the engine idle speed 3-15
Checking the engine oil 1-33, 3-5
Checking the engine shut-off switch 8-17
Checking the engine start switch 8-17
Checking the engine start switch and engine
stop switch/engine shut-off switch 1-35
Checking the filters 7-65
Checking the fuel filter 3-5
Checking the fuel joint and fuel hoses
(fuel joint-to-carburetor) 3-4
Checking the fuel pump 4-9
Checking the fuel system 1-33
Checking the fuse7-79, 8-20
Checking the gear oil 1-33
Checking the gear oil level 3-17
Checking the gear pump 7-66
Checking the gearshift and
throttle operation 1-34
Checking the gearshift operation 3-14
Checking the ignition coil 8-14
Checking the ignition spark gap 8-13
Checking the ignition timing 3-15
Checking the lighting coil 8-26
Checking the lower case 6-25, 6-63
Checking the lower unit (for air leakage) 3-19
Checking the neutral switch 8-20
Checking the oil pressure 5-25
Checking the oil pressure switch 8-18
Checking the oil pump 5-47
Checking the oil strainer and the
relief valve 7-39
Checking the outboard motor mounting
position 1-34
Checking the pilot water outlet 1-35
Checking the pinion and
forward gear 6-25, 6-63
Checking the piston clearance 5-57
Checking the piston diameter 5-56
Checking the piston pin5-58
Checking the piston pin boss bore5-58
Checking the piston ring grooves5-58
Checking the piston ring side clearance 5-58
Checking the piston rings5-57
Checking the power trim and
tilt fluid level 3-16
Checking the power trim and tilt motor 7-75
Checking the power trim and
tilt operation 3-16
Checking the power trim and tilt relay7-79
Checking the power trim and
tilt switch/trailer switch 7-80
Checking the Prime Start 4-20
Checking the propeller 3-19
Checking the propeller shaft 6-15, 6-55
Checking the propeller shaft
housing 6-15, 6-54
Checking the pulser coil8-16
Checking the pulser coil air gap8-16
Checking the Rectifier Regulator 8-26
Checking the remote control cables1-34
Checking the rocker arms and
rocker arm shaft 5-45
Checking the shift rod and shift cam6-25
Checking the shift rod assembly
operation7-29
Checking the spark plug caps8-14
Checking the spark plugs3-11
Checking the starter motor operation8-24
Checking the starter motor pinion 8-23
Checking the starter relay 8-20
Checking the steering wheel/
tiller handle1-34
Checking the thermostat 3-12
Checking the thermoswitch8-18
Checking the throttle cable and
shift cable7-15
Checking the throttle cable and shift rod7-23
Checking the throttle cable operation 3-13
Checking the tilt cylinder and
trim cylinder7-64
Checking the tilt system1-35
Checking the timing belt3-7
Checking the timing belt and sprockets 5-32
Checking the top cowling 3-4
Checking the trim sensor 7-80
Checking the valve clearance 3-10
Checking the valve guides 5-41
Checking the valve seat5-42
Checking the valve springs 5-40
Checking the valves5-40
Checking the water pump 6-14
Checking the water pump and shift rod 6-47
Checking the wiring harness (10 pins) 8-20
Clamp brackets 7-43
Control system 3-13
Cooling water hose 4-3
Cylinder body 5-51
Cylinder head 5-35
D
Dimensions 2-19
Disassembling the cylinder body 5-55
Disassembling the drive shaft 6-61
Disassembling the drive shaft assembly 6-23
Disassembling the forward gear 6-23, 6-61
Disassembling the fuel pump 4-9
Disassembling the gear pump 7-64
Disassembling the lower case 6-24, 6-62
Disassembling the oil pan 7-39
Disassembling the propeller shaft
assembly 6-14, 6-54
Disassembling the propeller shaft
housing 6-13, 6-53
Disassembling the tilt cylinder 7-63
Disassembling the trim cylinder 7-63
Disassembly and assembly 1-4
Drive shaft and lower case (F50/F50A) 6-21
Drive shaft and lower case
(T50/FT50B, FT50C) 6-59
E
Electrical 2-9, 2-16
Electrical components 8-5
F
Features and benefits 1-6
Fire prevention 1-3
Front view 8-6
Fuel and blowby hoses 4-2
Fuel filter and fuel pump 4-7
Fuel line 4-5
Fuel system 3-4
G
Gear pump 7-59
General 3-19
General specifications 2-1
General torques 2-31
Good working practices 1-4
Index
i-3 62Y3A11
H
Hose routing4-2
How to use this manual1-1
I
Identification1-5
Ignition system1-17
Ignition system and Ignition control
system8-11
Ignition timing control 1-19
Installing the camshaft 5-48
Installing the clamp brackets7-45
Installing the cylinder head 5-49
Installing the drive shaft 6-28, 6-66
Installing the lower unit 6-28, 6-66
Installing the power trim and tilt 7-76
Installing the power unit 5-67
Installing the propeller shaft
housing 6-18, 6-57
Installing the rocker arm assembly 5-49
Installing the steering arm7-49
Installing the timing belt and sprockets 5-32
Installing the upper case 7-41
Installing the valves5-47
Installing the water pump 6-18
Installing the water pump and shift rod 6-48
L
Lower unit 1-8, 2-9, 2-16, 3-17
Lower unit (F50/F50A) 6-7
Lower unit (T50/FT50B, FT50C) 6-41
Lubricating the throttle gear 7-23
Lubrication 3-21
M
Maintenance interval chart3-3
Maintenance specifications2-5
Manual format 1-1
Measuring the forward and
reverse gear backlash 6-39, 6-77
Measuring the lower resistance 8-4
Measuring the peak voltage8-4
N
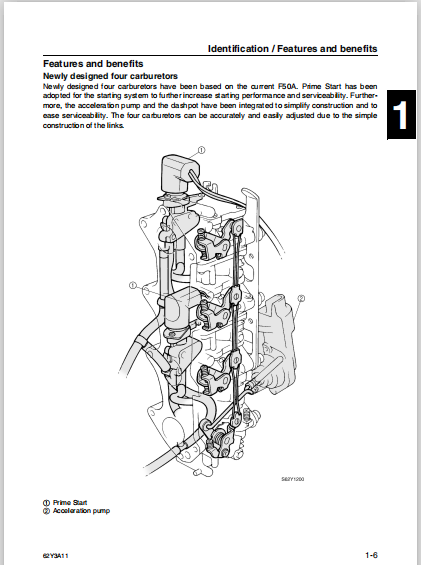
Newly designed four carburetors 1-6
P
Parts, lubricants, and sealants1-3
Power trim and tilt 1-22
Power trim and tilt electrical system7-78
Power trim and tilt motor 7-73
Power trim and tilt unit 3-16, 7-51
Power unit 2-5, 2-12, 3-5, 5-13
Predelivery checks 1-33
Propeller selection 1-32
Propeller shaft housing
(T50/FT50B, FT50C) 6-51
Propeller size 1-32
R
Refacing the valve seat 5-43
Removing and installing the oil filter 5-55
Removing the clamp brackets 7-45
Removing the cylinder head 5-39
Removing the drive shaft6-23, 6-61
Removing the lower unit 6-9, 6-43
Removing the power trim and tilt/
hydro tilt 7-53
Removing the power unit 5-26
Removing the propeller shaft housing
assembly 6-53
Removing the starter motor pinion 8-23
Removing the steering arm 7-49
Removing the timing belt and sprockets 5-31
Removing the water pump and
propeller shaft housing assembly 6-13
Removing the water pump and shift rod 6-47
Replacing the engine oil 3-5
Replacing the gear oil 3-17
Replacing the timing belt 3-7
Replacing the valve guides 5-41
S
Safety while working 1-3
Selecting the connecting rod big end
bearing 5-63
Selecting the crankshaft main journal
bearing 5-62
Selecting the forward gear
shims 6-33, 6-37, 6-71, 6-75
Selecting the pinion
shims 6-32, 6-36, 6-70, 6-74
Selecting the reverse gear shims 6-34, 6-38
Selection 1-32
Self-protection 1-3
Serial number 1-5
Shimming 6-32, 6-36, 6-70, 6-74
Shimming (F50) (for USA and Canada) 6-31
Shimming (F50A) (for worldwide) 6-35
Shimming (FT50B, FT50C)
(for worldwide) 6-73
Shimming (T50) (for USA and Canada) 6-69
Special service
tools 3-1, 4-1, 5-10, 6-1, 7-4, 8-2
Specified torques 2-29
Starboard and port views 8-5
Starter motor 8-21
Starting system8-19
Swivel bracket and steering arm7-47
Symbols 1-2
Synchronizing the carburetors 4-23
T
Technical tips 1-10
Test run1-35
Tightening torques 2-29
Tiller handle (F50/F50A, T50/FT50B) 7-5
Tiller handle (FT50C) 7-17
Tiller handle model
(F50/F50A, T50/FT50B)8-8
Tiller handle model (FT50C) 8-9
Tilt cylinder and trim cylinder 7-55
Timing belt and sprockets 5-29
Top cowling3-4
Top view8-7
Trim cylinder 7-57
Troubleshooting 5-1, 7-1, 8-1
U
Upper case7-31
V
Ventilation 1-3
W
Water pump and propeller shaft housing
(F50/F50A)6-11
Water pump and shift rod
(T50/FT50B, FT50C)6-45
Wiring harness 8-10
TABLE OF CONTENTS:
Yamaha F50a Ft50b Ft50c Outboards Factory Service Repair Workshop Manual Instant
- General information
- Specifications
- Periodic checks and adjustments
- Fuel system
- Power unit
- Lower unit
- Bracket unit
- Electrical systems
PLEASE NOTE:
- This is the same manual used by the dealers to diagnose and troubleshoot your vehicle
- You will be directed to the download page as soon as the purchase is completed. The whole payment and downloading process will take anywhere between 2-5 minutes
- Need any other service / repair / parts manual, please feel free to contact [email protected] . We still have 50,000 manuals unlisted


