Valtra Tractor Compact A Series A53-A73 Operator’s Manual – PDF DOWNLOAD
Original price was: $86.95.$18.95Current price is: $18.95.
Valtra Tractor Compact A Series A53-A73 Operator’s Manual – PDF DOWNLOAD
Description
Valtra Tractor Compact A Series A53-A73 Operator’s Manual – PDF DOWNLOAD
FILE DETAILS:
Valtra Tractor Compact A Series A53-A73 Operator’s Manual – PDF DOWNLOAD
Language : English
Pages : 74
Downloadable : Yes
File Type : PDF
Size: 5.45 MB
IMAGES PREVIEW OF THE MANUAL:
DESCRIPTION:
Valtra Tractor Compact A Series A53-A73 Operator’s Manual – PDF DOWNLOAD
TO THE USER We thank you for choosing Hattat tractor. We hope that your selection will make you happy in your life. As your agriculture partner Valtra, we also try to provide you reliable service support and quality and efficiency. This manual is prepared especially for our users. The purpose is that the owner or driver of the tractor uses the vehicle safely. If the information given is followed, your tractor may be used for years as it is according to the traditional Hattat quality. Delivery of the tractor by the dealer gives the opportunity for understanding the subjects of operating and maintaining the vehicle. If there is any part you don’t understand in the manual, you may have information by applying to the closest Hattat Tractor Authorized Dealer / Service. It is extremely important that the information contained in the manual are understood and followed. Daily maintenance of the vehicle should be a routine work and the records of service hours should be kept regularly. When a new part is required, only the original Hattat parts should be used. Hattat Tractor Authorized Dealer / Service may provide the original parts and give information on the assembly and usage based on your needs. Mounting low quality spare parts on the vehicle may cause permanent damages. We recommend our customers to buy the spare parts only from Hattat Tractor Authorized Dealer / Service. Your manual contains all information and directives required for the usage and maintenance of the tractor. If you want that your Hattat tractor operates economically and be safe for years together with you, be sure that usage and maintenance are always done correctly. Not all models are sold in some regions. The models sold may have some differences based on market zones. The basic equipment or accessories indicated in this manual change based on the region where the tractor is used. All equipment and detailed information are present in the dealer of the region you are in. Use only original Hattat tractor parts. These tractors are designed especially for agricultural works (usage according to the purpose). It is impossible that the losses and damages or negligence or wrong usages which may occur due to performance and usage techniques or usage areas or purposes of your tractor are stated in certainty by the producer company in this manual because they can be used for various purposes and in conditions. If the tractor will be used under hard conditions (e.g. deep water or paddy fields) which may be harmful, consult to the Hattat Tractor Authorized Dealer / Service, otherwise the guarantee will be void. The usages outside such works are referred as “usage not compatible with the purpose”. Hattat Tractor is not responsible for the damages or injuries which may happen due to user errors and wrong usages. The requirements of the local traffic rules should be followed if the tractor will be used only in the traffic, the requirements compatible with the purpose should be done if it is used other than agricultural purposes. In this case, always contact with the “Hattat Tractor Authorized Dealer” beforehand. We recommend you to read the manual carefully. Follow the maintenance program carefully and include the daily maintenances in your normal routine works you do. The maintenance, repair and adjustments defined in this manual require special tools and correct technical information usage. For such works, contact with the “technical service” which has specially trained personnel to help you. Use only “original Hattat” spare parts to have the optimum performance in your tractor. It is required that you order your spare parts according to the directives given in the parts catalogue giving example figures. Following and obeying the operation conditions, the service and maintenance directives stated by Hattat tractor are important for the purposed usage of the machine.
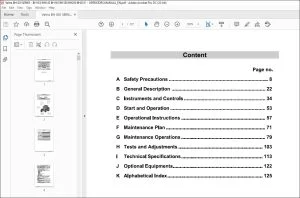
TABLE OF CONTENTS:
Valtra Tractor Compact A Series A53-A73 Operator’s Manual – PDF DOWNLOAD
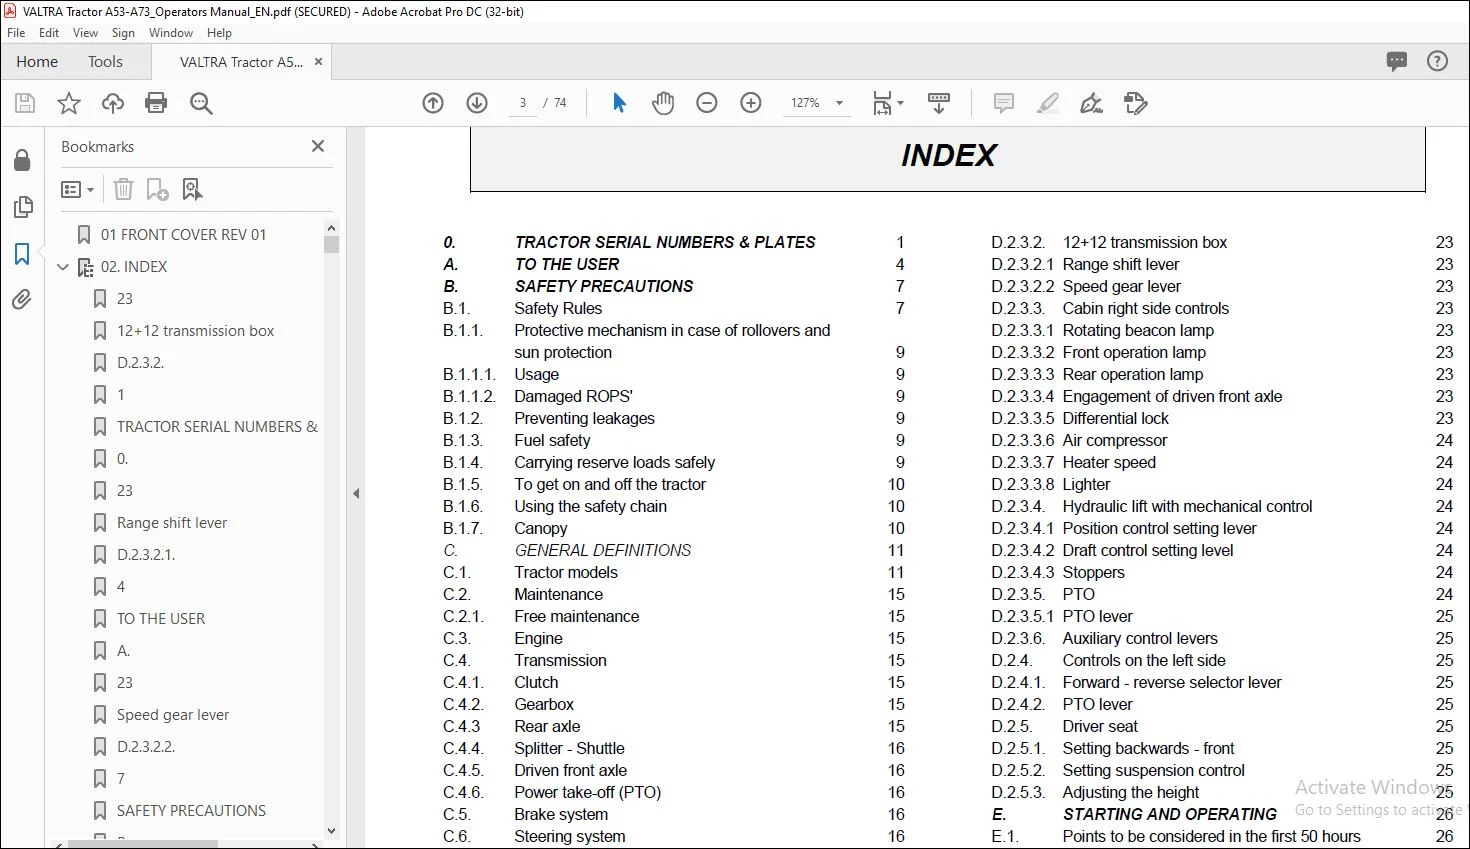
0. TRACTOR SERIAL NUMBERS & PLATES 1
A. TO THE USER 4
B. SAFETY PRECAUTIONS 7
B.1. Safety Rules 7
B.1.1. Protective mechanism in case of rollovers and
sun protection 9
B.1.1.1. Usage 9
B.1.1.2. Damaged ROPS’ 9
B.1.2. Preventing leakages 9
B.1.3. Fuel safety 9
B.1.4. Carrying reserve loads safely 9
B.1.5. To get on and off the tractor 10
B.1.6. Using the safety chain 10
B.1.7. Canopy 10
C. GENERAL DEFINITIONS 11
C.1. Tractor models 11
C.2. Maintenance 15
C.2.1. Free maintenance 15
C.3. Engine 15
C.4. Transmission 15
C.4.1. Clutch 15
C.4.2. Gearbox 15
C.4.3 Rear axle 15
C.4.4. Splitter – Shuttle 16
C.4.5. Driven front axle 16
C.4.6. Power take-off (PTO) 16
C.5. Brake system 16
C.6. Steering system 16
C.7. Hydraulic system 16
C.7.1. Hydraulic lift 17
C.7.1.1. Hydraulic lift with mechanic control 17
C.7.2. Auxiliary hydraulics 17
D. INDICATORS & CONTROLS 18
D.1. Indicator figures 18
D.1.1. Front controls 18
D.1.2. Dashboard 18
D.1.3. Controls on the right side 19
D.1.4. Controls on the left side 19
D.1.5. Driver seat 19
D.1.6. Mirrors 19
D.2. Indicator and control details 20
D.2.1. Front side controls 20
D.2.1.1. Clutch pedal 20
D.2.1.2. Power take-off (PTO) clutch lever 20
D.2.1.3. Accelerator 20
D.2.1.4. Brake pedals 20
D.2.1.5. Location of fuse box 20
D.2.2. Dashboard 20
D.2.2.1. Front part of dashboard 20
D.2.2.1.1 Steering wheel 20
D.2.2.1.2 Main & dipped beams, signals, park lamps & horn 21
D.2.2.1.3 Emergency flasher switch 21
D.2.2.1.4 Front wipers (in cabin models) 21
D.2.2.1.5 Washer (in cabin models) 21
D.2.2.1.6 Hand throttle 21
D.2.2.1.7 Ignition switch 21
D.2.2.2. Dashboard 22
D.2.3. Controls on the right side 23
D.2.3.1. 16+8 transmission box 23
D.2.3.1.1 HLR shift lever 23
D.2.3.1.2 Main gear lever 23
D.2.3.2. 12+12 transmission box 23
D.2.3.2.1 Range shift lever 23
D.2.3.2.2 Speed gear lever 23
D.2.3.3. Cabin right side controls 23
D.2.3.3.1 Rotating beacon lamp 23
D.2.3.3.2 Front operation lamp 23
D.2.3.3.3 Rear operation lamp 23
D.2.3.3.4 Engagement of driven front axle 23
D.2.3.3.5 Differential lock 23
D.2.3.3.6 Air compressor 24
D.2.3.3.7 Heater speed 24
D.2.3.3.8 Lighter 24
D.2.3.4. Hydraulic lift with mechanical control 24
D.2.3.4.1 Position control setting lever 24
D.2.3.4.2 Draft control setting level 24
D.2.3.4.3 Stoppers 24
D.2.3.5. PTO 24
D.2.3.5.1 PTO lever 25
D.2.3.6. Auxiliary control levers 25
D.2.4. Controls on the left side 25
D.2.4.1. Forward – reverse selector lever 25
D.2.4.2. PTO lever 25
D.2.5. Driver seat 25
D.2.5.1. Setting backwards – front 25
D.2.5.2. Setting suspension control 25
D.2.5.3. Adjusting the height 25
E. STARTING AND OPERATING 26
E.1. Points to be considered in the first 50 hours 26
E.2. Starting 26
E.2.1. Normal start – cold start 26
E.2.1.1. Special directives for cold start 26
E.2.2. Starting with spare battery 26
E.3. Driving 27
E.3.1. Shifting 27
E.3.1.1. Shifting in16+8 models 27
E.3.1.2. Shifting in12+12 models 27
E.3.2. Differential lock 28
E.3.2.1. Differential lock in16+8 models 28
E.3.2.2. Differential lock in12+12 models 28
E.3.3. Front axle 4×4 28
E.4. Stopping 28
E.5. Measurements to be taken during usage 29
E.5.1. Driving slopes allowed in ramps for tractor 29
E.5.2. Chain usage 29
E.5.3. Towing the tractor 29
F. USAGE DIRECTIVES 30
F.1. PTO usage 30
F.1.1. Disconnecting PTO 30
F.2. Equipment 30
F.2.1. Equipment plug 30
F.3. 3 Point hanger system 31
F.3.1. Leveling links 31
F.3.2. Stabilizers 31
F.4. Using hydraulic lift 31
F.4.1. Position control 31
F.4.2. Power control (Sensitivity control) 31
F.4.3. Mixed control 32
F.4.4. Floating position 32
F.4.5. Locking & controlled lowering system 32
F.5. Auxiliary hydraulics 33
F.5.1. Adjustment valve with single-double acting 33
INDEX
F.5.2. Measurements to be taken during usage 33
F.5.3. Hydraulic motor 33
F.6. Fixing equipment 33
F.6.1. Using PTO shaft 33
F.7. Using the top link 34
G. MAINTENANCE SCHEDULE 36
G.1. Maintenance 36
G.1.1. General directions about oil control & filling 36
G.1.2. Lubrication of grease nipples 36
G.1.3. Lubrication and maintenance schedule 36
G.1.4. Maintenance intervals (100, 250, 500 hours) 36
G.2. Recommended fuels and oils 37
G.2.1. Oil recommendations based on external temp. 37
G.2.2. Fuel quality values 37
G.2.2.1. Fuel 38
G.2.2.2. Fuel tank 38
G.2.2.3. Filter system 38
G.3. Grease 38
G.4. Maintenance schedule 39
G.4.1. Maintenance when required 39
G.4.2. Maintenance daily or once every 10 hrs. 39
G.4.3. Maintenance weekly or once every 50 hrs. 39
G.4.4. Maintenance monthly or once every 250 hrs. 39
G.4.5. Maintenance annual or once every 500 hrs. 39
G.4.6. 1.000 hour maintenance 39
G.4.7. 2.000 hour maintenance 39
G.4.8. 3.000 hour maintenance 39
H. PERIODICAL MAINTENANCE 40
H.1. General 40
H.1.1. Repairing the battery 40
H.1.2. Removing the battery and cables 40
H.1.3. Cleaning the engine 40
H.1.4. Taking oil samples from engine 40
H.1.5. Air filters with cylindrical bodies 40
H.1.6. Power core air filters 41
H.1.7. Checking and replacing injectors 41
H.1.8. Heavy maintenance applications 41
H.2. Daily / 10 hour maintenance 42
H.2.1. Checking the engine oil level 42
H.2.2. Checking / cleaning radiator grids 42
H.2.3. Checking setting & changing alternator fan belts 42
H.2.4. Checking the motor air filter service indicator 43
H.2.5. Discharging the fuel filter’s pre-filter water 43
H.2.6. General checks on tractor 43
H.2.6.1. Checking the leakages & connections 43
H.2.6.2. Checking the water pump 44
H.3. Weekly / 50 hours maintenance 44
H.3.1. Discharge water & contaminants from fuel tank 44
H.3.1.1. From fuel tank 44
H.3.1.2. From fuel storage tank 44
H.3.2. Lubricating the front axle & steering wheel greasers 44
H.3.3. Lubricating 3 point system 44
H.3.4. Checking tire pressures 44
H.4. Monthly / 100 hour maintenance 45
H.5. Annual / 500 hours maintenance 45
H.5.1. Checking the electrolyte level in battery 45
H.5.2. Replacing air filter & safety filter 45
H.5.2.1. Models with round body 45
H.5.2.2. Power core models 45
H.5.3. Lubricating the gearbox shift levers 46
H.5.4. Checking the wheel nuts 46
H.5.5. Replacing engine oil & oil filter 46
H.5.5.1. Drain 46
H.5.5.2. Re-attaching the oil filter element 46
H.5.5.3. Blow-by hose 47
H.5.5.4. Filling 47
H.5.6. Brake pedal clearance setup 47
H.5.7. Clutch pedal clearance setup 47
H.5.8. Setting park brake 47
H.5.9. Checking the PTO lever clearance setup 47
H.5.10. Checking the oil level in the transmission and
hydraulic systems 48
H.5.11. Checking the oil level on the 4WD hub 48
H.5.12. Replacing the pressure filters in transmission 48
H.5.13. Replacing fuel filter & pre-filter (water trap filter) 48
H.6. 1.000 hour maintenance 49
H.6.1. Replacing the oil and oil ventilation filter in the
hydraulic system 49
H.6.1.1. Draining 49
H.6.1.2. Refilling 49
H.6.2. Changing oil in the driven front axle 49
H.6.3. Changing the oil in the wheel hub gears of 4WD 50
H.6.4. Hydraulic system 50
H.6.4.1. Replacing the pressure filter of the hydraulic
system 50
H.6.4.1.1 Disassembly 50
H.6.4.1.2 Assembly 50
H.6.4.2. Replacing the suction filter of hydraulic pump 50
H.6.5. Checking and adjusting toe-in & toe-out of front 50
H.6.6. Checking and setting the valve clearances 51
H.6.7. Tightening chassis screw and nuts 51
H.6.8. Greasing flywheel gear 51
H.7. 2.000 hours maintenance 51
H.7.1. Checking alternator 51
H.7.2. Checking the engine connections 51
H.7.2.1. Checking the starter motor 51
H.7.2.2. Checking the turbo charger 51
H.7.2.3. Checking the water pump 51
H.8. Two years maintenance 51
H.8.1. Draining engine coolant liquid 51
H.8.2. Filling engine coolant liquid 52
H.8.3. Volume of the engine coolant liquid 52
H.8.4. Checking and replacing the injectors 52
I. CONTROLS & SETTINGS 53
I.1. Engine 53
I.1.1. Discharging the air in the fuel system 53
I.1.2. Air filter 53
I.1.2.1. Main filter maintenance 53
I.1.2.2. Cleaning main filter 53
I.1.3. Cooling system maintenance 53
I.1.3.1. Coolant 54
I.2. Electric system 54
I.2.1. Battery check and maintenance 54
I.2.2. Alternator 54
I.2.3. Safety precautions for the electrical system 54
I.2.4. Fuses 54
I.2.5. Receptacle plugs 55
I.2.6. Beam adjustment 55
I.3. Transmission and PTO Clutch settings 55
I.3.1. Adjusting the driving clutch pedal clearance 55
I.3.2. Adjusting PTO clutch rod clearance 55
I.4. Brake system 56
INDEX
I.4.1. Adjusting the course of the brake pedals 56
I.4.2. Adjusting parking brakes 56
I.5. Steering system 57
I.5.1. Checking the toe-in & toe-out of the front wheels 57
I.5.1.1. Adjusting toe-in of front tires 57
I.5.2. Max. turn limitation setting of front axle (4WD) 57
I.6. Adjusting tire track width 57
I.6.1. 4WD front axle 57
I.6.2. Tire track widths 57
I.6.3.1. Front axle tire track widths 58
I.6.3.2. Rear axle tire track widths 58
I.7. If the tractor is not used 58
I.7.1. Storing the tractor 58
I.7.1.1. For a period less than two months 58
I.7.1.2. For a period longer than two months 58
I.7.2. Taking the tractor out of the store 58
I.7.2.1. For a period less than two months 58
I.7.2.2. For a period longer than two months 58
J. TECHNICAL SPECIFICATIONS 59
J.1. Dimensions and Masses 59
J.2. Wheels 59
J.2.1. Tires, Tire Pressures and Permitted Loads 59
J.2.2. Wheel Nuts and Tightening Torques 59
J.3. Track Widths 60
J.4. Engine 60
J.4.1. Lubrication System 60
J.4.2. Fuel System & Air Filter 60
J.4.3. Engine Cooling System 61
J.5. Electric System 61
J.6. Transmission 61
J.6.1. Clutch 61
J.6.2. Gearbox 61
J.6.3. Speed Limits 62
J.6.3.1. 12+12 Gearbox 62
J.6.4. PTO 62
J.6.4.1. PTO Output (kW) 63
J.6.5. 4WD Powered Front Axle 63
J.7. Brake System 63
J.8. Steering System 63
J.8.1. Turning Diameter Without Brake 63
J.9. Hydraulic Lift 64
J.9.1. Hydraulic Lift Functions 64
J.9.1.1. Maximum Lifting Capacity (in ton) 64
J.9.1.2. Hydraulic Lift Controls 64
J.10. Vertical Loads 64
J.11. Ballast Weights & Static Loads 65
J.11.1. Front Ballast Weights 65
J.11.2. Rear Ballast Weights 65
J.11.3. Permitted Vertical Static Loads 65
K. Appendix 66
K.1. Measures in Metric System and Equivalents 66
K.2. Bolt Torque Table 66
Questions? Email us: [email protected]
PLEASE NOTE:
- This is the SAME manual used by the dealers to troubleshoot any faults in your vehicle. This can be yours in 2 minutes after the payment is made.
- Contact us at [email protected] should you have any queries before your purchase or that you need any other service / repair / parts operators manual.
S.V