Valtra SERIE A GII A650 A750 A750L A850 A950 A990 Operators Manual 87315500 – PDF DOWNLOAD
Original price was: $89.95.$27.95Current price is: $27.95.
Valtra SERIE A GII A650 A750 A750L A850 A950 A990 Operators Manual 87315500 – PDF DOWNLOAD
Description
Valtra SERIE A GII A650 A750 A750L A850 A950 A990 Operators Manual 87315500 – PDF DOWNLOAD
FILE DETAILS:
Valtra SERIE A GII A650 A750 A750L A850 A950 A990 Operators Manual 87315500 – PDF DOWNLOAD
Language : English
Pages : 187
Downloadable : Yes
File Type : PDF
Size: 59 MB
IMAGES PREVIEW OF THE MANUAL:
DESCRIPTION:
Valtra SERIE A GII A650 A750 A750L A850 A950 A990 Operators Manual 87315500 – PDF DOWNLOAD
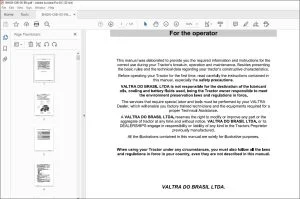
Introduction:
- The purpose of this manual is to enable the owner and operator to operate the tractor safely and
appropriately. If the instructions are followed correctly, the tractor will work for many years, following the
Valtra tradition. Configuring and adjusting the tractor in the dealership will ensure that these operating and
service instructions are properly understood. - Always consult the dealer if any part of the manual is not understood. It is extremely important that these
instructions are understood and followed . - Daily maintenance should become a routine. Always keep a record of the service hours. When ordering
new parts, use only original Valtra parts. The Valtra dealer network provides original parts and can give
instructions for installation and use. Using low quality parts can seriously damage the equipment. - We recommend that customers buy service parts from authorised Valtra dealers only.
- Due to variations in operating conditions, it is impossible for the manufacturer to make comprehensive or
definitive statements in its publications with respect to the performance or usage methods of its
machines, or to be responsible for any damages or losses arising from such statements, errors or
omissions. - To prevent the warranty being invalidated, consult your Valtra dealer for special instructions if the tractor
will be used in special conditions that may be harmful (use in deep waters or in flooded fields, for
example). These products were designed for agricultural applications only (appropriate use). Any other use
shall be considered inappropriate. - Valtra is not liable for damage to property or personal injuries caused by improper use. The user must take
full responsibility for the consequences of misuse. - Conformity and full adherence to the operation, service and maintenance requirements specified by Valtra
are essential factors for appropriate use. - These tractors must be operated and maintained only by qualified personnel familiar with the features of
the tractor, in addition to the safety rules and standards (accident prevention). It is recommended that
customers contact one of the Valtra dealerships in the event of post-sale problems and for any adjustment
that may be required.
General Recommendations:
Why is safety important?
1. Accidents incapacitate and can be fatal
2. Accidents generally involve significant costs
3. Accidents can be avoided.
This section of the Manual is intended to point out some of the basic safety situations involved with your
equipment and to provide suggestions on how to avoid high-risk situations and accidents. Therefore, users
must take all possible precautions and guidance. There are always a series of precautions to be taken for
each implement, attachment and work situation, which would be impossible to list in this Manual.
Valtra is in no way able to directly control the conditions of use, servicing or repair to which the product is
subjected. Therefore, users are responsible for always following appropriate practices for their safety and
for the integrity of the product, other people or machines in the same work area.
The tractor:
The tractor is a source of mechanical and hydraulic power.
• On its own, the tractor has little practical value. It only becomes a work unit when used in conjunction
with an implement or other accessory.
• This Maintenance Guide was compiled to cover the safety practices when the tractor is operating under
normal conditions.
• This manual does not address all operating and safety instructions relating to all known implements and
accessories, which may be installed when the tractor is delivered or on another date.
• It is essential that operators read and understand the manuals of the related implements and
accessories.
TABLE OF CONTENTS:
Valtra SERIE A GII A650 A750 A750L A850 A950 A990 Operators Manual 87315500 – PDF DOWNLOAD
1 1 Introduction 11
1 2 General Recommendations 12
1 2 1 The tractor 12
1 2 2 Safety notes 12
1 2 3 Note to the operator 13
1 2 4 Roll-Over Protective Structure (ROPS) 13
1 2 5 Safe maintenance 14
1 2 6 Fuel 14
1 3 Follow a safety program 16
1 3 1 For proper operation 16
1 4 Prepare yourself for safe operation 17
1 4 1 Know your equipment 17
1 4 2 Protect yourself 17
1 4 3 Use the safety devices and protection available 17
1 4 4 Check the equipment 18
1 4 5 Cleaning the tractor 19
1 4 6 Protect the environment 19
1 5 Start-up 20
1 5 1 Prior to start-up 20
1 5 2 How to mount and dismount the machine safely 20
1 5 3 Safe start-up 21
1 5 4 Test the controls 21
1 5 5 Starting fluid 22
1 6 Safe operation 23
1 6 1 Manoeuvre correctly 23
1 6 2 Safety practices 23
1 6 3 Rollover risk 24
1 6 4 To prevent rear rollover 25
1 6 5 To prevent side rollovers 25
1 6 6 Emergency brake 26
1 6 7 General operating hazards 26
1 6 8 Implements and additional equipment 27
1 6 9 Towing with the tractor 27
1 6 10 Noise level 28
1 7 Road Transport 29
1 7 1 Rules of the Road 29
1 8 Quality policy 30
1 8 1 Main guidelines 30
1 8 2 ISO 14000 30
1 8 3 Environmental Management System 30
1 8 4 Environmental issues 30
1 8 5 Recommendations for tractor users and customers 31
1 8 6 CONAMA Resolution 32
1 8 7 Mandatory battery recycling 32
1 8 8 Battery safety 32
1 9 Diesel fuel B 34
1 9 1 Use of diesel fuel B 34
1 9 2 Additive for DIESEL PRO fuel 34
1 9 3 DIESEL GUARD fuel biocide 35
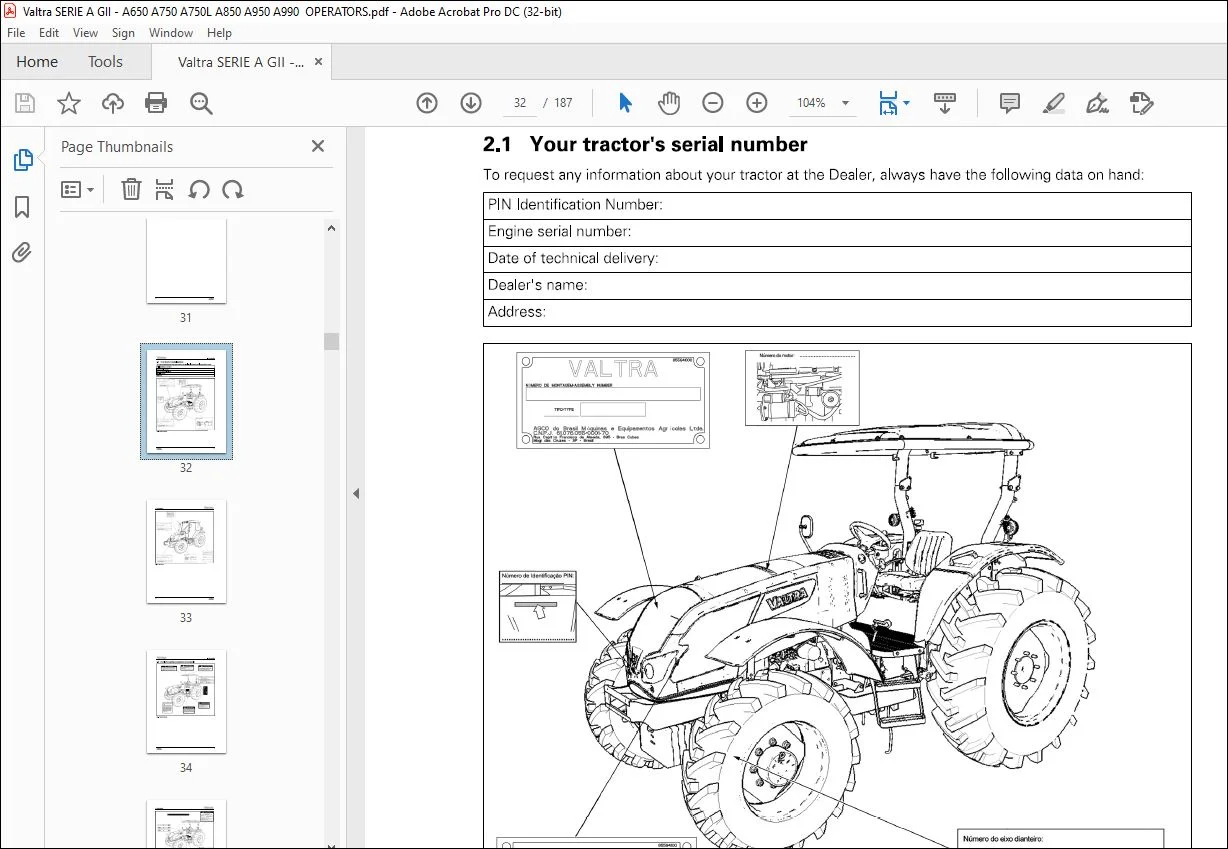
2 1 Your tractor’s serial number 39
2 2 Decals for safety precautions and controls 41
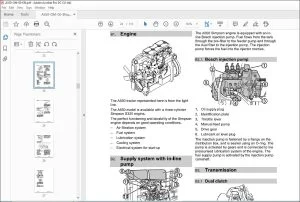
2 3 Engine 48
2 4 Supply system 49
2 4 1 Supply system with in-line pump 49
2 4 2 In-line injection pump 49
2 5 Transmission 50
2 5 1 Dual clutch 50
2 5 2 Gearbox 50
2 5 3 Speed splitter/creeper 50
2 5 4 Speed inverter (optional) 51
2 6 Axles 52
2 6 1 Rear axle 52
2 6 2 Front-wheel drive axle 52
2 6 3 Power take-off 52
2 7 Brake system 54
2 8 Hydraulic and steering system 55
2 9 Hydraulic system 56
2 9 1 3-point hydraulic lift system 56
2 9 2 Auxiliary hydraulic valve (optional) 56
2 10 General description 57
2 10 1 Left-hand side of the tractor (Tractor with Platform) 57
2 10 2 Right-hand side of the tractor (Tractor with Platform) 58
2 10 3 Rear view of tractor (Tractor with Platform) 59
2 10 4 Left-hand side of the tractor (Cab Tractor) 60
2 10 5 Right-hand side of the tractor (Cab Tractor) 61
2 10 6 Rear view of tractor (Cab Tractor) 62
2 10 7 Front view of the tractor (Cab Tractor) 63
3 1 Controls 67
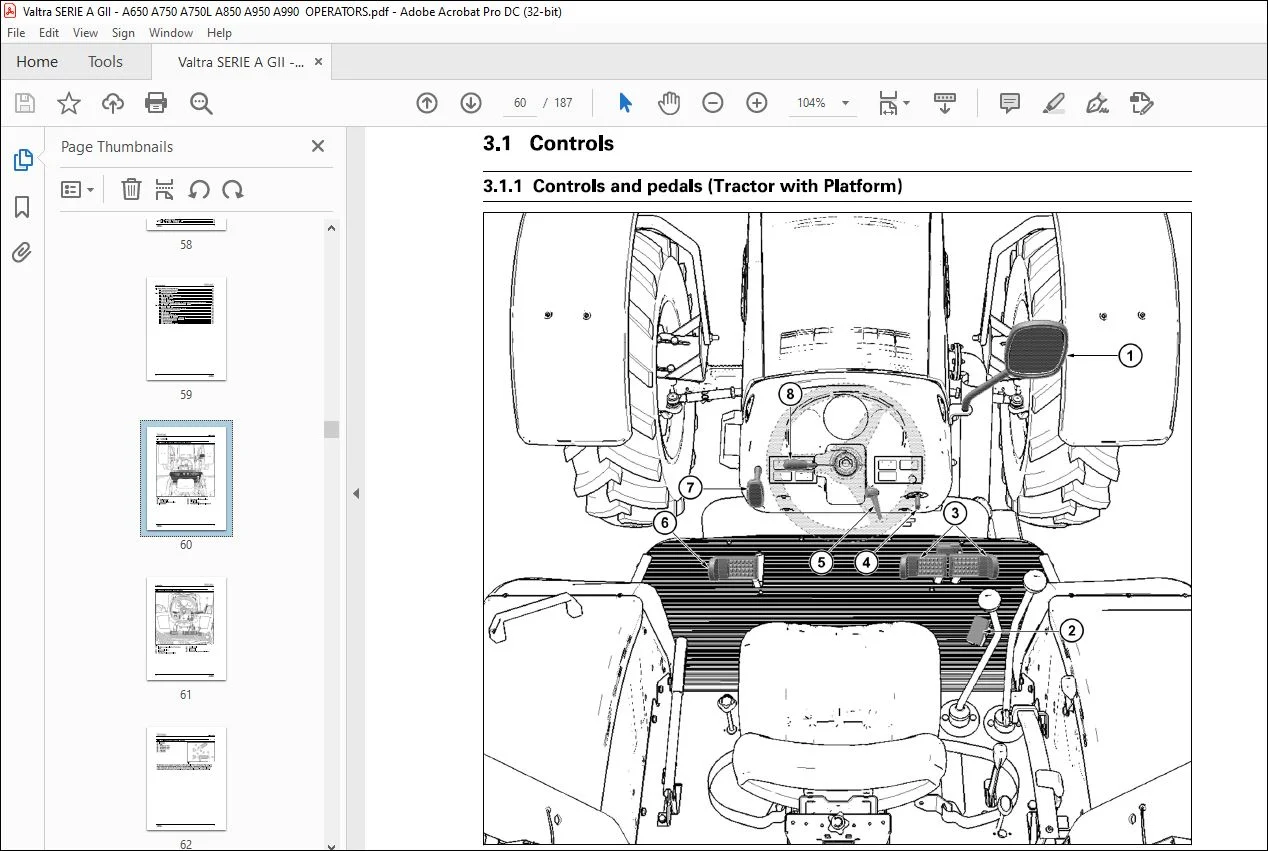
3 1 1 Controls and pedals (Tractor with Platform) 67
3 1 2 Controls and pedals (Cab Tractor) 68
3 1 3 Combination wrench (Cab Tractor) 69
3 1 4 Controls and levers (Tractor with Platform) 70
3 1 5 Right-hand side controls and levers (Cab Tractor) 71
3 1 6 Left-hand side controls and levers (Cab Tractor) 72
3 1 7 Instrument Panel (Tractor with Platform) 73
3 1 8 Instrument Panel (Cab Tractor) 74
3 1 9 Operator’s seat control 75
3 1 10 Controls on the right-hand side of the cab roof 75
3 2 Instrument panel 76
3 2 1 Light and headlights switch 76
3 2 2 Key for starting and stopping the engine 76
3 2 3 Warning lights switch (hazard lights) 76
3 2 4 Fuel indicator, tachometer and temperature indicator 77
3 2 5 Indicator lights and warning lights 78
3 3 Controls and equipment so
3 3 1 Clutch pedal 80
3 3 2 Power take-off clutch lever (Tractor with Platform) 80
3 3 3 PTO drive switch (Cab Tractor) 80
3 3 4 Power take-off lever 81
3 3 5 Throttle pedal 81
3 3 6 Brake pedals 82
3 3 7 Hand throttle lever 82
3 3 8 Steering wheel 83
3 3 9 Gearshift control lever 83
3 3 9 1 STD group lever 83
3 3 9 2 Gear selection lever 84
3 3 9 3 Splitter/creeper lever 85
3 3 9 4 Group lever with speed inverter (optional) 85
3 3 9 5 Gear selection lever with inverter (optional) 86
3 3 9 6 Operation with the gearbox 86
3 3 10 Differential lock lever 87
3 3 11 Hydraulic system position control lever 87
3 3 12 Lowering speed control lever 88
3 3 13 Parking brake lever 89
3 3 14 Front-wheel drive engage lever 89
3 3 15 Remote control valve control lever (optional) 90
3 3 15 1 Quick-coupling valve 91
3 4 Engine start-up 92
3 4 1 Engine start-up 92
3 4 2 Start-up with auxiliary battery 92
3 4 2 1 Connecting cables 93
3 4 2 2 Engine start-up 93
3 4 2 3 Disconnecting cables 93
3 5 Prolonged downtime 94
3 5 1 Prolonged downtime 94
3 6 Fuel filling and cleaning the filter 95
3 6 1 Fuel filling and cleaning the filter 95
3 7 Care during and after the job 96
3 7 1 Care during and after the job 96
3 7 2 Shutting down the engine 96
3 8 Three-point system 97
3 8 1 Three-point system 97
3 8 2 Pulse lever to eliminate sensitivity 97
3 8 3 Lower coupling arm 98
3 8 4 Upper lift arm 98
3 8 5 Upper link arm (3-point) 98
3 8 6 Support for the hydraulic system’s 3-point upper arm and sensitivity mechanism 99
3 8 7 Use of the 3-point hitch system without implements 99
3 9 General guidelines 1 oo
3 9 1 General guidelines 100
3 9 2 To engage the PTO (Tractor with Platform) 100
3 9 3 To engage the PTO (Cab Tractor) 101
3 9 4 Trailer 101
3 9 5 Using the trailer 101
3 9 6 Using the power take-off 102
3 9 7 Using the hook and draw bar 102
3 9 8 Remote control valve for auxiliary hydraulics 103
3 9 9 Checking and adding hydraulic system oil 103
3 9 10 Opening the rear window 104
3 9 11 Air conditioning 104
3 9 12 Air-conditioning installation 105
4 1 Maintenance services 109
4 1 1 Lubrication with grease gun 109
4 1 2 Maintenance and lubrication plan 109
4 1 3 Engine break-In 109
4 1 4 General instructions for checking and filling oil 111
4 2 Recommended fuel and lubricants 112
4 3 Periodic servicing 114
4 3 1 Periodic servicing of the engine, fuel and cooling system 114
4 3 2 Periodic servicing – clutch 115
4 3 3 Periodic servicing – gearbox/final drive, rear axle and hydraulic system 115
4 3 4 Periodic servicing – brakes 116
4 3 5 Periodic servicing – front axle and steering 116
4 3 6 Periodic servicing – cab and air conditioner 117
4 3 7 Periodic servicing – electrical system and instruments 118
4 3 8 Periodic servicing – general 119
4 4 Cleaning operations 120
4 4 1 Dust exhaust valve 120
4 4 2 Cleaning or replacing the filter elements 120
4 4 3 Cleaning the radiator grate and core 121
4 4 4 Cleaning the cooling system 121
4 4 5 Cleaning the fuel tank 121
4 4 6 Cleaning the hydraulic system suction filter 122
4 4 7 Cleaning the gearbox vent 123
4 4 8 Cleaning the front-wheel drive axle vent 123
4 5 Lubrications 124
4 5 1 Lubrication of the knuckles of the group and gearshift lever 124
4 5 2 Lubrication of the rear axle bearings 124
4 5 3 Lubricating the sleeve (4×2) 124
4 5 4 Lubrication of the wheel hub knuckles 125
4 5 5 Lubricating the wheel hub (4X2) 125
4 5 6 Lubrication of the felt of the clutch guide bushing bearing 126
4 5 7 Lubrication of the 3-point system 126
4 5 8 Lubricating the front axle and linkages (4X2) 126
4 5 9 Lubrication of 4×4 front and rear bearings 127
4 5 10 Universal cardan joints 127
4 6 Bleeding and replacements 128
4 6 1 Bleeding the injection pump 128
4 6 2 Bleeding the fuel filter 128
4 6 3 Bleeding the fuel system 128
4 6 4 Bleeding and/or cleaning the hydraulic brake circuit 128
4 6 5 Draining the sedimenter pre-filter 129
4 6 6 Draining the cooling system 130
4 6 7 Replacing the fuel filter 130
4 6 8 Replacing the engine oil and filter 130
4 6 9 Replacing the gearbox oil filter 132
4 6 10 Replacing the gearbox and splitter/creeper oil 132
4 6 11 Replacing the planetary gear lubricant oil 133
4 6 12 Replacing the front axle differential oil 134
4 7 Checks and adjustments 135
4 7 1 Checking the protective caps on the gear and group levers 135
4 7 2 Checking the wheel cylinder cup 135
4 7 3 Checking the level of oil in the gearbox, final reduction and splitter/creeper 135
4 7 4 Checking the planetary gears oil level 136
4 7 5 Checking the engine oil level 136
4 7 6 Checking the engine coolant level 136
4 7 7 Checking the front axle differential oil level 137
4 7 8 Checking the oil level of the hydraulic lifting and steering system 138
4 7 9 Checking the level of brake fluid 138
4 7 10 Checking the turbocharger 138
4 7 11 General check of clamp tightness 139
4 7 12 Checking or replacing the steering and hydraulic system vent cover 139
4 7 13 Checking and adjusting the alternator belt 139
4 7 14 Checking the alternator load conditions 140
4 7 15 Checking and adjusting the free play of the brake pedals 140
4 7 16 Checking and adjusting the free play of the parking brake 141
4 7 17 Checking and adjusting the free play of the clutch pedal 141
4 7 18 Checking the slack of the power take-off clutch lever 142
4 7 19 Checking the tightness of the wheel nuts 142
4 7 20 Checking the tyre pressure 142
4 7 21 Checking the battery terminals 143
4 7 22 Checking the air-conditioning system 143
4 7 23 Checking the starter motor conditions 144
4 7 24 Inspecting and maintaining the safety belt 144
4 7 25 Filling the cooling system 144
4 7 25 1 Adding radiator additive to the cooling system 145
4 7 26 Adjusting the slack of the front wheel hubs only for tractors with 4×2 145
4 7 27 Removing the battery (Tractor with Platform) 146
4 7 28 Removing the battery (Cab Tractor) 146
4 8 Adjustments and replacements 148
4 8 1 Operator’s seat 148
4 8 2 Adjusting the throttle 148
4 8 3 Replacing the fuses (Tractor with Platform) 149
4 8 4 Replacing the fuses (Cab Tractor) 151
4 8 5 Ballasting the tractor 153
4 8 5 1 With counterweights 153
4 8 5 2 Rear tyre inflation with water 154
4 9 Steering system 155
108
4 9 1 Checking and adjusting the front wheel convergence (4×2 models) 155
4 9 2 Adjusting the front-wheel drive toe-in (4×4 models) 155
4 9 3 Front tread adjustment (4×2) 156
4 9 4 Adjusting the stop of the front-wheel drive axle (4×4 models) 157
4 9 5 Adjusting the front track (for 4×4 models) 157
4 9 6 Adjusting the rear track 158
5 1 Diagnosis of faults 161
5 1 1 Fault diagnostics 161
6 1 Technical Specifications 169
6 1 1 Engine 169
6 1 1 1 Engine lubrication system 169
6 1 1 2 Air filter and fuel system 170
6 1 1 3 Cooling system 170
6 1 2 Gearbox 171
6 1 3 Clutch 172
6 1 4 Splitter/creeper 172
6 1 5 Speeds at 2000 rpm 172
6 1 6 Power take-off 174
6 1 7 Rear axle tracks 175
6 1 8 Air-conditioned cab 176
6 1 9 Dimensional characteristics 177
6 1 10 Tyre pressure and load (speed 32 km/h) 177
6 1 11 4×4 front-wheel drive axle 178
6 1 12 4×2 front axle 179
6 1 13 Hydraulic lift 179
6 1 14 Mechanically controlled hydraulic lift 179
6 1 15 Maximum lift strength 180
6 1 16 Working hydraulics 180
6 1 17 Weights 181
6 1 18 Wheel set 181
6 1 19 Steering system 182
6 1 20 Electrical system 182
6 1 21 Tightening torque for wheels 182
6 1 22 Final drive and brakes 183
7 1 Accessories 187
7 1 1 Auxiliary hydraulic valve 187
7 1 2 Splitter/creeper 187
7 1 3 Speed inverter 188
7 1 3 1 Forward and reverse gear inversion lever (optional) 188
7 1 4 Operator’s seat 188
7 1 5 Radio (speaker mounting measurements) 189
7 1 6 Operator’s seat 190
7 1 7 Connection adjustment handle 190
Questions? Email us: [email protected]
PLEASE NOTE:
- This is the SAME exact manual used by your dealers to fix your vehicle.
- The same can be yours in the next 2-3 mins as you will be directed to the download page immediately after paying for the manual.
- Any queries / doubts regarding your purchase, please feel free to contact [email protected]
S.V