Ag Chem Applicator Liquid System Service Manual_79036467A – PDF DOWNLOAD
Original price was: $86.95.$29.95Current price is: $29.95.
Ag Chem Applicator Liquid System Service Manual_79036467A – PDF DOWNLOAD
Description
Ag Chem Applicator Liquid System Service Manual_79036467A – PDF DOWNLOAD
FILE DETAILS:
Ag Chem Applicator Liquid System Service Manual_79036467A – PDF DOWNLOAD
Language : English
Pages : 436
Downloadable : Yes
File Type : PDF
Size: 44.1 MB
IMAGES PREVIEW OF THE MANUAL:
DESCRIPTION:
Ag Chem Applicator Liquid System Service Manual_79036467A – PDF DOWNLOAD
Important safety information:
- Most accidents that involve product operation, maintenance and repair are caused by failure to observe
basic safety rules or precautions. An accident can often be avoided by recognizing potentially hazardous
situations before an accident occurs. A person must be alert to potential hazards. This person must also
have the necessary training, skills and tools to do these functions correctly. - Incorrect operation, lubrication, maintenance, or repair of this product can be dangerous and can result in
injury or death. - Do not operate or do any lubrication, maintenance or repair on this product, until you read and understand
the operation, lubrication, maintenance, and repair information. - Safety precautions and warnings are provided in this manual and on the product. If these hazard warnings
are not heeded, bodily injury or death can occur to you or other persons. - AGCO cannot anticipate every possible circumstance that might involve a potential hazard. The warnings in
this publication and on the product are, thus, not all-inclusive. If a tool, procedure, work method or
operating technique that is not specifically recommended by AGCO is used, you must satisfy yourself that
it is safe for you and others. You must make sure the product will not be damaged or made unsafe by the
operation, lubrication, maintenance, or repair procedures that you choose. - The information, specifications, and illustrations in this publication are based on the information that was
available at the time that the publication was written. The specifications, torques, pressures,
measurements, adjustments, illustrations, and other items can change at any time. These changes can
affect the service that is given to the product. Obtain the complete and most current information before
you start any job. AGCO dealers have the most current information available.
Prepare for operation:
- Read and understand all operating instructions and precautions in this manual before operating or servicing
the machine. - Make sure you know and understand the positions and operations of all controls. Make certain all controls
are in neutral and the parking brake is applied before starting the machine. - Make certain all people are well away from your area of work before starting and operating the machine.
Check and learn all controls in an area clear of people and obstacles before starting your work. Be aware of
the machine size and have enough space available to allow for operation. Never operate the machine at
high speeds in crowded places.
Emphasize the importance of using correct procedures when working around and operating the machine. - Do not let children or unqualified persons operate the machine. Keep others, especially children, away
from your area of work. Do not permit others to ride on the machine. - Make sure the machine is in the proper operating condition as stated in the Operator Manual. Make sure
the machine has the correct equipment required by local regulations.
A word to the operator Liquid system:
Safety It is your responsibility to read and understand the safety section in this manual and the manual for all attachments before operating this machine. Remember you are the key to safety.
- Good safety practices not only protect you, but also the people around you . Study the content in this manual and make the content a working part of your safety program. Keep in mind that this safety section is written only for this type of machine.
- Practice all other usual and customary safe working precautions, and above all remember – safety is your responsibility. You can prevent serious injury or death. This safety section is intended to point out some of the basic safety situations that may be encountered during the normal operation and maintenance of your machine.
- This section also suggests possible ways of dealing with these situations. This section is not a replacement for other safety practices featured in other sections of this manual. Personal injury or death may result if these precautions are not followed. Learn how to operate the machine and how to use the controls properly.
- Do not let anyone operate the machine without instruction and training. For your personal safety and the personal safety of others, follow all safety precautions and instructions found in the manuals and on safety signs affixed to the machine and all attachments. Use only approved attachments and equipment. Make sure your machine has the correct equipment needed by the local regulations.
TABLE OF CONTENTS:
Ag Chem Applicator Liquid System Service Manual_79036467A – PDF DOWNLOAD
1 Safety 1-1
1 1 Important safety information 1-3
1 1 1 Prepare for operation 1-3
1 1 2 A word to the operator 1-3
1 1 3 Safety alert symbol 1-4
1 1 4 Safety messages 1-5
1 1 5 Informational messages 1-5
1 1 6 General hazard information 1-5
1 1 7 Fire prevention and first aid 1-6
1 1 8 Mounting and dismounting the machine 1-7
1 1 9 Before starting the engine 1-8
1 1 10 Engine starting 1-8
1 1 11 Before operating the machine 1-8
1 1 12 Operating the machine 1-8
1 1 13 Parking the machine 1-10
1 1 14 Operator station 1-10
1 1 15 Exiting the cab in an emergency 1-10
1 1 16 Safety lamps and marking devices use 1-11
1 1 17 Roading on public roads 1-11
1 1 18 Operating on a slope 1-12
1 1 19 Maintenance safety 1-12
1 1 20 Proper disposal of waste 1-16
1 1 21 Support the machine correctly 1-16
1 1 22 Asbestos information 1-17
1 1 23 Pressurized air 1-17
1 1 24 Electrical storm injury prevention 1-17
1 1 25 Cut and crushing prevention 1-17
1 1 26 Boom safety 1-18
1 1 27 Fuel safety 1-18
1 1 28 Hydraulic safety 1-18
1 1 29 Chemical safety 1-18
1 1 30 Avoid eye contact with radar 1-21
1 1 31 Exhaust fumes 1-21
1 1 32 Electrical power lines overhead 1-22
1 1 33 Shield and guards 1-22
1 1 34 Towing 1-23
1 1 35 Modifications 1-23
1 1 36 High pressure leaks 1-23
1 1 37 Engine safety 1-24
1 1 38 Battery safety 1-26
1 1 39 Tire safety 1-26
1 1 40 Mobile radio installation 1-27
1 1 41 Safety signs 1-27
1 2 Tightening specifications 1-29
1 2 1 Constant torque hose clamp 1-29
1 2 2 Fastener tightening specifications 1-29
1 2 3 Metric fasteners 1-32
1 2 4 Inch fasteners 1-33
1 2 5 Conversion table 1-37
2 Introduction 2-1
Liquid system
79036467A
Table of contents
2 1 Service manual 2-3
2 1 1 Units of measurement 2-3
2 1 2 Replacement parts 2-3
2 2 Lubrication and maintenance 2-4
2 2 1 Maintenance introduction 2-4
2 2 2 Lubricant filling reminders 2-4
2 2 3 Lubricants and fluids 2-4
3 Air system 3-1
3 1 Air system components 3-3
4 Hydraulics 4-1
4 1 System hydraulic pump 4-3
4 1 1 Removing the system hydraulic pump 4-3
4 1 2 Installing the system hydraulic pump 4-5
4 2 Hydraulic cylinder disassembly and assembly 4-8
4 2 1 Removing the lift cylinder from the boom 4-8
4 2 2 Removing the swing cylinder from the boom frame 4-10
4 2 3 Removing the boom tip cylinder 4-12
4 2 4 Removing the head gland (wrap-in wire) 4-13
4 2 5 Removing the head gland (with external threads) 4-15
4 2 6 Removing the head gland (with internal threads) 4-16
4 2 7 Removing the head gland (retaining ring) 4-18
4 2 8 Removing the rod assembly 4-20
4 2 9 Removing a threaded piston 4-20
4 2 10 Removing a lock nut piston 4-22
4 2 11 Removing the piston seal 4-23
4 2 12 Removing the head gland seal 4-24
4 2 13 Installing the piston seal 4-25
4 2 14 Installing the head gland seal 4-26
4 2 15 Installing the head gland (wrap-in wire) 4-28
4 2 16 Installing the head gland (with external threads) 4-31
4 2 17 Installing the head gland (with internal threads) 4-32
4 2 18 Installing the head gland (retaining ring) 4-33
4 2 19 Installing a threaded piston 4-34
4 2 20 Installing a lock nut piston 4-37
4 2 21 Installing the rod assembly 4-39
4 2 22 Installing the lift cylinder onto the boom 4-41
4 2 23 Installing the swing cylinder onto the boom frame 4-42
4 3 Boom motion hydraulic circuit 4-44
4 3 1 Boom motion hydraulic circuit 4-44
4 3 2 Boom motion hydraulic circuit components 4-44
4 3 3 The rear boom frame lift cylinders location 4-45
4 3 4 The boom lift cylinders location 4-46
4 3 5 The boom swing cylinders location 4-46
4 3 6 Hydraulic schematic for boom motion 4-47
4 4 Hydraulic valve bank disassembly and assembly 4-50
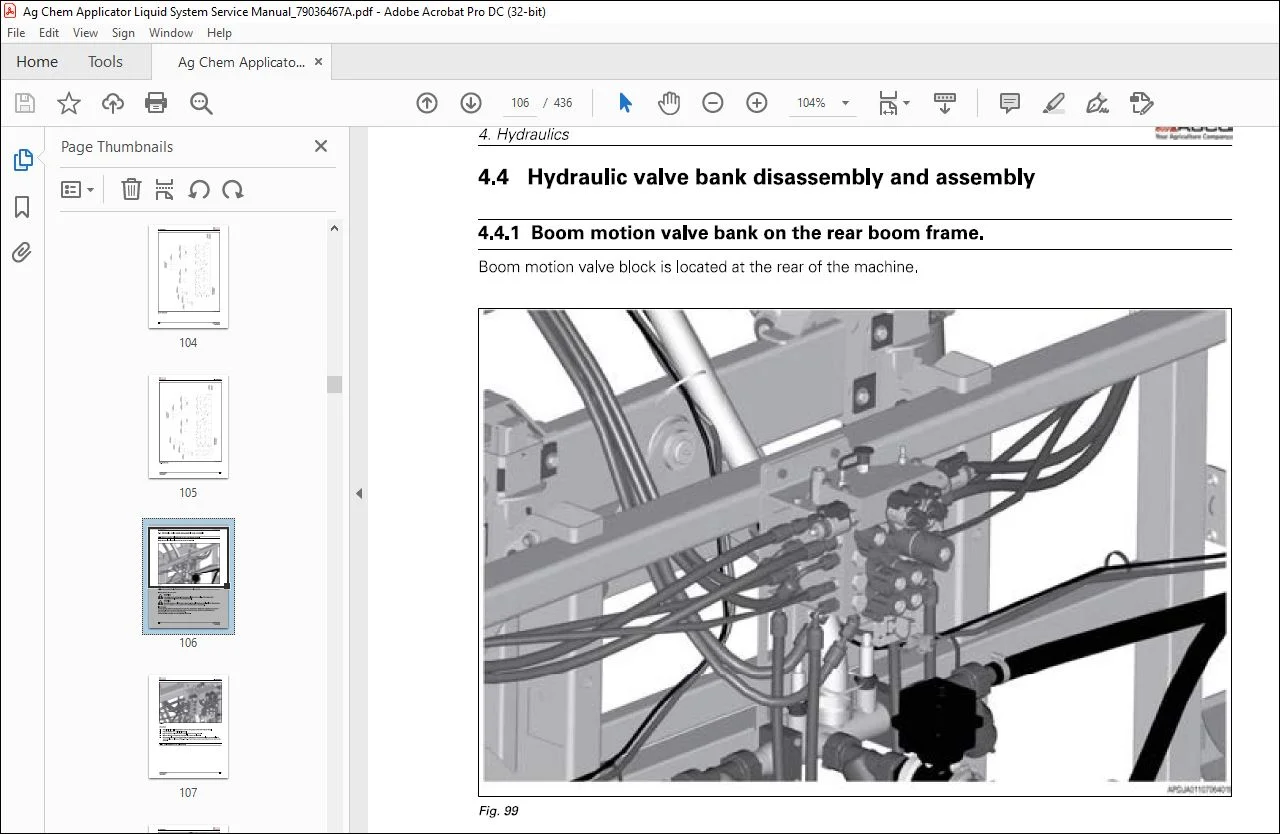
4 4 1 Boom motion valve bank on the rear boom frame 4-50
4 4 2 Removing the left-hand hoses from the valve bank 4-50
4 4 3 Left-hand ports on valve bank 4-51
4 4 4 Removing the right-hand hoses from the valve bank 4-52
4 4 5 Right-hand ports on valve bank 4-53
4 4 6 Removing the boom motion valve block from the rear boom frame 4-54
4 4 7 Removing the brackets from the boom motion block 4-55
4 4 8 Removal of the hydraulic fittings from valve block 4-56
4 4 9 Removing the orifices from the boom motion valve block 4-57
Liquid system
79036467A
Table of contents
4 4 10 Remove the raven autoboom valve block from the boom motion valve block 4-57
4 4 11 Removing relief cartridge valve 4-58
4 4 12 Removing the solenoids from boom motion valve block 4-58
4 4 13 Installation of solenoids into boom motion valve block assembly 4-59
4 4 14 Installing the orifices into the boom motion valve block 4-59
4 4 15 Installing the hydraulic adapter fittings into the boom motion valve block 4-60
4 4 16 Installing the relief cartridge valve 4-61
4 4 17 Installing the Raven autoboom valve block 4-61
4 4 18 Installing the bracket onto the boom motion block 4-62
4 4 19 Installing the boom motion valve block onto the rear boom frame 4-63
4 4 20 Installing the left-hand hoses onto the valve block 4-63
4 4 21 Installing the right-hand hoses onto the valve block 4-66
5 Electrical 5-1
5 1 Product control 5-3
5 1 1 Installing an actuator 5-3
5 1 2 Removing an actuator 5-3
5 2 SA 192 System module 5-5
Liquid system
79036467A
5 2 1 Code SA 192 SPN 2368 FM I 05 5-5
5 2 2 Code SA 192 SPN 2368 FMI 06 5-8
5 2 3 Code SA 192 SPN 2370 FM I 06 5-10
5 2 4 Code SA 192 SPN 2372 FM I 05 5-13
5 2 5 Code SA 192 SPN 2372 FMI 06 5-16
5 2 6 Code SA 192 SPN 2374 FMI 05 5-19
5 2 7 Code SA 192 SPN 2374 FMI 06 5-22
5 2 8 Code SA 192 SPN 2392 FMI 05 5-25
5 2 9 Code SA 192 SPN 2404 FMI 05 5-28
5 2 10 Code SA 192 SPN 2404 FMI 06 5-31
5 2 11 Code SA 192 SPN 522020 FMI 05 5-33
5 2 12 Code SA 192 SPN 522020 FMI 06 5-36
5 2 13 Code SA 192 SPN 522021 FMI 05 5-39
5 2 14 Code SA 192 SPN 522021 FMI 06 5-42
5 2 15 Code SA 192 SPN 522022 FMI 05 5-45
5 2 16 Code SA 192 SPN 522022 FMI 06 5-48
5 2 17 Code SA 192 SPN 522023 FMI 05 5-51
5 2 18 Code SA 192 SPN 522023 FMI 06 5-54
5 2 19 Code SA 192 SPN 522024 FMI 05 5-57
5 2 20 Code SA 192 SPN 522024 FMI 06 5-60
5 2 21 Code SA 192 SPN 522025 FMI 05 5-63
5 2 22 Code SA 192 SPN 522025 FMI 06 5-66
5 2 23 Code SA 192 SPN 522026 FMI 05 5-69
5 2 24 Code SA 192 SPN 522026 FMI 06 5-72
5 2 25 Code SA 192 SPN 522027 FMI 05 5-75
5 2 26 Code SA 192 SPN 522027 FMI 06 5-78
5 2 27 Code SA 192 SPN 522028 FMI 05 5-81
5 2 28 Code SA 192 SPN 522028 FMI 06 5-84
5 2 29 Code SA 192 SPN 522029 FMI 05 5-87
5 2 30 Code SA 192 SPN 522029 FMI 06 5-90
5 2 31 Code SA 192 SPN 522030 FMI 05 5-93
5 2 32 Code SA 192 SPN 522030 FMI 06 5-96
5 2 33 Code SA 192 SPN 522031 FMI 05 5-99
5 2 34 Code SA 192 SPN 522031 FMI 06 5-102
5 2 35 Code SA 192 SPN 522032 FMI 05 5-105
5 2 36 Code SA 192 SPN 522032 FMI 06 5-109
5 2 37 Code SA 192 SPN 522033 FMI 05 5-112
5 2 38 Code SA 192 SPN 522033 FMI 06 5-116
5 2 39 Code SA 192 SPN 522037 FMI 05 5-119
Table of contents
5 2 40 Code SA 192 SPN 522037 FMI 06 5-123
5 2 41 Code SA 192 SPN 522038 FMI 05 5-126
5 2 42 Code SA 192 SPN 522038 FMI 06 5-129
5 2 43 Code SA 192 SPN 522039 FMI 05 5-132
5 2 44 Code SA 192 SPN 522039 FMI 06 5-136
5 2 45 Code SA 192 SPN 522040 FMI 05 5-139
5 2 46 Code SA 192 SPN 522040 FMI 06 5-142
5 2 47 Code SA 192 SPN 522041 FMI 05 5-145
5 2 48 Code SA 192 SPN 522041 FMI 06 5-148
5 2 49 Code SA 192 SPN 522042 FMI 05 5-151
5 2 50 Code SA 192 SPN 522042 FMI 06 5-154
5 2 51 Code SA 192 SPN 522043 FMI 05 5-157
5 2 52 Code SA 192 SPN 522043 FMI 06 5-160
5 2 53 Code SA 192 SPN 522044 FMI 05 5-163
5 2 54 Code SA 192 SPN 522044 FMI 06 5-166
5 2 55 Code SA 192 SPN 522045 FMI 05 5-169
5 2 56 Code SA 192 SPN 522045 FMI 06 5-172
5 2 57 Code SA 192 SPN 522050 FMI 05 5-175
5 2 58 Code SA 192 SPN 522050 FMI 06 5-177
5 2 59 Code SA 192 SPN 522051 FMI 05 5-179
5 2 60 Code SA 192 SPN 522051 FMI 06 5-182
5 2 61 Code SA 192 SPN 522052 FMI 05 5-184
5 2 62 Code SA 192 SPN 522052 FMI 06 5-186
5 2 63 Code SA 192 SPN 522053 FMI 06 5-188
5 2 64 Code SA 192 SPN 522056 FMI 00 5-189
5 2 65 Code SA 192 SPN 522056 FMI 01 5-192
5 2 66 Code SA 192 SPN 522056 FMI 03 5-195
5 2 67 Code SA 192 SPN 522056 FMI 04 5-198
5 2 68 Code SA 192 SPN 522057 FMI 00 5-201
5 2 69 Code SA 192 SPN 522057 FMI 01 5-204
5 2 70 Code SA 192 SPN 522057 FMI 03 5-207
5 2 71 Code SA 192 SPN 522057 FMI 04 5-210
5 2 72 Code SA 192 SPN 522058 FMI 02 5-213
5 2 73 Code SA 192 SPN 522059 FMI 02 5-214
5 2 74 Code SA 192 SPN 522172 FMI 14 5-215
5 2 75 Code SA 192 SPN 522173 FMI 14 5-217
6 Decals 6-1
6 1 Decal locations 6-3
7 Product containment 7-1
7 1 Hand rinse tank 7-3
7 1 1 Removing the hand rinse tank 7-3
7 1 2 Installing the hand rinse tank 7-5
7 2 Product tank 7-8
7 2 1 Removing the product tank 7-8
7 2 2 Installing the product tank 7-11
8 Product distribution 8-1
8 1 Product pump 8-3
8 1 1 Removing the product pump 8-3
8 1 2 Disassembling the product pump 8-4
8 1 3 Assembling the product pump 8-4
8 1 4 Installing the product pump 8-5
8 2 System plumbing 8-7
8 2 1 Manual valve locations 8-8
Liquid system
79036467A
Table of contents
8 3 Line strainer 8-1 o
8 3 1 Removing the system line strainer 8-10
8 3 2 Installing the system line strainer 8-10
9 Booms 9-1
9 1 Boom plumbing 9-3
9 1 1 Removing the boom tree manifold 9-3
9 1 2 Installing the boom tree manifold 9-5
9 1 3 Removing the boom strainers 9-8
9 1 4 Installing the boom strainers 9-8
9 2 Boom assembly 9-1 o
9 2 1 Removing the boom 9-10
9 2 2 Installing the boom 9-12
10 Foam marker 10-1
10 1 Foam marker components 10-3
10 2 Troubleshooting the foam marker system 10-6
11 Accessories 11-1
11 1 Eductor 11-3
11 1 1 Removing the eductor 11-3
11 1 2 Eductor assembly 11-4
11 1 3 Eductor plumbing 11-5
11 1 4 Installing the eductor 11-5
12 Schematics 12-1
12 1 Liquid system electrical schematics 12-3
14 Index lndex-1
Liquid system
79036467A
Questions? Email us: [email protected]
PLEASE NOTE:
- This is the SAME exact manual used by your dealers to fix your vehicle.
- The same can be yours in the next 2-3 mins as you will be directed to the download page immediately after paying for the manual.
- Any queries / doubts regarding your purchase, please feel free to contact [email protected]
S.V