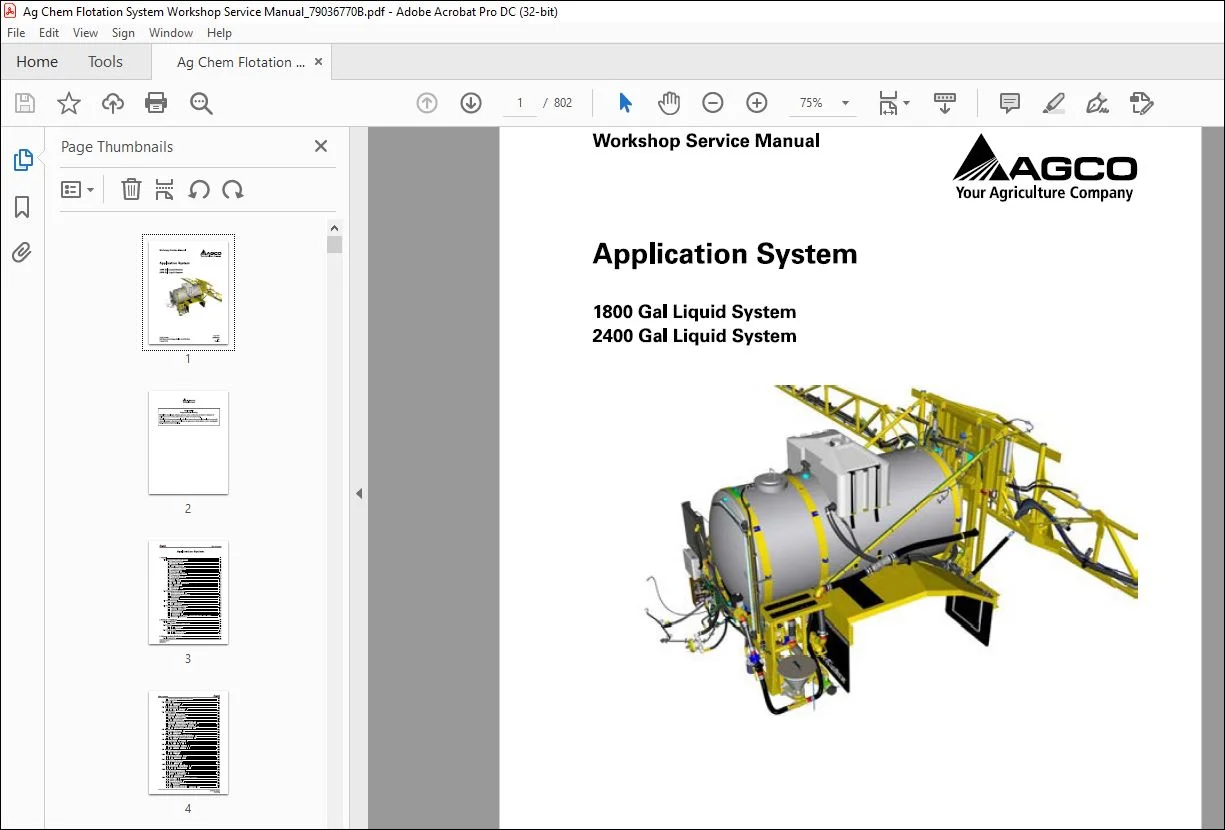

Ag Chem Application System 1800 & 2400 Gal Liquid System Workshop Service Manual_79036770B – PDF DOWNLOAD
Original price was: $89.95.$33.95Current price is: $33.95.
Ag Chem Application System 1800 & 2400 Gal Liquid System Workshop Service Manual_79036770B – PDF DOWNLOAD
Description
Ag Chem Application System 1800 & 2400 Gal Liquid System Workshop Service Manual_79036770B – PDF DOWNLOAD
FILE DETAILS:
Ag Chem Application System 1800 & 2400 Gal Liquid System Workshop Service Manual_79036770B – PDF DOWNLOAD
Language : English
Pages : 802
Downloadable : Yes
File Type : PDF
Size: 94.5 MB
IMAGES PREVIEW OF THE MANUAL:
DESCRIPTION:
Ag Chem Application System 1800 & 2400 Gal Liquid System Workshop Service Manual_79036770B – PDF DOWNLOAD
Important safety information:
- Most accidents that involve product operation, maintenance and repair are caused by failure to observe
basic safety rules or precautions. An accident can often be avoided by recognizing potentially hazardous
situations before an accident occurs. A person must be alert to potential hazards. This person must also
have the necessary training, skills and tools to do these functions correctly. - Incorrect operation, lubrication, maintenance, or repair of this product can be dangerous and can result in
injury or death. - Do not operate or do any lubrication, maintenance or repair on this product, until you read and understand
the operation, lubrication, maintenance, and repair information. - Safety precautions and warnings are provided in this manual and on the product. If these hazard warnings
are not heeded, bodily injury or death can occur to you or other persons. - AGCO cannot anticipate every possible circumstance that might involve a potential hazard. The warnings in
this publication and on the product are, thus, not all-inclusive. If a tool, procedure, work method or
operating technique that is not specifically recommended by AGCO is used, you must satisfy yourself that
it is safe for you and others. You must make sure the product will not be damaged or made unsafe by the
operation, lubrication, maintenance, or repair procedures that you choose. - The information, specifications, and illustrations in this publication are based on the information that was
available at the time that the publication was written. The specifications, torques, pressures,
measurements, adjustments, illustrations, and other items can change at any time. These changes can
affect the service that is given to the product. Obtain the complete and most current information before
you start any job. AGCO dealers have the most current information available.
Prepare for operation:
- Read and understand all operating instructions and precautions in this manual before operating or servicing
the machine. - Make sure you know and understand the positions and operations of all controls. Make certain all controls
are in neutral and the park brake is applied before starting the machine. - Make certain all people are well away from your area of work before starting and operating the machine.
Check and learn all controls in an area clear of people and obstacles before starting your work. Be aware of
the machine size and have enough space available to allow for operation. Never operate the machine at
high speeds in crowded places. - Emphasize the importance of using correct procedures when working around and operating the machine.
Do not let children or unqualified persons operate the machine. Keep others, especially children, away
from your area of work. Do not permit others to ride on the machine. - Make sure the machine is in the proper operating condition as stated in the Operator Manual. Make sure
the machine has the correct equipment required by local regulations.
A word to the operator:
It is your responsibility to read and understand the safety section in this manual and the manual for all attachments before operating this machine. Remember you are the key to safety. Good safety practices not only protect you, but also the people around you .
- Study the content in this manual and make the content a working part of your safety program. Keep in mind that this safety section is written only for this type of machine. Practice all other usual and customary safe working precautions, and above all remember – safety is your responsibility. You can prevent serious injury or death.
- This safety section is intended to point out some of the basic safety situations that may be encountered during the normal operation and maintenance of your machine. This section also suggests possible ways of dealing with these situations. This section is not a replacement for other safety practices featured in other sections of this manual.
- Personal injury or death may result if these precautions are not followed. Learn how to operate the machine and how to use the controls properly. Do not let anyone operate the machine without instruction and training.
- For your personal safety and the personal safety of others, follow all safety precautions and instructions found in the manuals and on safety signs affixed to the machine and all attachments. Use only approved attachments and equipment. Make sure your machine has the correct equipment needed by the local regulations.
TABLE OF CONTENTS:
Ag Chem Application System 1800 & 2400 Gal Liquid System Workshop Service Manual_79036770B – PDF DOWNLOAD
1 General 1-1
1 1 Important safety information 1-3
1 1 1 Prepare for operation 1-3
1 1 2 A word to the operator 1-4
1 1 3 Safety symbol 1-5
1 1 4 Information messages 1-5
1 1 5 General hazard information 1-5
1 1 6 Fire prevention and first aid 1-6
1 1 7 Maintenance safety 1-7
1 1 8 Proper disposal of waste 1-11
1 1 9 Support the machine correctly 1-11
1 1 10 Pressurized air 1-11
1 1 11 Cut and crush prevention 1-12
1 1 12 Boom safety 1-12
1 1 13 Hydraulic safety 1-12
1 1 14 Chemical safety 1-13
1 1 15 Electrical power lines overhead 1-15
1 1 16 Shield and guards 1-15
1 1 17 Modifications 1-15
1 1 18 High pressure leaks 1-16
1 1 19 Safety signs 1-16
1 2 Tightening specifications 1-17
1 2 1 Constant torque hose clamp 1-17
1 2 2 Fastener tightening specifications 1-17
1 2 3 Metric fasteners 1-19
1 2 4 Inch fasteners 1-21
1 2 5 Conversion table 1-24
1 3 Service manual 1-25
1 3 1 Units of measurement 1-25
1 3 2 Replacement parts 1-25
1 4 Lubrication and maintenance 1-26
1 4 1 Maintenance introduction 1-26
1 4 2 Lubricant filling reminders 1-26
1 4 3 Lubricants and fluids 1-26
1 4 4 Maintenance schedule 1-27
1 4 5 Bleed the hydraulics 1-28
1 4 6 Bleed the hydraulics – 2400 gallon system with high volume plumbing 1-28
1 4 7 Winterize the liquid system 1-29
2 Product containment 2-1
2 1 Introduction 2-3
2 1 1 Product containment components 2-3
2 2 System 2-4
2 2 1 Remove the system 2-4
2 2 2 Install the system 2-8
2 3 Product tank 2-13
2 3 1 Remove the product tank 2-13
2 3 2 Install the product tank 2-16
3 Primary product distribution 3-1
3 1 Introduction 3-3
Application System
790367708
Table of contents ~•AGCO
Your Agriculture Company
3 1 1 Primary product distribution components 3-3
3 1 2 Product flow 3-5
3 2 Sump valve 3-6
3 2 1 Remove the sump valve 3-6
3 2 2 Install the sump valve 3-6
3 3 Reload suction valve 3-8
3 3 1 Remove the reload suction valve 3-8
3 3 2 Install the reload suction valve 3-8
3 4 Product pump 3-10
3 4 1 Remove the product pump 3-10
3 4 2 Disassemble the product pump 3-12
3 4 3 Assemble the product pump 3-13
3 4 4 Replace the product pump seal 3-15
3 4 5 Install the product pump 3-17
3 4 6 Remove the product pump – 2400 high volume 3-18
3 4 7 Disassemble the product pump – 2400 high volume 3-21
3 4 8 Assemble the product pump – 2400 high volume 3-22
3 4 9 Replace the product pump seal – 2400 high volume 3-23
3 4 10 Install the product pump – 2400 high volume 3-24
3 5 Sparger valve 3-27
3 5 1 Remove the sparger valve 3-27
3 5 2 Install the sparger valve 3-27
3 6 Pump pressure accumulator assembly 3-29
3 6 1 Remove the pump pressure gauge accumulator 3-29
3 6 2 Install the pump pressure gauge accumulator 3-30
3 7 Reload-bypass valve 3-32
3 7 1 Remove the reload-bypass valve 3-32
3 7 2 Install the reload-bypass valve 3-32
3 8 Manual rate control valve 3-34
3 8 1 Remove the manual rate control valve 3-34
3 8 2 Install the manual rate control valve 3-34
3 9 Strainer 3-36
3 9 1 Remove the strainer 3-36
3 9 2 Install the strainer 3-38
3 10 Chemical Eductor 3-40
3 10 1 Remove the chemical eductor 3-40
3 10 2 Install the chemical eductor 3-41
3 11 Flowmeter 3-42
3 11 1 Remove the flowmeter 3-42
3 11 2 Install the flowmeter 3-45
3 12 Electric rate control valve 3-48
3 12 1 Remove the electric rate control valve 3-48
3 12 2 Install the electric rate control valve 3-50
3 13 Boom manifold 3-52
3 13 1 Remove the boom manifold 3-52
3 13 2 Disassemble the boom manifold 3-55
3 13 3 Assemble the boom manifold 3-57
3 13 4 Install the boom manifold 3-59
3 14 Primary product distribution maintenance 3-61
3 14 1 Service a ball valve 3-61
3 14 2 Service a butterfly valve 3-61
3 14 3 Operate the fluid flush valve 3-61
3 14 4 Clean the strainer 3-63
3 14 5 Replace the product pump seal 3-63
3 14 6 Replace the product pump seal – 2400 high volume 3-65
Application System
790367708
~ A AGCO
Your Agriculture Company Table of contents
4 Secondary product distribution 4-1
4 1 Boom plumbing options 4-3
4 1 1 30 inch nozzle spacing 4-3
4 1 2 60 inch nozzle spacing 4-4
4 1 3 End row nozzles (if equipped) 4-4
4 1 4 Product recovery/Boom clean-out 4-5
4 2 Quick stop valve 4-6
4 2 1 Remove a quick stop valve 4-6
4 2 2 Install a quick stop valve 4-7
4 3 Nozzle pressure gauge accumulator 4-8
4 3 1 Remove the nozzle pressure gauge accumulator 4-8
4 3 2 Install the nozzle pressure gauge accumulator 4-10
4 4 Main boom butterfly valve 4-12
4 4 1 Remove a main boom butterfly valve 4-12
4 4 2 Install a main boom butterfly valve 4-14
4 5 Valve maintenance 4-16
4 5 1 Service a ball valve 4-16
4 5 2 Service a butterfly valve 4-16
4 6 Product plumbing maintenance 4-17
4 6 1 Clean out the booms through the nozzles 4-17
4 6 2 Clean out the booms through the tank 4-18
4 6 3 Release the boom line pressure 4-19
4 6 4 Replace a quick stop bladder 4-20
4 7 Product plumbing troubleshooting 4-21
5 Booms 5-1
5 1 Boom options 5-3
5 1 1 Boom break-away assembly 5-4
5 1 2 Boom fold-over assembly 5-4
5 2 80 foot boom 5-6
5 2 1 Remove the boom 5-6
5 2 2 Install the boom 5-8
5 2 3 Remove the boom tip 5-10
5 2 4 Install the boom tip 5-12
5 3 60-80 foot boom 5-15
5 3 1 Remove the boom 5-15
5 3 2 Install the boom 5-17
5 3 3 Remove the 60-80 foot boom fold 5-19
5 3 4 Install the 60-80 foot boom fold 5-22
5 3 5 Remove the boom tip 5-25
5 3 6 Install the boom tip 5-27
5 4 Ag-Chem boom frame 5-30
5 4 1 Remove the Ag-Chem boom frame 5-30
5 4 2 Install the Ag-Chem boom frame 5-33
5 5 Benson boom frame 5-37
5 5 1 Remove the Benson boom frame 5-37
5 5 2 Install the Benson boom frame 5-40
5 5 3 Remove the pivoting center weldment 5-44
5 5 4 Install the pivoting center weldment 5-47
5 6 Boom maintenance 5-52
5 6 1 Lubricate the boom fold 5-52
5 6 2 Lubricate the Benson boom frame 5-53
5 6 3 Lubricate the AGCO boom frame 5-54
5 6 4 Adjust the Benson boom 5-56
5 6 5 Adjust the booms 5-58
Application System
790367708
Table of contents ~•AGCO
Your Agriculture Company
5 6 6 Release the boom line pressure 5-61
6 Foam Marker 6-1
6 1 Foam marker system 6-3
6 2 Foam marker tank 6-4
6 2 1 Remove the foam marker tank 6-4
6 2 2 Disassemble the foam marker tank 6-5
6 2 3 Assemble the foam marker tank 6-6
6 2 4 Install the foam marker tank 6-7
6 3 Foam marker pressure regulator 6-8
6 3 1 Remove the foam marker pressure regulator 6-8
6 3 2 Install the foam marker pressure regulator 6-8
6 4 Foam marker gauge 6-10
6 4 1 Remove the foam marker gauge 6-10
6 4 2 Install the foam marker gauge 6-10
6 5 Foam marker enable solenoid 6-12
6 5 1 Remove the foam marker enable solenoid 6-12
6 5 2 Install the foam marker enable solenoid 6-12
6 6 Foam marker solenoid valve 6-14
6 6 1 Remove a foam marker solenoid valve 6-14
6 6 2 Install a foam marker solenoid valve 6-15
6 7 Foam marker maintenance 6-17
6 7 1 Fill the foam marker tank 6-17
6 7 2 Winterize the foam marker 6-17
6 8 Troubleshoot the foam marker 6-18
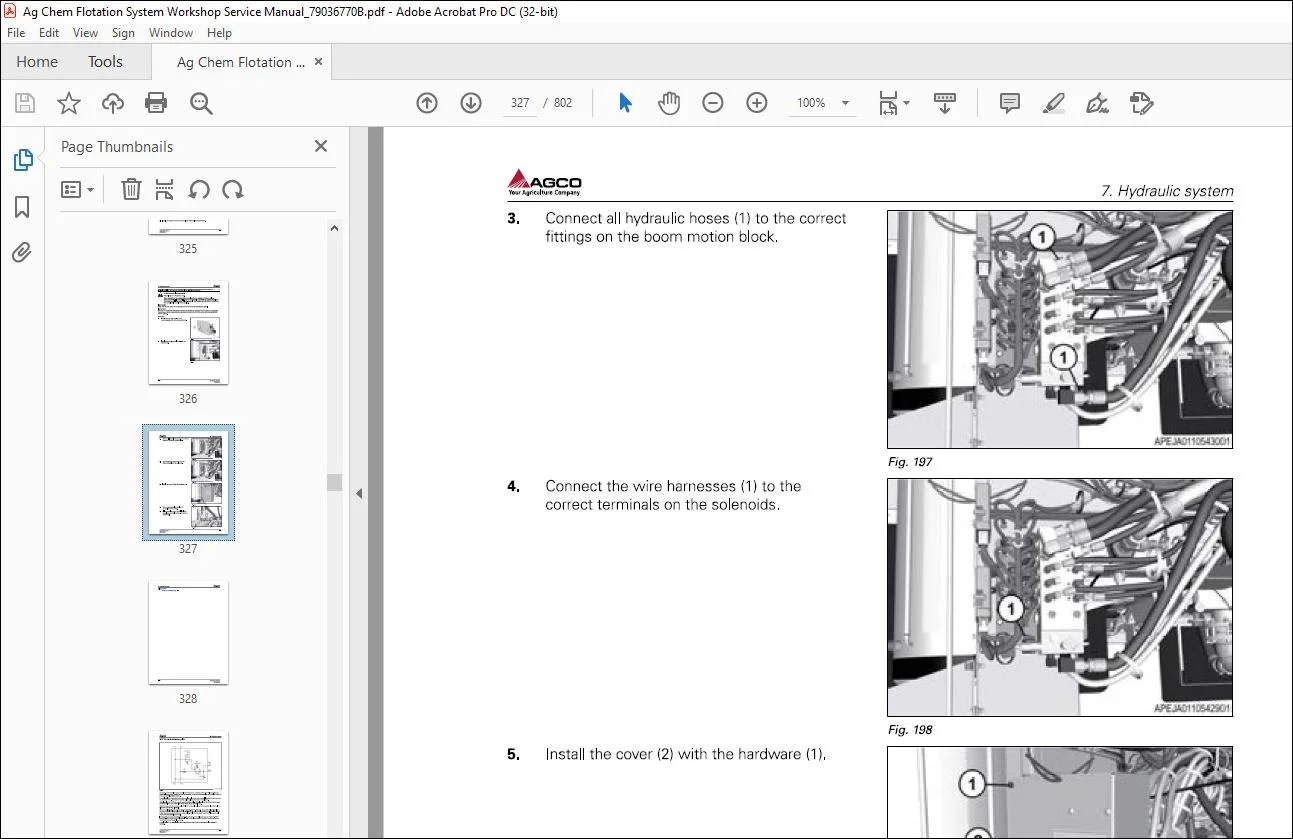
7 Hydraulic system 7-1
7 1 Product pump hydraulics 7-3
7 1 1 Product pump hydraulics – 1800 gallon 7-3
7 1 2 Product pump hydraulics – 2400 gallon low volume 7-4
7 1 3 Product pump hydraulics – 2400 gallon medium-high volume 7-5
7 1 4 Product pump hydraulic system operation 7-6
7 2 Gear pump 7-7
7 2 1 Remove the gear pump 7-7
7 2 2 Disassemble the gear pump – 1800 gal 7-10
7 2 3 Assemble the gear pump – 1800 gal 7-10
7 2 4 Disassemble the gear pump – 2400 gal 7-10
7 2 5 Assemble the gear pump – 2400 gal 7-11
7 2 6 Install the gear pump 7-11
7 3 Piston pump 7-14
7 3 1 Remove the piston pump 7-14
7 3 2 Install the piston pump 7-15
7 4 Control valve 7-17
7 4 1 Remove the control block 7-17
7 4 2 Disassemble the control block 7-19
7 4 3 Assemble the control block 7-20
7 4 4 Install the control block 7-20
7 5 Oil cooler 7-23
7 5 1 Remove the oil cooler – 1800 gal 7-23
7 5 2 Install the oil cooler – 1800 gal 7-25
7 5 3 Remove the oil cooler – 2400 gal 7-27
7 5 4 Install the oil cooler – 2400 gal 7-29
7 5 5 Remove the oil cooler – 2400 gal high volume 7-31
7 5 6 Install the oil cooler – 2400 gal high volume 7-33
7 5 7 Replace the hydraulic oil temperature switch 7-35
Application System
790367708
~ A AGCO
v Ag,kuhu,o(ompaoy Table of contents
7 6 Hydraulic tank 7-37
7 6 1 Remove the hydraulic tank – 1800 gal 7-37
7 6 2 Install the hydraulic tank – 1800 gal 7-40
7 6 3 Remove the hydraulic tank – 2400 gal 7-42
7 6 4 Install the hydraulic tank – 2400 gal 7-44
7 7 Filter assembly 7-47
7 7 1 Remove the filter assembly- 1800 gal 7-47
7 7 2 Install the filter assembly- 1800 gal 7-49
7 7 3 Remove the filter assembly – 2400 gal 7-51
7 7 4 Install the filter assembly – 2400 gal 7-54
7 7 5 Remove the charge filter assembly 7-55
7 7 6 Install the charge filter assembly 7-58
7 8 Hydraulic motor 7-61
7 8 1 Remove the gear motor 7-61
7 8 2 Install the gear motor 7-62
7 8 3 Remove the hydraulic motor – 2400 gal medium-high volume system 7-63
7 8 4 Disassemble the gear motor 7-65
7 8 5 Assemble the gear motor 7-66
7 8 6 Install the hydraulic motor – 2400 gal medium-high volume system 7-66
7 9 Boom motion hydraulics 7-68
7 9 1 Boom motion hydraulic operation – Benson boom 7-72
7 9 2 Boom motion hydraulic operation – Ag-Chem boom 7-75
7 10 Boom motion block – Benson boom 7-78
7 10 1 Remove the boom motion block – Benson boom 7-78
7 10 2 Disassemble the boom motion block- Benson boom 7-80
7 10 3 Assemble the boom motion block- Benson boom 7-81
7 10 4 Install the boom motion block – Benson boom 7-83
7 11 Boom motion block – Ag-Chem boom 7-86
7 11 1 Remove the boom motion block – Ag-Chem boom 7-86
7 11 2 Disassemble the boom motion block – Ag-Chem boom 7-88
7 11 3 Assemble the boom motion block – Ag-Chem boom 7-90
7 11 4 Installing the boom motion block -Ag-Chem boom 7-92
7 12 Boom break-away valve 7-95
7 12 1 Remove the boom break-away valve – Ag Chem 7-96
7 12 2 Disassemble the boom break-away valve 7-98
7 12 3 Assemble the boom break-away valve 7-99
7 12 4 Install the boom break-away valve -Ag Chem 7-100
7 12 5 Adjust the boom break-away pressure 7-102
7 13 Boom cylinders 7-104
7 13 1 Remove a boom tip fold cylinder 7-105
7 13 2 Install a boom tip fold cylinder 7-107
7 13 3 Remove a boom tilt cylinder 7-108
7 13 4 Install a boom tilt cylinder 7-109
7 13 5 Remove the inner boom hoist cylinder 7-110
7 13 6 Install the inner boom hoist cylinder 7-112
7 13 7 Remove the outer boom hoist cylinder 7-113
7 13 8 Install the outer boom hoist cylinder 7-115
7 13 9 Remove a boom swing cylinder – Benson boom 7-116
7 13 10 Install a boom swing cylinder- Benson boom 7-117
7 13 11 Remove a boom swing cylinder – Ag-Chem boom 7-118
7 13 12 Install a boom fold cylinder-Ag-Chem boom 7-119
7 13 13 Remove the leveler cylinder – Benson boom 7-120
7 13 14 Install the leveler cylinder – Benson boom 7-121
7 13 15 Remove the boom break-away cylinder 7-122
7 13 16 Install the boom break-away cylinder 7-123
7 14 Hydraulic system maintenance 7-125
Application System
790367708
Table of contents ~•AGCO
Your Agriculture Company
7 14 1 Change the hydraulic filter 7-125
7 14 2 Change the hydraulic oil 7-126
7 14 3 Replace the hydraulic tank breather 7-128
7 15 Troubleshoot the hydraulic system 7-129
8 Electrical system 8-1
8 1 Remote reload controls 8-5
8 1 1 Remove the remote reload controls 8-5
8 1 2 Install the remote reload controls 8-7
8 2 Boom pressure transducer 8-8
8 2 1 Remove the boom pressure transducer 8-8
8 2 2 Install the boom pressure transducer 8-10
8 3 Pump pressure sender 8-12
8 3 1 Remove the pump pressure sender 8-12
8 3 2 Install the pump pressure sender 8-14
8 4 Hydraulic oil cooling fan 8-16
8 4 1 Remove the hydraulic oil cooling fan 8-16
8 4 2 Install the hydraulic oil cooling fan 8-17
8 5 General electrical information 8-19
8 5 1 Introduction to the electrical system 8-19
8 5 2 Basic electrical troubleshooting procedures 8-19
8 5 3 Electrical service tools 8-19
8 5 4 Test a fuse 8-20
8 5 5 Test a diode 8-20
8 5 6 Test a relay 8-21
8 6 Fault codes 8-22
8 6 1 Code R610 8-22
8 6 1 1 Boom motion schematic 8-23
8 6 2 Code R611 8-24
8 6 2 1 Boom motion schematic 8-26
8 6 3 Code R612 8-27
8 6 3 1 Boom motion schematic 8-29
8 6 4 Code R613 8-30
8 6 4 1 Boom motion schematic 8-32
8 6 5 Code R614 8-33
8 6 5 1 Boom motion schematic 8-35
8 6 6 Code R615 8-36
8 6 6 1 Boom motion schematic 8-38
8 6 7 Code R616 8-39
8 6 7 1 Boom motion schematic 8-41
8 6 8 Code R617 8-42
8 6 8 1 Boom motion schematic 8-44
8 6 9 Code R618 8-45
8 6 9 1 Boom motion schematic 8-47
8 6 10 Code R619 8-48
8 6 10 1 Boom motion schematic 8-50
8 6 11 Code R620 8-51
8 6 11 1 Boom motion schematic 8-53
8 6 12 Code R621 8-54
8 6 12 1 Boom motion schematic 8-56
8 6 13 Code R622 8-57
8 6 13 1 Boom motion schematic 8-59
8 6 14 Code R623 8-60
8 6 14 1 Boom motion schematic 8-62
8 6 15 Code R624 8-63
8 6 15 1 Boom motion schematic 8-65
8 6 16 Code R625 8-66
Application System
790367708
~ A AGCO
Your Agriculture Company Table of contents
8 6 16 1 Boom motion schematic 8-68
8 6 17 Code R626 8-69
8 6 17 1 Boom motion schematic 8-71
8 6 18 Code R627 8-72
8 6 18 1 Boom motion schematic 8-74
8 6 19 Code R628 8-75
8 6 19 1 Foam marker system schematic 8-77
8 6 20 Code R629 8-78
8 6 20 1 Foam marker system schematic 8-80
8 6 21 Code R630 8-81
8 6 21 1 Foam marker system schematic 8-83
8 6 22 Code R631 8-84
8 6 22 1 Foam marker system schematic 8-86
8 6 23 Code R632 8-87
8 6 23 1 Foam marker system schematic 8-89
8 6 24 Code R633 8-90
8 6 24 1 Foam marker system schematic 8-92
8 6 25 Code R634 8-93
8 6 25 1 Pump enable schematic 8-95
8 6 26 Code R635 8-96
8 6 26 1 Pump enable schematic 8-98
8 6 27 Code R636 8-99
8 6 27 1 Sump enable schematic 8-101
8 6 28 Code R637 8-104
8 6 28 1 Sump enable schematic 8-106
8 6 29 Code R638 8-109
8 6 29 1 Sump enable schematic 8-111
8 6 30 Code R639 8-114
8 6 30 1 Sump enable schematic 8-116
8 6 31 Code R640 8-119
8 6 31 1 Sump enable schematic 8-121
8 6 32 Code R641 8-124
8 6 32 1 Sump enable schematic 8-126
8 6 33 Code R642 8-129
8 6 33 1 Sump enable schematic 8-131
8 6 34 Code R643 8-134
8 6 34 1 Sump enable schematic 8-136
8 6 35 Code R644 8-139
8 6 35 1 Sump enable schematic 8-141
8 6 36 Code R645 8-144
8 6 36 1 Sump enable schematic 8-146
8 6 37 Code R646 8-150
8 6 37 1 Boom motion schematic 8-150
8 6 38 Code R647 8-152
8 6 38 1 Boom motion schematic 8-152
8 6 39 Code R648 8-154
8 6 39 1 Boom motion schematic 8-154
8 6 40 Code R649 8-156
8 6 40 1 Boom motion schematic 8-156
8 6 41 Code R650 8-158
8 6 41 1 Boom motion schematic 8-158
8 6 42 Code R651 8-160
8 6 42 1 Boom motion schematic 8-160
8 6 43 Code R652 8-162
8 6 43 1 Boom motion schematic 8-162
8 6 44 Code R653 8-164
8 6 44 1 Boom motion schematic 8-164
8 6 45 Code R654 8-165
Application System
790367708
Table of contents ~•AGCO
Your Agriculture Company
8 6 45 1 Boom motion schematic 8-167
8 6 46 Code R655 8-168
8 6 46 1 Boom motion schematic 8-170
8 6 47 Code R656 8-171
8 6 47 1 Boom motion schematic 8-173
8 6 48 Code R657 8-174
8 6 48 1 Boom motion schematic 8-176
8 6 49 Code R658 8-177
8 6 49 1 Boom motion schematic 8-179
8 6 50 Code R659 8-180
8 6 50 1 Boom motion schematic 8-182
8 6 51 Code R660 8-183
8 6 51 1 Boom motion schematic 8-185
8 6 52 Code R661 8-186
8 6 52 1 Boom motion schematic 8-188
8 6 53 CodeR664 8-189
8 6 53 1 Boom section schematic 8-191
8 6 54 Code R665 8-192
8 6 54 1 Boom section schematic 8-194
8 6 55 Code R666 8-195
8 6 55 1 Boom section schematic 8-197
8 6 56 Code R667 8-198
8 6 56 1 Boom section schematic 8-200
8 6 57 Code R668 8-201
8 6 57 1 Boom section schematic 8-203
8 6 58 Code R669 8-204
8 6 58 1 Boom section schematic 8-206
8 6 59 Code R670 8-207
8 6 59 1 Boom section schematic 8-209
8 6 60 Code R671 8-210
8 6 60 1 Boom section schematic 8-212
8 6 61 Code R672 8-213
8 6 61 1 Boom section schematic 8-215
8 6 62 Code R673 8-216
8 6 62 1 Boom section schematic 8-218
8 6 63 Code R674 8-219
8 6 63 1 Boom section schematic 8-221
8 6 64 Code R675 8-222
8 6 64 1 Boom section schematic 8-224
8 6 65 Code R676 8-225
8 6 65 1 Boom section schematic 8-227
8 6 66 Code R677 8-228
8 6 66 1 Boom section schematic 8-230
8 6 67 Code R678 8-231
8 6 67 1 Boom section schematic 8-233
8 6 68 Code R679 8-234
8 6 68 1 Boom section schematic 8-236
8 6 69 Code R680 8-237
8 6 69 1 Boom section schematic 8-239
8 6 70 Code R681 8-240
8 6 70 1 Boom section schematic 8-242
8 6 73 Code R848 8-257
8 6 73 1 System hazard warning lamps electrical circuits 8-259
8 6 73 2 Tail lamp electrical schematic 8-261
8 6 74 Code R849 8-264
8 6 74 1 System hazard warning lamps electrical circuits 8-266
8 6 74 2 Tail lamp electrical schematic 8-268
8 6 75 Code R850 8-271
Application System
790367708
~ A AGCO
Your Agriculture Company Table of contents
8 6 75 1 System hazard warning lamps electrical circuits 8-273
8 6 75 2 Tail lamp electrical schematic 8-275
8 6 76 Code R851 8-278
8 6 76 1 System hazard warning lamps electrical circuits 8-280
8 6 76 2 Tail lamp electrical schematic 8-282
8 6 77 Code R852 8-285
8 6 77 1 System hazard warning lamps electrical circuits 8-286
8 6 77 2 Tail lamp electrical schematic 8-288
8 6 78 Code R853 8-291
8 6 78 1 System hazard warning lamps electrical circuits 8-292
8 6 78 2 Tail lamp electrical schematic 8-294
8 6 79 Code R854 8-297
8 6 79 1 System hazard warning lamps electrical circuits 8-298
8 6 79 2 Tail lamp electrical schematic 8-300
8 6 80 Code R855 8-303
8 6 80 1 System hazard warning lamps electrical circuits 8-304
8 6 80 2 Tail lamp electrical schematic 8-306
8 6 81 Code R856 8-309
8 6 81 1 System hazard warning lamps electrical circuits 8-310
8 6 81 2 Tail lamp electrical schematic 8-312
8 6 82 Code R857 8-315
8 6 82 1 System hazard warning lamps electrical circuits 8-316
8 6 82 2 Tail lamp electrical schematic 8-318
8 6 83 Code R858 8-321
8 6 83 1 System hazard warning lamps electrical circuits 8-322
8 6 83 2 Tail lamp electrical schematic 8-324
8 6 84 Code R859 8-327
8 6 84 1 System hazard warning lamps electrical circuits 8-328
8 6 84 2 Tail lamp electrical schematic 8-330
9 Air system 9-1
9 1 Air system 9-3
9 1 1 Air system operation 9-3
9 1 2 Air line configuration 9-3
9 1 3 Product recovery – boom clean out 9-5
9 1 4 Quick stop system 9-5
9 2 8-valve air manifold 9-7
9 2 1 Remove the 8-valve air manifold 9-8
9 2 2 Install the 8-valve air manifold 9-10
9 3 4-valve air manifold 9-13
9 3 1 Remove the 4-valve air manifold 9-13
9 3 2 Install the 4-valve air manifold 9-15
9 4 Air solenoid valve (Mac valve) 9-18
9 4 1 Remove an air solenoid valve 9-18
9 4 2 Install an air solenoid valve 9-19
9 5 Pressure switch 9-20
9 5 1 Remove a pressure switch 9-20
9 5 2 Installing a pressure switch 9-21
9 6 Air valve 9-22
9 6 1 Remove an air valve 9-22
9 6 2 Install an air valve 9-23
9 7 Air pressure regulator 9-24
9 7 1 Remove the air pressure regulator 9-24
9 7 2 Install the air pressure regulator 9-24
9 8 Quick stop valve 9-26
9 8 1 Remove a quick stop valve 9-26
9 8 2 Replace a quick stop bladder 9-27
Application System
790367708
Table of contents ~•AGCO
Your Agriculture Company
9 8 3 Install a quick stop valve 9-28
9 9 Quick exhaust valve 9-29
9 9 1 Remove a quick exhaust valve 9-29
9 9 2 Install a quick exhaust valve 9-29
9 10 Sump valve 9-31
9 10 1 Remove the sump valve 9-31
9 10 2 Install the sump valve 9-31
9 11 Main boom butterfly valve 9-33
9 11 1 Remove a main boom butterfly valve 9-33
9 11 2 Install a main boom butterfly valve 9-35
9 12 Air system maintenance 9-37
9 12 1 Test a quick stop valve 9-37
9 12 2 Replace a quick stop bladder 9-38
9 12 3 Adjust an air pressure switch 9-38
9 12 4 Adjusting the air pressure regulator 9-39
9 13 Air system troubleshooting 9-40
10 Pressure washer and rinse system 10-1
10 1 Rinse tank 10-3
10 1 1 Remove the rinse tank 10-3
10 1 2 Install the rinse tank 10-5
10 2 Auxiliary tank (optional) 10-8
10 2 1 Removing the auxiliary tank 10-8
10 2 2 Installing the auxiliary tank 10-10
11 Attachments 11-1
11 1 Mud flaps 11-3
11 1 1 Removing the mud flaps 11-3
11 1 2 Installing the mud flaps 11-4
11 2 Step and handle 11-6
11 2 1 Removing the step and handle 11-6
11 2 2 Installing the step and handle 11-7
12 Diagrams 12-1
12 1 Hydraulic schematics 12-3
12 1 1 Hydraulic schematics – 1800 gal 12-5
12 1 2 Hydraulic schematics- 2400 gal 12-7
12 2 1800 – 2400 gallon Schematics 12-9
12 2 1 Beacon 12-9
12 2 2 Booms 12-10
12 2 3 S05 12-11
12 2 4 PWM derate module 12-12
12 2 5 Can shield 12-13
12 2 6 Raven CAN network 12-14
12 2 7 Falcon PWM CAN network 12-15
12 2 8 Power/ground dist block 12-16
12 2 9 System taillights 12-17
12 2 10 Falcon flowmeter 12-18
12 2 11 Falcon servo 12-19
12 2 12 Fan relay 12-20
12 2 13 Left and right foam marker diode 12-21
12 2 14 Taillight power divider 12-22
12 2 15 System 12-23
12 2 16 Pump pressure ground 12-24
12 2 17 Valve jumper 12-25
12 2 18 PWM control option 12-26
Your Agriculture Company Table of contents
12 2 19 Servo control option 12-27
12 2 20 Pump pressure pull-up resistor 12-28
12 2 21 System reload panel 12-29
12 2 22 Raven jumper PWM 12-30
12 2 23 Air box 12-31
12 2 24 Boom speed harness 12-32
12 2 25 Controller harness 12-33
13 Index lndex-1
Application
Questions? Email us: [email protected]
https://vimeo.com/820209212?share=copy
PLEASE NOTE:
- This is not a physical manual but a digital manual – meaning no physical copy will be couriered to you. The manual can be yours in the next 2 mins as once you make the payment, you will be directed to the download page IMMEDIATELY.
- This is the same manual used by the dealers inorder to diagnose your vehicle of its faults.
- Require some other service manual or have any queries: please WRITE to us at [email protected]
S.V